¶ Introduction
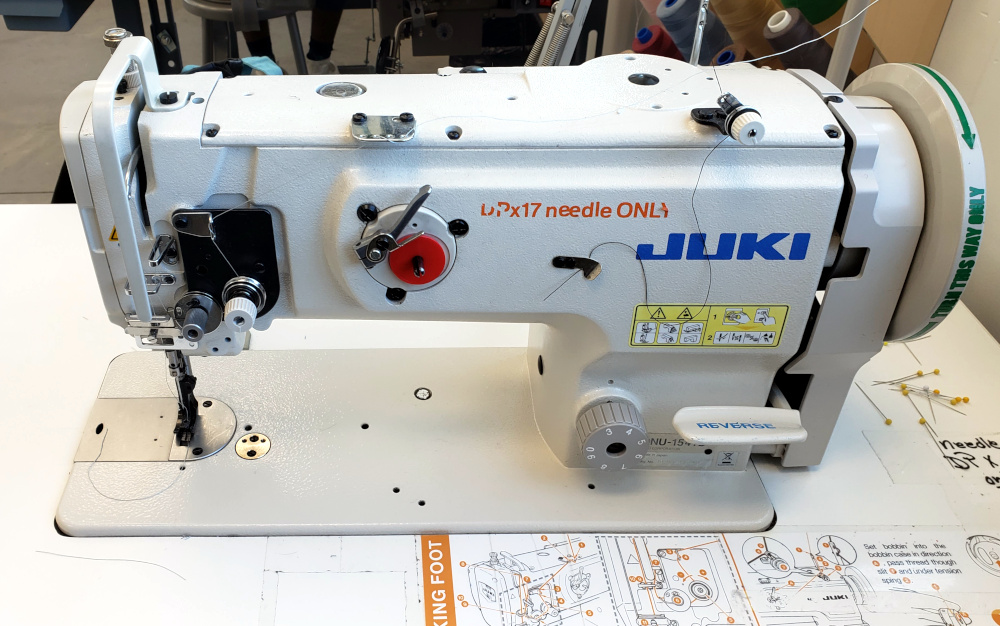
The walking foot machine is a straight stitch machine with a walking presser foot attached. The walking foot keeps constant pressure on the fabric as the fabric moves, unlike most other presser feet.
¶ Shop Access
A membership or day pass is required to access Textiles.
The Shop Safety Class Sewing 1: Shop Safety is required to operate the lockstitch sewing machines.
¶ Machine Reservations
The walking foot sewing machine doed not require a machine reservation and is available on a first-come first-serve basis.
¶ Machine Overview
Best for medium to heavy weight fabrics and top stitching through many layers.
¶ Needle type
- DP X 17 Needles
¶ Thread type
- #69 Nylon (THICK) thread ONLY
¶ Stitch type
- Straight stitches using thick nylon thread
¶ Machines Available
- There is one walking foot machine available.
¶ Machine Comparison Chart
See the Machine Comparison Chart to get a full overview of all the machines in the Textiles Shop.
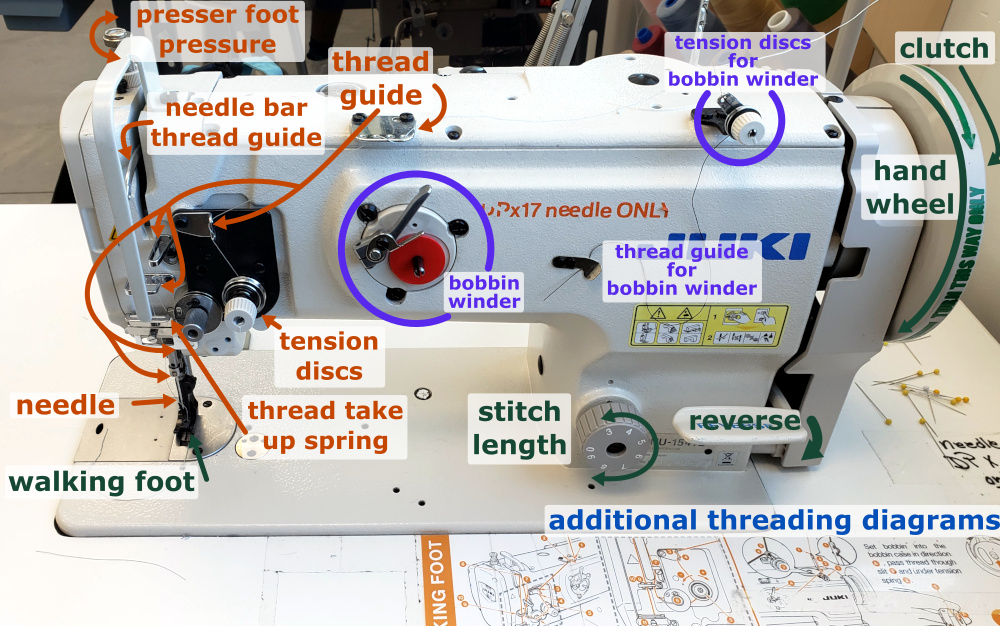
¶ Parts of the machine:
Click to see the parts of the machine.

¶ Material Considerations
¶ Acceptable Materials:
all woven fabrics
¶ Use with Caution and Proper Technique:
knit fabrics
non-fabrics such as leather, vinyl, paper, etc
¶ Forbidden Materials:
¶ Safety
Personal Protective Equipment (PPE):
• Sturdy, close-toed shoes must be worn at all times.
• Long hair, jewelry, and loose clothing must be tied back.
For more information on shop safety visit Textiles under "Safety."
Follow these guidelines to sew safely and prevent jams:
✓ Take your foot off the “drive” pedal when turning the machine on, threading, installing the bobbin, or changing a needle or foot.
✓ Never sew without material under the needle.
✓ Make sure top thread and bobbin thread are the same type and tension is adjusted accordingly.
✓ Only use DB X 17 needles, with the curve facing to the right.
✓ Always thread left to right.
✓ Always hold thread tails when you start a stitch.
✓ Only turn the hand wheel towards you, never away.
¶ Step by Step Guides
¶ Before You Begin
- How to change the needle
- How to thread the lockstitch
- How to install a bobbin
- How to wind a bobbin
- Set stitch length.
¶ Using the Machine
¶ Starting a seam
- Raise the presser foot using the lever on the back of the machine or the knee pad beside your right knee. If there is not already a few inches of top and bottom thread pulled out, pull some length out now.
Be careful not to brace your foot against the drive pedal and accidentally activate the machine when using the knee pad.
- Place fabric under presser foot and lower the presser foot.
- Insert the needle approximately halfway into the fabric by turning the top of the hand wheel towards yourself.
- Get your hands in place for holding and guiding the fabric and out of the way out of the presser foot and needle.
- Ease on the drive pedal to start the machine.
¶ Guiding a seam
There is only one way to guide fabric as it moves under the presser foot: using your hands. All other tools and techniques just make that process easier.
¶ Hand position
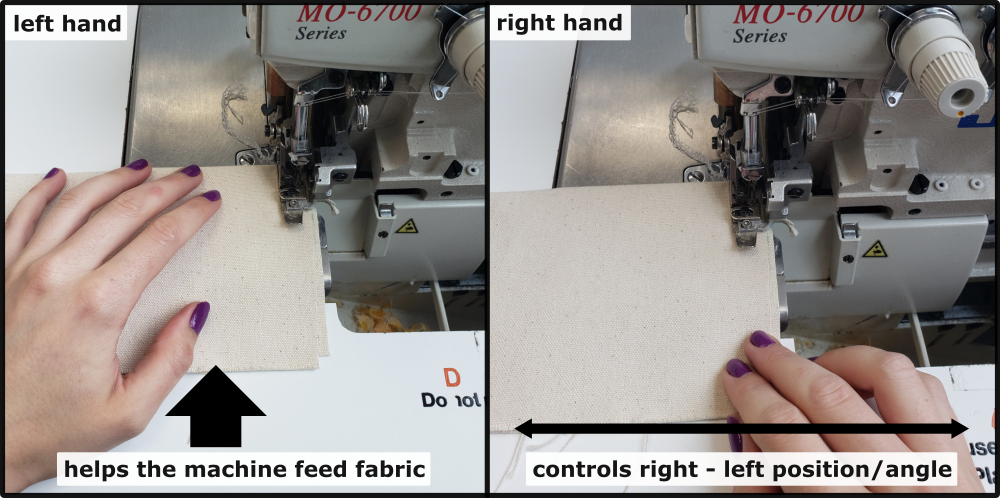
This is an ambidextrous operation, meaning that you will use both hands to guide the fabric regardless of which hand you use most often for other tasks.
| hold hand | guide hand |
|---|---|
| typically left hand | typically right hand |
| holds and moves the weight of the fabric | guides the seam |
| moves the fabric from you towards the back of the machine | left right direction control |
Always keep the fabric flat between your hands.
Never let your fingers go under the needle.

¶ Seam allowance tools
There are many tools that can make placing the seam a consistent distance from the edge of the fabric easier.
- Most of the machines have throat plates that are engraved with quarter inch increments.
- If you want a distance that is not an even 1/4", place a piece of tape on the throat plate at the distance you want. You can also highlight an existing measurement this way.
- Mark it on the fabric using tailors chalk or pencil.
- Presser foot attachment- often used for quilting, there is a presser foot attachment that extends to the right or left of the presser foot to give a visual and physical indicator of where the edge of the material should be.
- Table attachment- there is a table attachment that bolts to the table of the machine that provides a physical guide for the edge of the seam.
¶ Ending a seam
- Lift your foot off the drive pedal to stop the machine.
- Make sure the needle is raised above the fabric.
- Lift the presser foot using the knee pad or the lever on the back of the machine.
- Slide your fabric at least several inches away from the needle.
- Cut the threads.
¶ Machine Maintenance
Maintenance can be done by members but if you are not comfortable performing the maintenance and you think it needs to be done, find a Community Technician.
- Dusting/Removing lint.
1.1 Any dust bunnies or clots of lint should be removed from the machine when sighted.
1.2 Use tweezers to pluck them out or a brush to brush them out. - Oiling. Sewing machines should be oiled regularly and this is a normal part of their maintenance. Members should not need to oil the sewing machines.
2.1 Place a drop or two of oil on the joints.
2.2 Use the handwheel to turn to the mechanisms of the machine to distribute the oil.
¶ Troubleshooting
Troubleshooting can be done by members but if you want a second opinion on your analysis, find a Community Technician.
- Dropping Stitches.
1.1 Needle not correctly oriented- remove and replace needle, making sure that the scarf is facing to the right.
1.2 Dull needle- remove and replace needle with fresh needle. - Tension issues: Top thread visible on the bottom / Bottom thread visible on the top.
2.1 Top thread visible on bottom- increase tension on top.
2.2 Bottom thread visible on top- decrease tension on top. - Nesting at the start of the seam.
3.1 Make sure to insert needle halfway into fabric before starting the machine.
3.2 Not enough length on threads when starting the seam- press in on knee pad and pull both threads to the right a few inches.
3.3 Hold the threads against the table with one hand when starting the seam. After a few stitches, release them. - Needle 'punching' the fabric, pulling threads instead of going between.
4.1 Dull needle- remove and replace needle with fresh needle.
¶ References
¶ Video Walkthroughs
¶ Resupply Form
Click here to report any consumables needing to be replenished within Textiles.
¶ Glossary
%%TERM
%%definition/description of term