¶ Introduction
The following page is intended as an introduction to the Creality Ender-3 V3 SE 3D printers.
¶ Shop Access
A membership or day pass is required to access 3D Printing.
The workshop 3D Printing provides additionl training, but is not required to operate the Ender-3 V3 SE.
¶ Machine Reservations
You can make machine reservations in the following ways:
Click to expand
- In person at the front desk.
- Reserve a machine any time through our Mind Body Portal.
- Call the front desk during business hours at (410) 862-0424.
- Email us at frontdesk@openworksbmore.com. Please include your name, the machine you'd like to reserve, and the date(s) and times of the reservation(s).
Open Works recommends slicing your file before making a machine reservation. The slicer will provide a time estimate which you may use to accurately book your reservation.
¶ Machine Overview
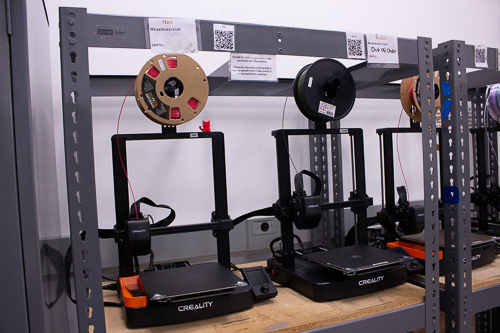
The Creality Ender-3 V3 SE 3D printers use a heated extruder and a gcode file to print three-dimensional objects with PLA filament. 3D prints can be used as a step in the prototyping process, or they can be created as finished sculptural objects in their own right.
There are two Ender-3 V3 SE 3D printers available.
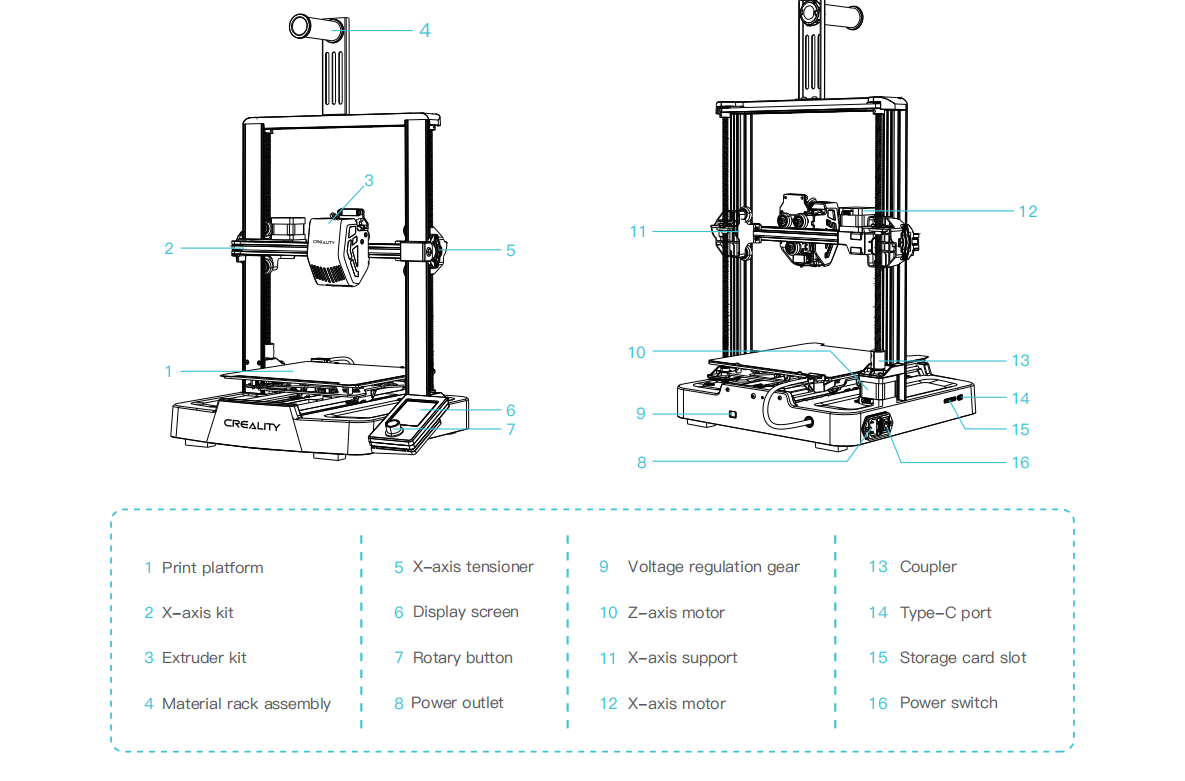
¶ Parts of the Machine
Click to expand

¶ Materials
If a filament is not listed you can assume the material is not allowed.
¶ Acceptable Materials:
PLA
¶ Use with Caution and Proper Technique:
PETG
¶ FORBIDDEN MATERIALS :
ABS
Nylon
TPU
¶ Safety and setup
Personal Protective Equipment (PPE):
• As in all of the shops, sturdy, close-toed shoes must be worn at all times for traction and stability.
For more information on shop safety visit 3D Printing under "Safety."
- The nozzle and bed of the 3D printers get
hot! Do not touch the nozzle or the bed while they are
hot!
¶ Slicing
At this point you should have a gcode file for the printer.
¶ Preparing the Printer
Make sure you have reserved the machine for more than the print time estimated by the slicer.
Check to make sure there is enough filament to print your model. Here's how to load filament into the printer.
The Ender-3 V3 has automatic bed leveling, but the user must initiate the process. Here's how to level the bed.
¶ Printing the Model
Save a copy of your gcode file to the SD of your reserved printer by:
- Retrieving the SD card from the slot on the left side of the printer
- Inserting it into the SD card reader attached to the computer in the 3D printing lab
- Save a copy of the gcode file to it
- Once the file has saved, take the SD card from the reader and reinsert it into the printer.
Memory card tips
• Saved files must be placed in the root directory (not a subdirectory) of the memory card.
• The file name must be Latin letters or numbers, not Chinese characters or other special symbols, and no more than 20 characters.
• Do not insert or remove the memory card during the printing process.
¶ Printing:
- Insert the membory card into the card slot.
- Turn on the machine using the red switch on the back left side.
- Select "Print" from the menu.
- Select the file you want to print from the menu.

¶ The First Layer
The First Layer is the most important. If the first layer fails for any reason, the rest of the print will not work.

If the first layer needs adjustment, select the "Tune" menu, then "Z-offset". This will let you use the knob to tweak the Z height up or down. Make this adjustment slowly: typically only a tiny adjustment is needed. Avoid running the nozzle into the printbed.

The printer will display the amount of time remaining for the print to complete.
If you are not there when your print completes, a Community Technician will remove the print and weigh it at the front desk.
¶ Post Processing
If the print is still on the machine, gently break it free of the build plate and bring it to the front desk to be weighed and the filament used paid for.
Clean up any support material and stray threads.
¶ Machine Maintenance
All machine maintenance pages are only accessible to Staff. All machine maintenance is only to be done by Staff.
¶ Calibration
Running a Calibration Print on the Ender-3 V3 SE is just a regular print with a specific file. Lately the CaliCat (Calibration Cat) has been used. The calibration print will be placed on or near each printer in the morning.
¶ Cleaning the Print Bed
Materials: 70% Isopropyl Alcohol, lint free cloth
- If the print bed is hot, wait for it to cool.
- Remove any stuck on debris with plastic tools to avoid scratching the build plate.
- Soak some isopropyl alcohol into the lint free cloth.
- Scrub the surface of the build plate all over with the cloth.
¶ Removing Clogs from the Nozzle
Impurities may get into the hot end via unclean filament.
- Unload the filament.
- Select "Control" - "Temperature" and adjust the nozzle temperature to 240 degrees Celsius and wait for the temperature to rise
- Insert the needle into the nozzle from the bottom, pushing upward.
- This is kind of vibes based. Wiggle it around.
- When the vibes feel better, load new filament. Push the filament manually until it comes out of the nozzle.
- If it doesn't, repeat 3 and 4.
¶ Changing the Nozzle
You will be working on the hot end while it is hot. Be extremely careful.
- Unload the filament.
- Select "Cooldown" and wait for the temperature to drop to 50 degrees Celsius.
- Select "Move" - "Move Z", and raise the Z-axis to a convenient working height.
- Remove the silicone sleeve from the heater block.
- Select "Control" and then "Temperature" and set the nozzle temperature to 240 degrees Celsius. Wait for it to heat.
- Using the wrench, remove the old nozzle. You may need to hold the heater block with an adjustable wrench.
- Screw in the new nozzle. Tighten it gently with the wrench.
- Select "Cooldown" and wait for the temperature to drop.
- Reinstall the silicone sleeve.
- Load filament.
¶ Troubleshooting
All troubleshooting pages are only accessible to Staff. All troubleshooting is only to be done by Staff.
Commonly Encountered Problems and their remedies.
Creality Wiki Troubleshooting Guides.
¶ References
¶ Video Walkthroughs
¶ Resupply Form
Click here to report any consumables needing to be replenished.
¶ Glossary
%%TERM
%%definition/description of term