¶ Introduction
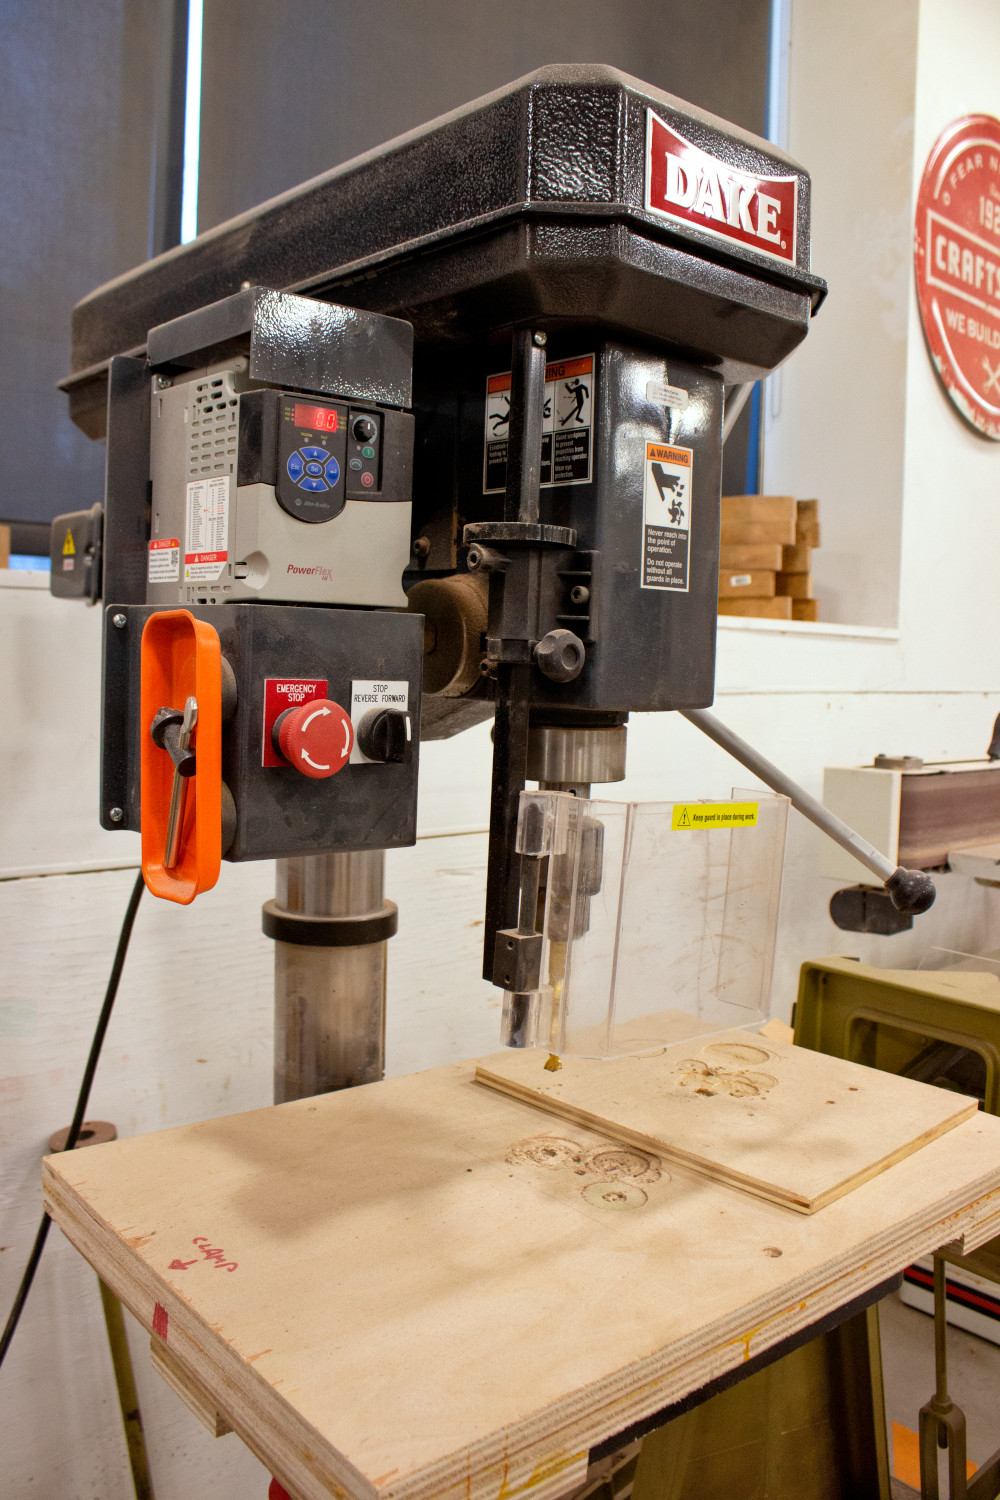
Open Works has a Dake SB-25V drill press available. You must complete Wood Shop 1 before using the machine.
¶ Machine Overview
A drill press is used to bore precise holes into material. This drill press is speed adjustable either through setting the drive belts before operation or using the knob on the front panel while drilling. The LED indicator on the front panels shows the speed. There is a lock for repeatable depth drilling. There is a forward and reverse selector switch for tapping.
| parameter | maximum dimension |
|---|---|
| Max. Drill Capacity | 1” |
| Spindle Travel | 5” |
| Max. Work Diameter | 18” |
| Spindle to Table | 28 3/8” |
¶ Parts of the Machine
Click to the front panel of the machine!
Note that the speed read out is in Hertz (cycles per second) rather than the more familiar RPM (revolutions per minute).
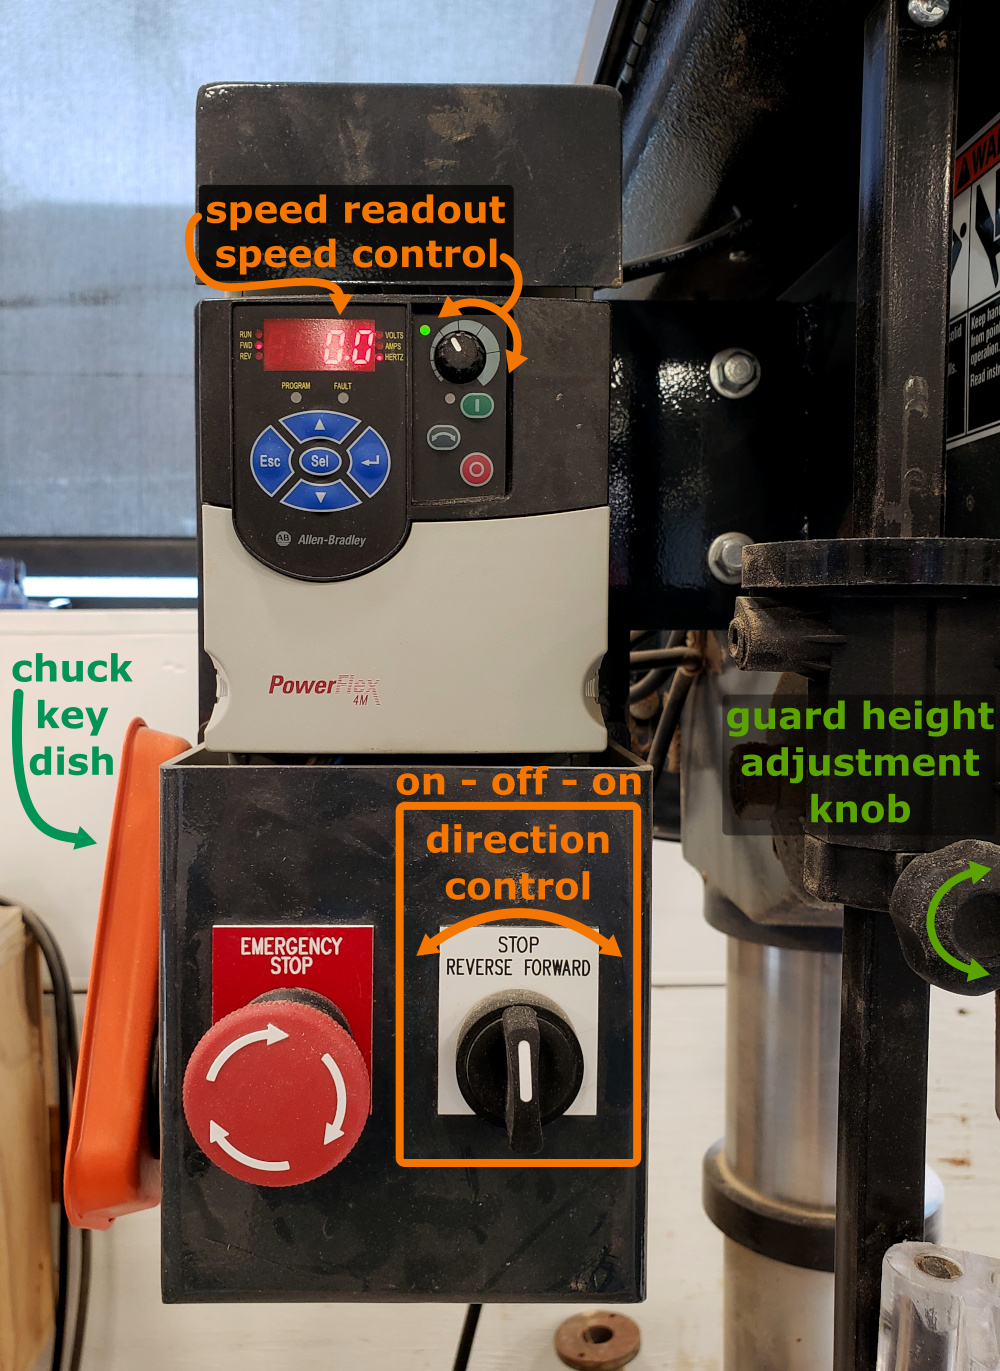
The chuck WILL start turning the moment you turn the direction control knob.
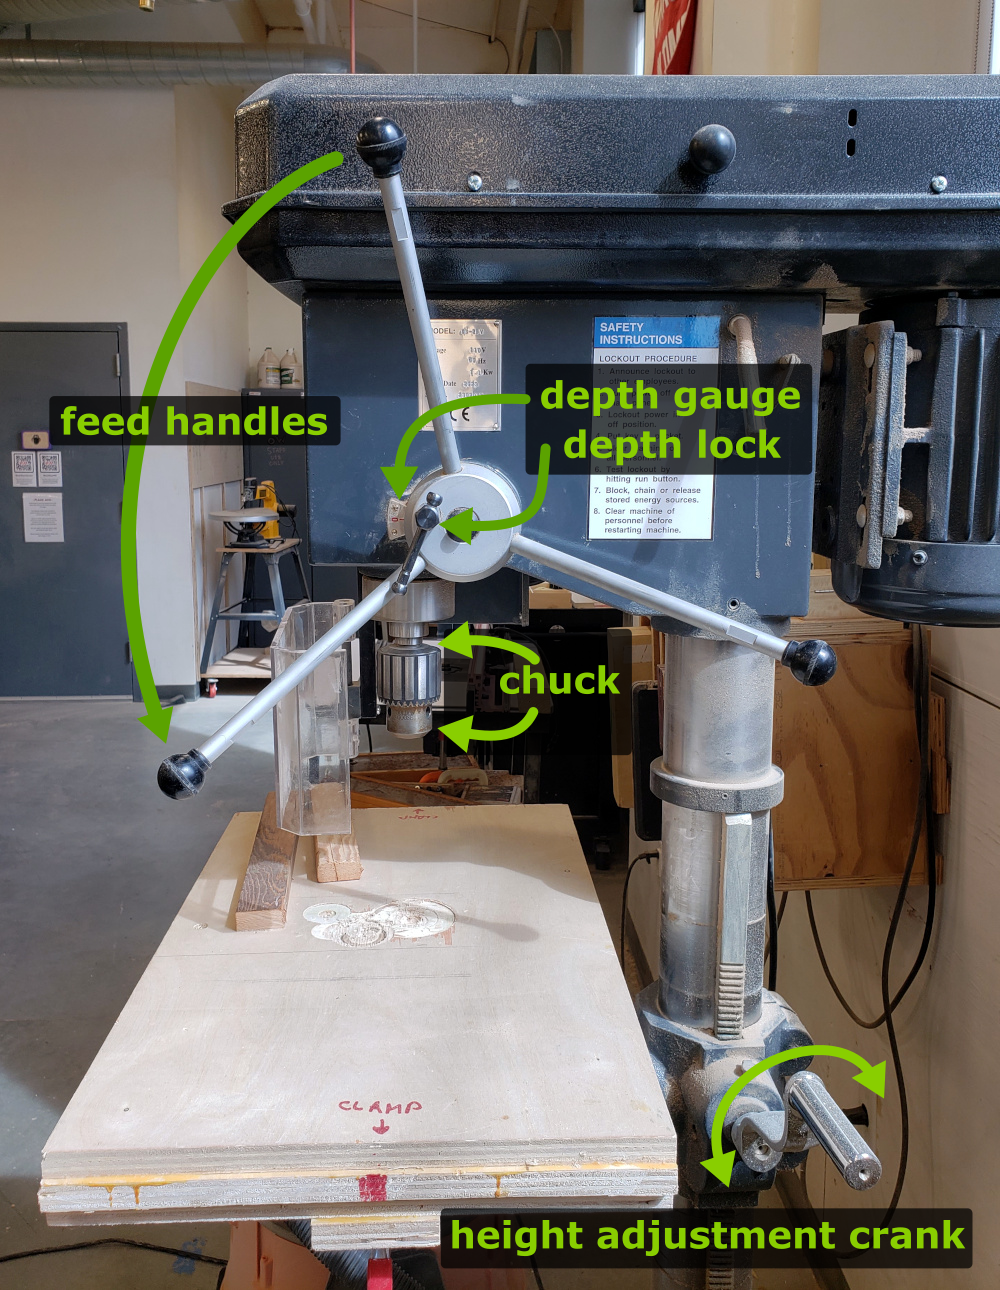
Click to see the side of the machine!
¶ Machine Reservations
You do not need to reserve this machine.
¶ Materials
Permitted Materials:
Hardwoods
softwoods
composites
Open Works allows but does not encourage the use of reclaimed wood. Any reclaimed wood must be inspected by the member with a metal detector (provided) and reviewed by a Community Technician before processing.
The following materials are NOT permitted in the Wood Shop:
Reclaimed wood containing metal
Materials containing or coated with lead or lead-based paint
Any pre-finished woods (for example: finished flooring, old bar tops, etc.)
Pressure treated wood
Foam
Metal
Glass
PVC and vinyl
¶ Safety and Setup
Safety Check:
Sturdy, close-toed shoes must be worn at all times.
Long hair, jewelry, and loose clothing must be tied back.
Safety glasses and earmuffs must be worn while machines are running.
A dust mask or a NIOSH certified respirator is recommended.
For more information on shop safety visit the Wood shop page under "Safety."
Do not drill round or unstable objects.
The drill press does not have kickback like many saws do. This means that there are different risks, such as
- the bit binding in the material and rotating the material or snapping the bit.
- unsecured material being dragged up the bit and rotated violently.
- unsecured material being flung in any direction away from the machine.
The chuck WILL start turning the moment you turn the direction control knob.
¶ Step-by-Step Guides
¶ Before You Begin
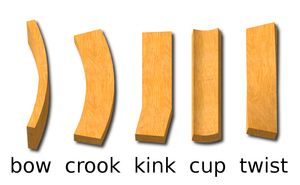
Check your material for warping using the table test. Lay your board face down on a guaranteed flat surface. Press your weight down into the workpiece and check for rocking. The face that rocks back and forth the least is the one that goes against the machine's table.
¶ Types of Warping to Look For:
If your material is warped in any way, consider processing it with the jointer and planer before using the drill press. Material with parallel faces will produce a cleaner cut and be safer to work with.
Do not drill round or unstable objects.
¶ Marking the material
Mark where the holes should go before bringing the material over to the machine. This will help you work more confidently.
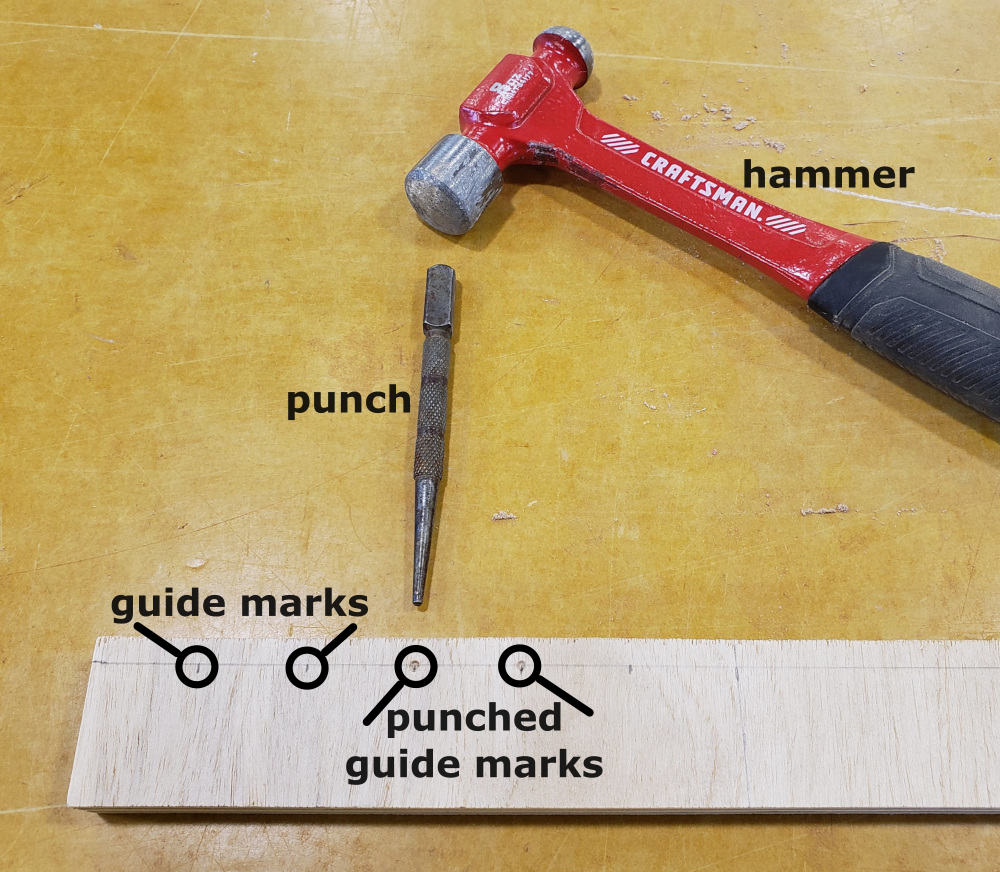
Mark the center of the hole with a pencil. You may also wish to punch the center of the mark so that the point of the bit has a guide to catch, especially in hardwoods and woods with a strong grain. Hold the punch steady against the mark with one hand and give it a firm tap with the hammer in your other hand.
¶ Selecting a drill bit
There are a wide variety of drill bits available. Bits available include but are not limited to
| small holes | large holes | misc |
|---|---|---|
|
|
|
Twist bits are the most common type of bit and are easy to use. Spur bits are very similar, but the point on them makes them easier to align with marks and they tend to want to go in straighter. Auger bits are good for deep holes because they lift the chips out.
For large holes, spade bits are fast but create a more splintery hole in most woods. Forstner bits need to be run at a very low speed but create a very nice hole in most woods. A hole saw removes a disk of material to create even larger holes, but suffers from all the same drawbacks of normal saws.
A step drill is a special conical bit that is typically used in metalworking applications. It is a very sturdy, stiff bit that resists wandering and deviation.
¶ Installing a bit
Click to see the parts of the chuck!
Notice how the teeth on the chuck key and the teeth on the sleeve mesh together. Make sure that the teeth on the chuck and the sleeve are fully meshed before turning the key.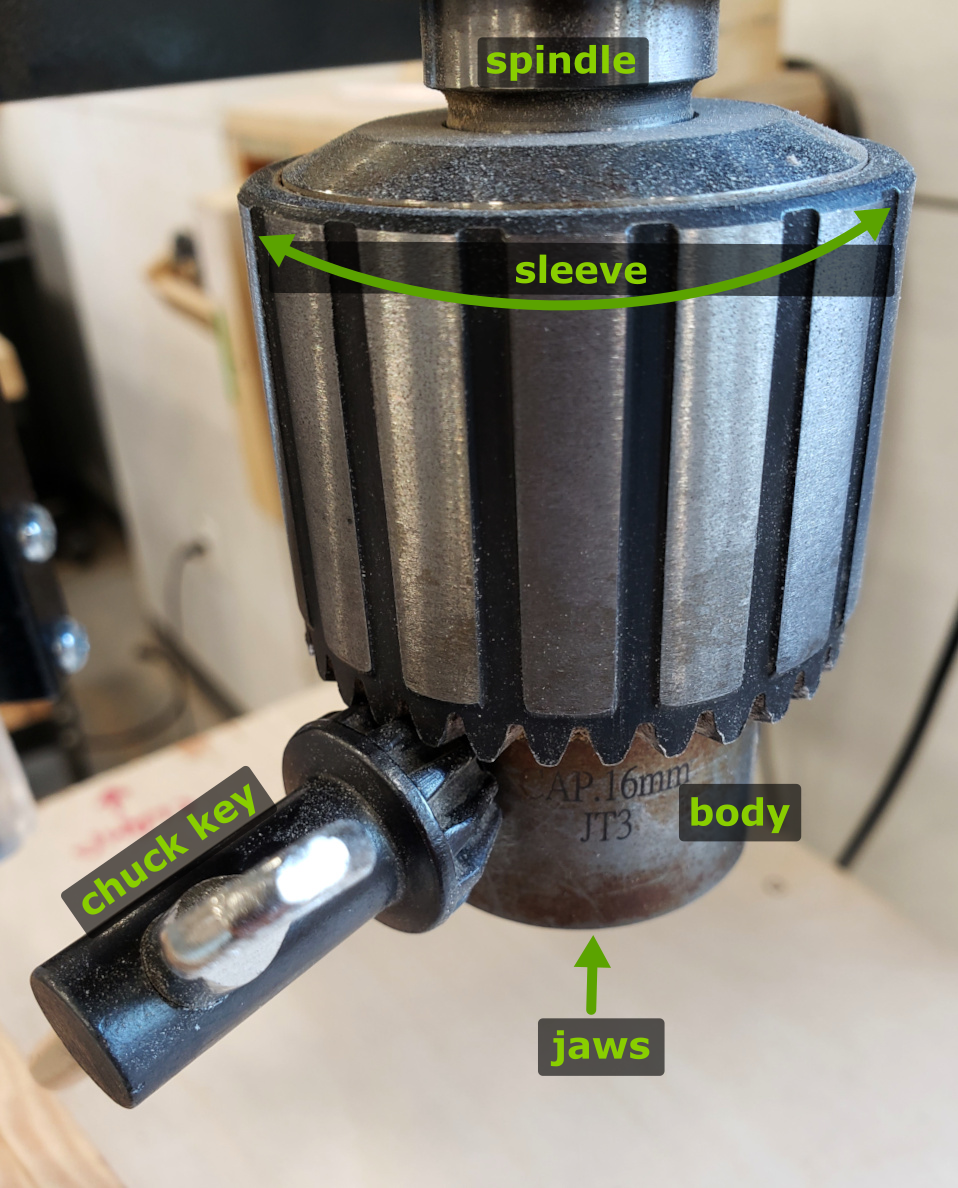
- Find the chuck key in the orange magnetic dish on the left side of the front panel.
- Loosen the chuck by turning the sleeve to the left. Loosen it until the shaft of the chosen bit fits between the chuck's jaws. You may be able to turn the chuck by hand, or you may need to use the chuck key.
- Insert bit and hold it there with one hand while you tighten chuck by turning the sleeve to the right.
3.1 Make sure that the bit is centered between the three jaws and not caught between two of the jaws.
 |
 |
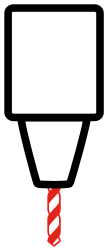
3.2 Make sure that the jaws are closed on the shaft of the bit, not the flutes.
| bad | good |
|---|---|
 |
 |
- Use the chuck key to tighten the chuck the rest of the way.
- Put the chuck key back back in the magnetic dish on the left side of the front panel.
If the chuck key is left in the chuck, the machine will throw it when turned on.
¶ Drilling holes of the same depth repeatedly
Click to see the parts of the drill press that make that easy!
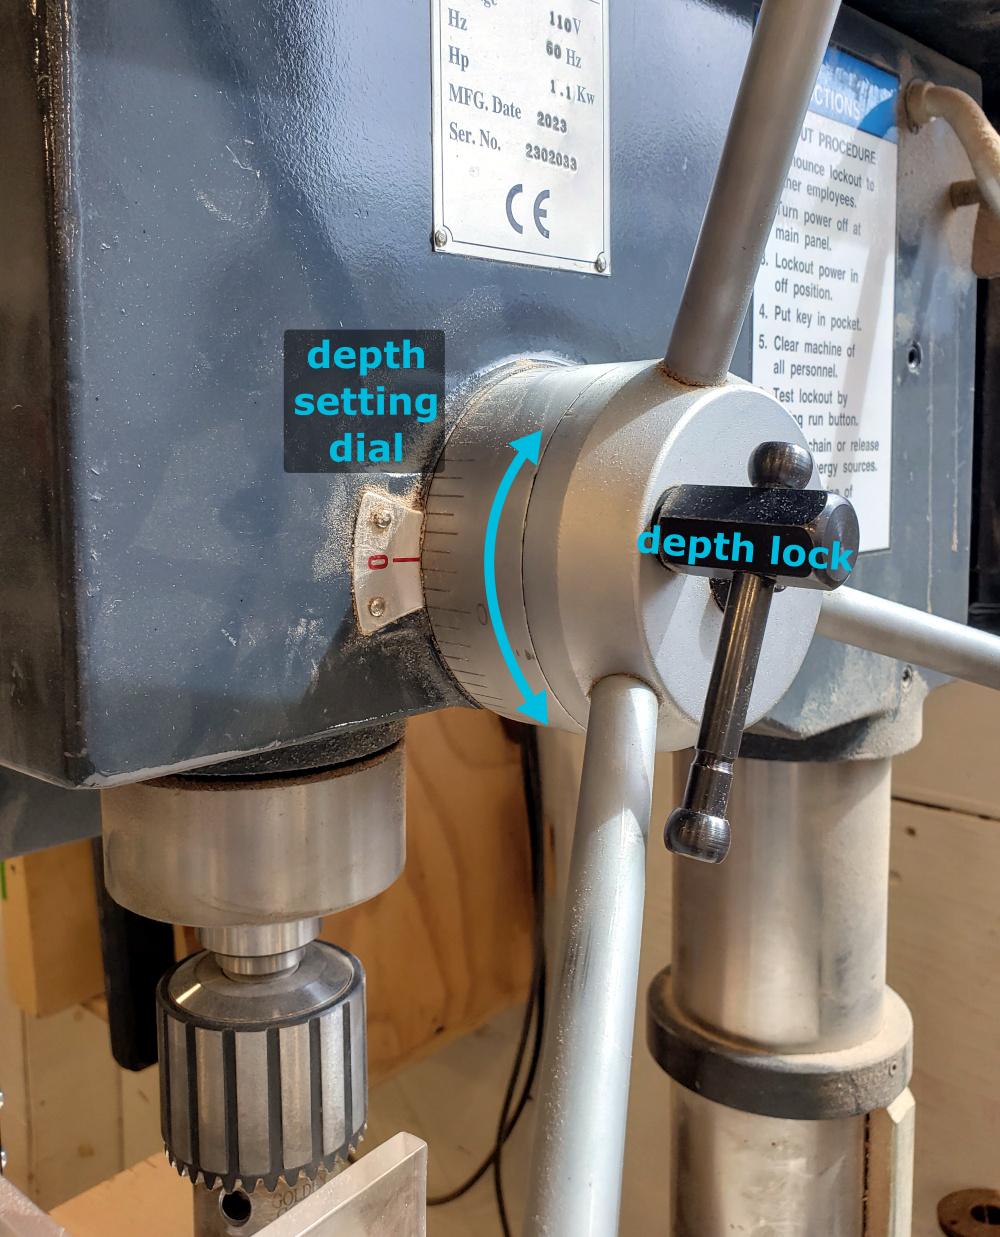
To set the depth lock:
- Loosen the depth lock handle on the feed handle hub.
- Turn the marked dial to the depth you want. Scale is in inches. Scale may not be accurate.
Depth is relative to the maximum height of the spindle, not your work piece. For example, setting the dial to 2.5" with material 2" away from the tip of the bit means that the depth of the hole will be only 0.5".
- Set the depth by tightening the depth lock handle.
- Verify the depth of the cut against the work piece by moving the work piece aside and lowering the bit until it hits the stop.
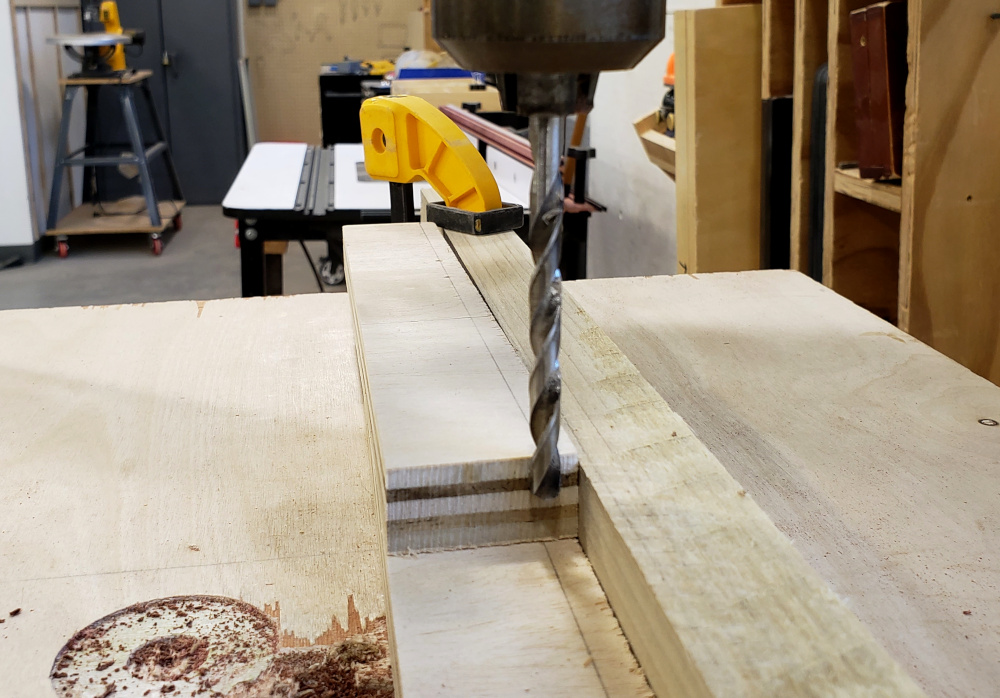
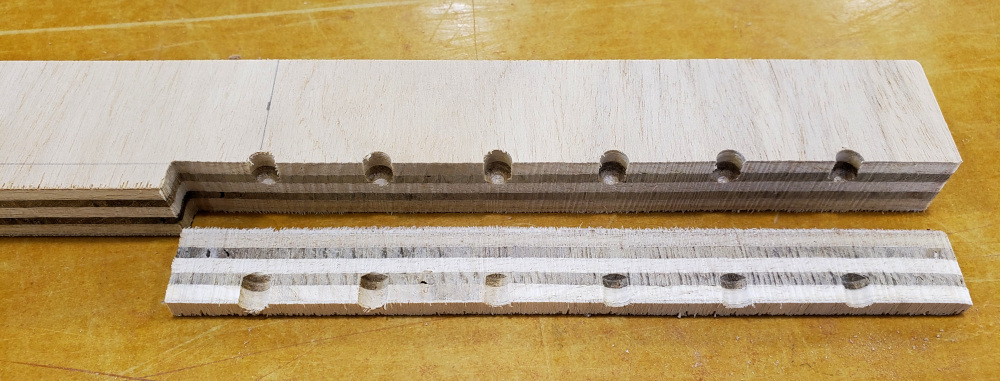
Example: A series of holes was drilled into plywood using the repeat depth setting and then cut open along the line of the holes. The distinct colors in the plywood show that the holes are all the same depth.
¶ Securing the material
It is strongly recommended to clamp the work piece to the table before starting drilling, especially when using larger bits. There is plenty of space on the edges of the table for clamps. Use at least two for maximum security.
If drilling all the way through the work piece, it is also recommended to use a piece of spoil board to prevent you from drilling into the table and to prevent the back of the work piece from blowing out or splintering.
Make sure that the bit comes down exactly where you want it to.
Make sure the clamps do not interfere with the chuck or bit.
¶ A note on freehanding
Freehanding means that the material is not clamped down in any way. This is risky because the drill press can rip the material out of your grip and fling it at you or beat you with it.
It is also difficult to get the hole exactly where you want it because you may accidentally move the material between setting it up and the bit contacting the material, or the bit may move the material before the hole is truly started.
If you are determined to freehand, set up a fence or another guide to press the work piece against.
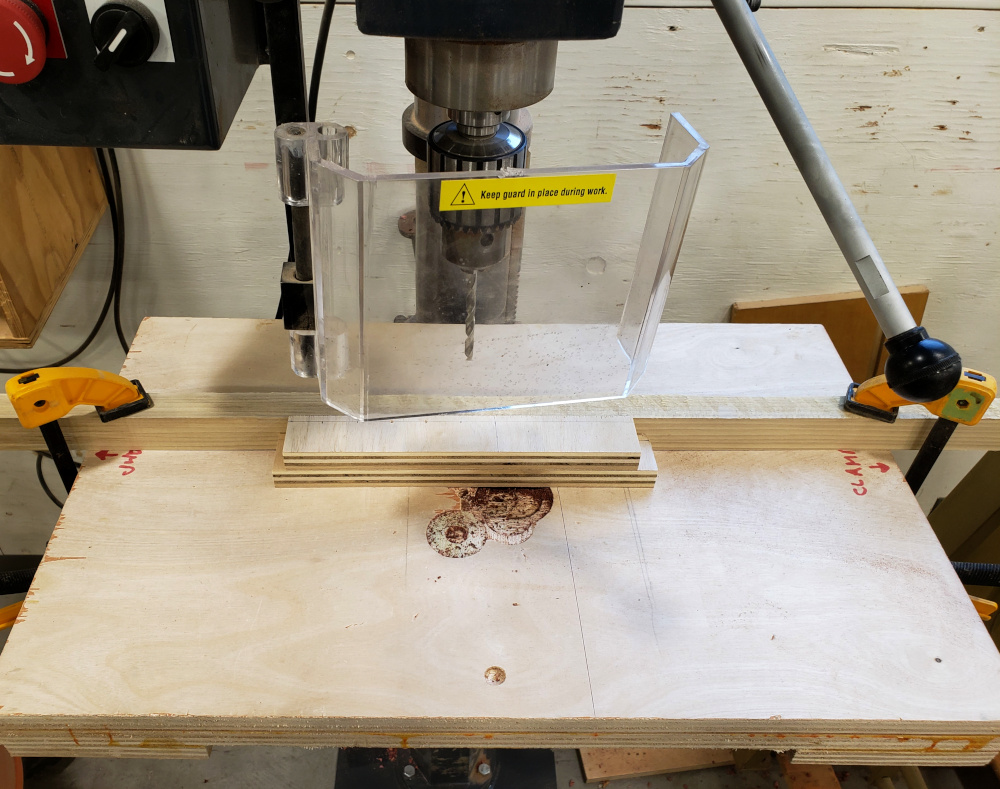 |
| Here a piece of plywood is shown pushed up against a fence clamped to the table and with a piece of spoilboard underneath it. It could also be clamped horizontally to the fence. |
¶ A note on drilling round or unstable objects
It is possible to drill holes in round or unstable object if enough stabilization is provided.
Round or unstable objects significantly increase the risk of the object moving during drilling and causing the bit to bind or break, the hole to be created in the wrong location or the hole to be oblong, and generally increased danger to the user.
| Unsupported Round Object | Risks: |
|---|---|
 |
|
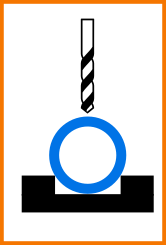
These risks can be reduced but not eliminated by supporting the object and adjusting where the drill bit contacts the object. Always support the object so that the force of the drill bit coming down onto it transfers straight through to the table without the object wobbling in any way. This could be as simple as putting it in a clamp that holds it steady against the table or as complex as building a custom jig that the object is screwed into.
| Supported Round Object | Risks: |
|---|---|
 |
|
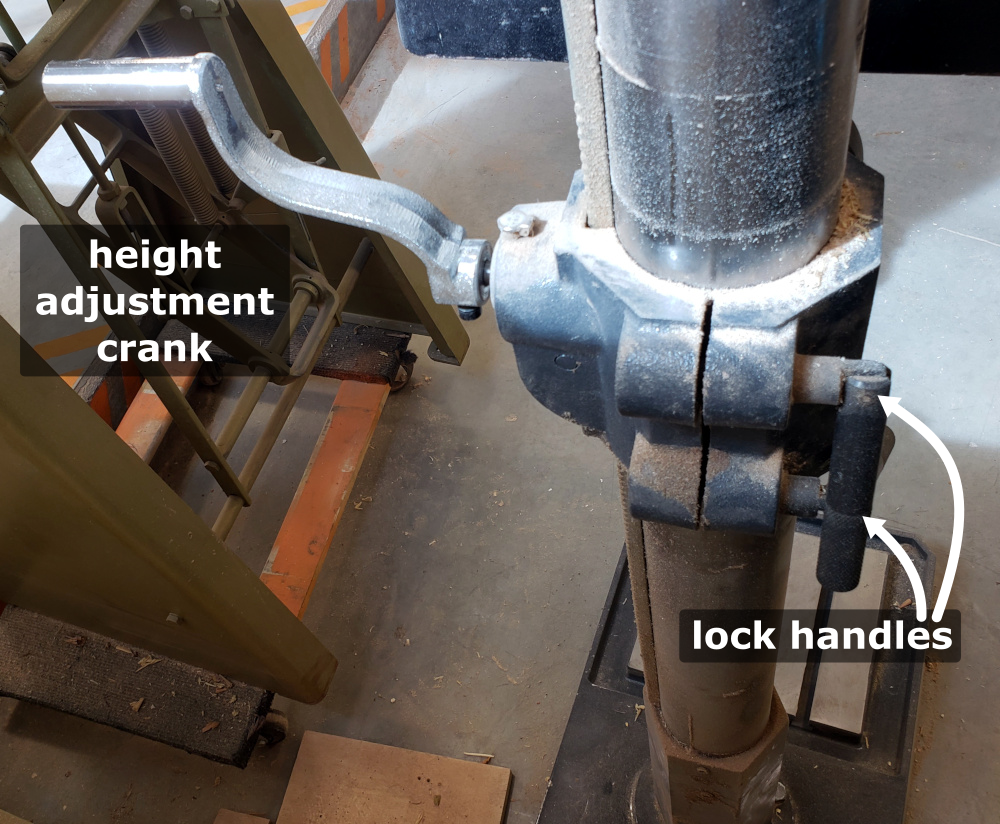
¶ Adjusting the height of the table
Adjust the height of the table so that the tip of the bit clears the surface of the material by about 1". This gives you space to move the material around without gouging it on the bit but keeps the bit close enough to the material to be able to estimate where the bit will come down and (in most cases) makes it so that you won't have to turn the feed handles uncomfortably far.
In general, the user should not turn the feed handles more than about 1/2 revolution, meaning that the handle at the top ends at the bottom. This makes it easier to control the feed rate because pushing the feed handles can be difficult.
Adjust the height of the table by:
- Loosening the two handles on the left side of the machine.
- Turning the crank on the right side of the machine to raise or lower the table.
Click to see a back view of the drill press with the lock handles and crank indicated!
¶ Making a cut
Larger holes require slower cuts. If the machine struggles, go slower.
- Dry run the cut to make sure that the point of the bit comes down in the expected location.
- Put the guard in place.
- Turn the knob to forward and wait a couple of seconds for the machine to spin up.
- Pull topmost feed handle toward yourself to lower the bit to the material.
- Drill the hole.
- Carefully raise the bit from the material.
- Turn the knob to stop and wait for the chuck to spin down before removing your material.
Releasing the feed handles will automatically lift the bit, but in a fast and uncontrolled way. It is better to maintain control at all times.
¶ Clean up
- Remove the bit and put it away.
- Make sure the chuck key is in the orange magnetic dish on the left of the control panel.
- Vacuum up the table and surrounding floor.
¶ Maintenance
¶ Troubleshooting
¶ References
Manufacturer's manual
drill bit icon by Darius Lau from Noun Project (CC BY 3.0)
