¶ Introduction
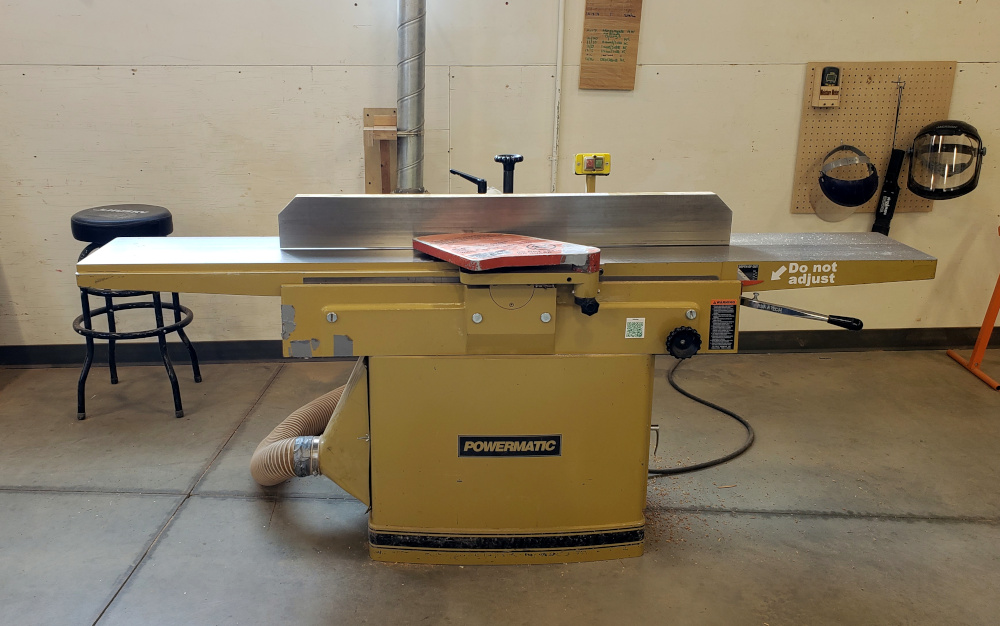
The Powermatic 12-inch Jointer (Model 1285) is used for making flat, squared sides in a piece of stock. It's the first step in milling lumber of any thickness up to 12" wide and at minimum 8" long. Only solid wood can be milled on the Jointer.
¶ Shop Access
A membership or day pass is required to access the Wood Shop. The Shop Safety Class Wood 2: Jointer, Planer & Router is required to access the Jointer.
¶ Machine Overview
The jointer is used for making flat, squared sides in a piece of stock. It is the first step in milling lumber of any thickness up to 12" wide and at minimum 14" long. Only solid wood can be milled on the jointer.
Reclaimed lumber MUST be thoroughly checked for screws and nails using a metal detector. Remove any metal that's found, or find a way to work around it.
Members and day pass users will be charged for inflicting damage to the machine or blades.
Have a Community Technician double check reclaimed lumber before milling.
¶ Machines Available
- Open Works has one Powermatic 12-inch Jointer (Model 1285) available for use.
¶ Machine Comparison
Unlike the Planer you must manually feed your stock through the Jointer. The Jointer's cutter head is only slightly above the infeed table and flush with the outfeed table. The Jointer will remove material from the face or the edge facing down, flush against the infeed table. Conversely, the Planer's cutting head is located at the top of the machine and removes material from the face facing up.
When milling a parallel set of surfaces use the Planer.
¶ Parts of the Machine
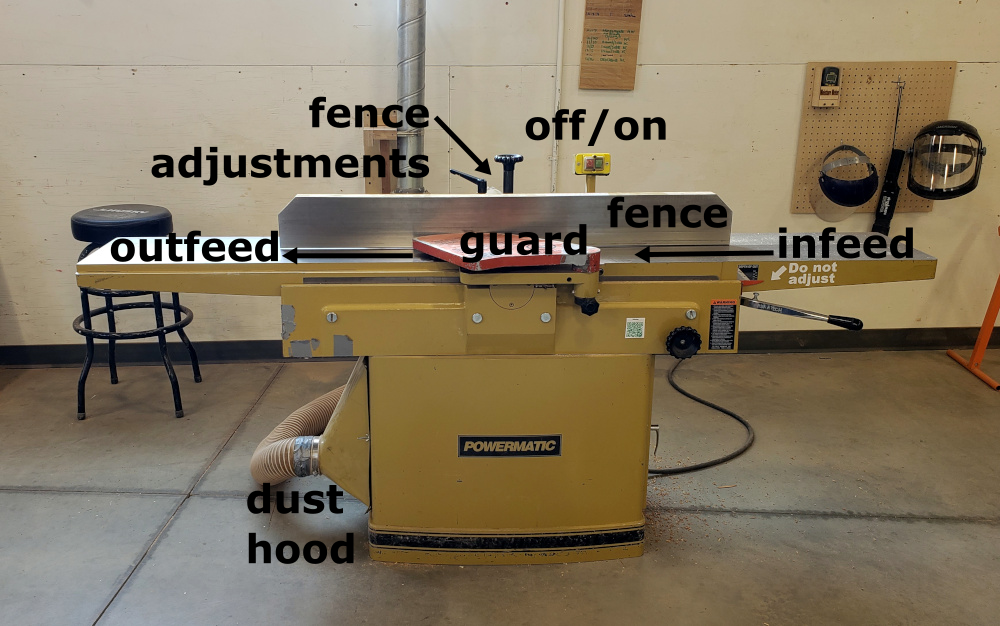
Click to expand

¶ Material Considerations
¶ Acceptable Materials
Always check moisture levels with the Moisture Meter and look for nails with the Metal Detector.
Hardwoods.
Softwoods.
Untreated lumber.
Reclaimed lumber.
Slabs.
¶ Use with Caution and Proper Technique:
Always check moisture levels with the Moisture Meter and look for nails with the Metal Detector.
Logs.
Green wood.
¶ FORBIDDEN MATERIALS
DO NOT, under any circumstances, cut the following materials on the table saw:
Pressure treated wood.
Materials containing or coated with lead or lead-based paint.
Any pre-finished woods (for example: finished flooring, old bar tops, etc.).
Plywood.
OSB.
Particle board.
MDF.
Hardboard.
¶ Safety and Setup
Safety Check:
Sturdy, close-toed shoes must be worn at all times.
Long hair, jewelry, and loose clothing must be tied back.
Safety glasses and earmuffs must be worn while machines are running.
A dust mask or a NIOSH certified respirator is recommended.
For more information on shop safety visit Wood under "Safety."
¶ Follow the "Three Points of Contact" Rule
- Hands - Keep at least one hand or push stick on the material at all times.
- Table - Keep the material flat against the table.
- Fence - Keep the material flush against the fence.
¶ Additional Safety Considerations
The jointer can cause significant kickback if not used properly. To prevent damage to the machine and injury to the operator, follow these steps to support and feed the material through the cut:
- Always feed stock with flattest side on the table.
- Only mill stock at least 14" long.
- Use push blocks to feed material for any operation where your hands will be lower than the height of the fence.
- Check the work area - make sure it is clear of other material and that no one is behind you.
¶ Step-by-Step Guides
¶ Before You Begin
You are now ready to mill your workpiece on the Jointer!
¶ Using the Machine
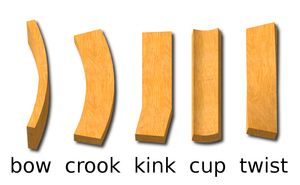
- Check your lumber for warping using the table test. Lay your board face down on a guaranteed flat surface. Press your weight down into the workpiece and check for rocking. Mill the face which rocks back and forth the least.
Types of Warping to Look For:
- If the lumber is cupped, mill the face with the cupping pointing down.
-
The fence can be moved forwards and back to accomodate different widths. Always have as little of the blade exposed as possible. Loosen the lever first, then turn the knob to move the fence so that the work piece just covers the blade.
-
Turn on the dust collector, if it is not already on.
-
Open blast gate, turn on blower motor, and then turn on the jointer.
-
Start by milling the face. Push your material across the blade while maintaining the three points of contact.
Use a push stick to help feed the material for any operation where your hands will be lower than the height of the fence. Push firmly towards the fence and down against the table.
-
Repeat step 5 until the face you're milling is 80% flat.
-
Turn the freshly milled face against the fence and mill one edge flat.
-
Repeat step 7 until the edge is flat.
This will create an edge that is perpendicular to a face and you will now be ready to move to the Table Saw.
¶ Next steps
- Create a parallel edge on the Table Saw.
- Create a parallel face with the Planer.
¶ Machine Maintenance
All machine maintenance pages are only accessible by Staff. All machine maintenance is only to be done by Staff.
- Perform a Blade Change on the Powermatic 12-inch Jointer (Model 1285).
- Set infeed height
¶ Troubleshooting
All troubleshooting pages are only accessible by Staff. All troubleshooting is only to be done by Staff.
- Machine is spitting chips back- clear out jam in dust hood with shop vac.
- Troubleshooting
¶ References
Powermatic 12-inch Jointer (Model 1285) Operating Instructions and Parts Manual
