¶ Introduction
Instructions to thread the Juki Lockstitch.
¶ Skills/Class Required
A membership or day pass is required to access Textiles. The following Shop Safety Class is required before using the Lockstitch sewing machines:
¶ Machine Reservations
The lockstitch sewing machines do not require a machine reservation and are available on a first-come first-serve basis.
¶ Before You Begin
Personal Protective Equipment (PPE):
• Sturdy, close-toed shoes must be worn at all times for traction and stability.
• Long hair, jewelry, and loose clothing must be tied back to prevent getting caught in moving parts.
For more information on shop safety visit Textiles under "Safety."
✓ Make sure the machine is turned off before threading the machine.
✓ Ensure that you are not wearing any dangling jewelry or loose clothing that could get caught in the machine.
✓ Keep your feet off the drive pedal[^1] as you perform this procedure.
¶ Time to complete
- 5 minutes.
¶ Tools Required
- Tweezers (optional)
- Scissors
¶ Materials Required
- Tweezers (optional)
- Scissors
¶ Previous Steps
Changing the needle on the lockstitch sewing machine (Optional/Situational)
Wind thread onto your bobbin
Replace the bobbin
¶ Threading the Lockstitch
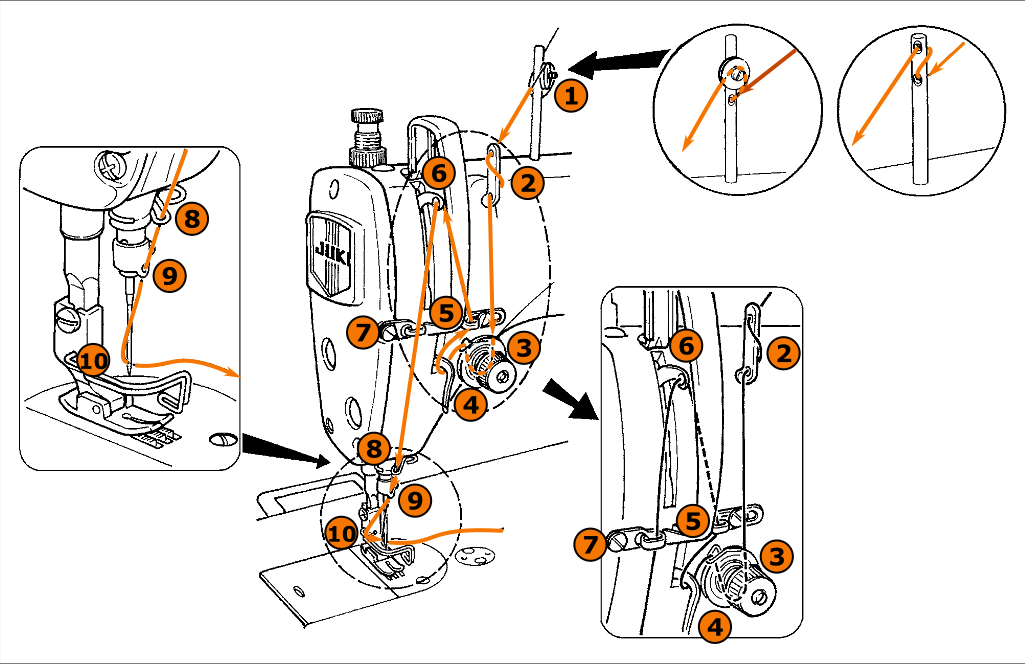
There are two main ways to thread the lockstitch. If it is already threaded correctly, you can use the fast way. If it is not threaded, or threaded incorrectly, follow the diagram below.
 |
| Diagram adapted from the Juki Manual. |
- Thread guide. Take the end of the thread from the spool and thread the first guide. Pass the end through the upper hole in the guide from back to front. Then pass it through the lower hole in the guide from back to front, or pass it between the discs with the end to the left.
- Thread guide. Thread the top hole from right to left. Then thread the bottom hole from right to left. The thread will wrap around the guide in the front.
- Tension plates. Bring the thread straight down to the tension plates and wrap it underneath from right to left. Make sure that the thread goes between the plates. You may need to press the knee pad to the right to release the pressure in order to more easily slide the thread between the plates.
- Take up spring and guide. Bring the thread underneath and to the left between the plates, and then up, right, and back to catch it in the hook on the spring, then pull left and down to catch it under the hook on the machine.
- Thread guide. Bring the thread up through the thread guide above the tension plates. With a small amount of tension on the thread, pulling it right to left across the guide should cause it to pop in.
- Needle bar eye. The needle bar is behind the guard. Thread the end from right to left through the hole.
- Thread guide. Bring the thread straight down through the guide. With a small amount of tension on the thread, pulling it left to right across the guide should cause it to pop in.
- Thread guide. Bring the thread behind the wire guide to the right, then forward and left to catch the thread in the guide.
- Thread guide. Pass the end front to back through the hole.
- Needle eye. Pass the thread left to right through the needle eye.
¶ The Fast Way
- Unthread the needle.
- Cut the thread between the machine and the spool.
- Tie the end of the new spool of thread to the machine end of the old thread.
- Using the end of the old thread by the needle, pull the knot and new thread all the way through the machine.
- Cut the old thread off of the new thread.
- Thread the needle with the new thread.