¶ Introduction
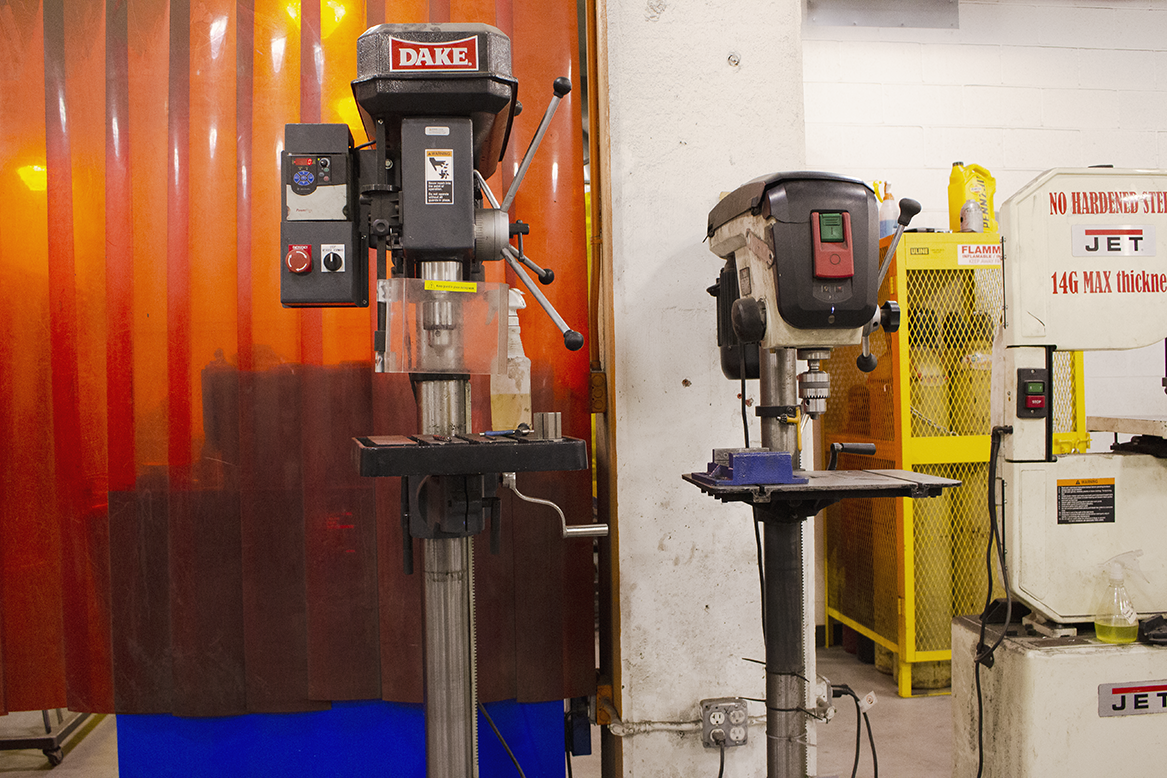
A heavy machine for drilling holes and countersinking into wood, metal and plastic. It can be used for any type of metal as long as the proper drill bit and speed are used. Clean oil and debris from the machine with a chip brush and sweep up with a bench brush.
¶ Shop Access
A membership or day pass is required to access the Metal Shop
The Shop Safety Class Metal 1: Shop safety is required to operate the drill presses.
¶ Machine Reservations
Both drill presses do not require machine reservations and are available on a first come first serve basis.
¶ Machine Overview
A drill press is used to bore precise holes into material. This drill press is speed adjustable either through setting the drive belts before operation or using the knob on the front panel while drilling.
¶ Machines Available
- One JDP-15F Jet 15" Drill Press.
- One SB-25V Dake Drill Press.
¶ Machine Comparison Chart
| Drill press make | speed selection | can perform tapping operation |
|---|---|---|
| Dake | Digital, via knob on the front | yes |
| Jet | manual, via belts in the back | no |
¶ Parts of the Machine
Click to the front panel of the Dake!
Note that the speed read out is in Hertz (cycles per second) rather than the more familiar RPM (revolutions per minute).
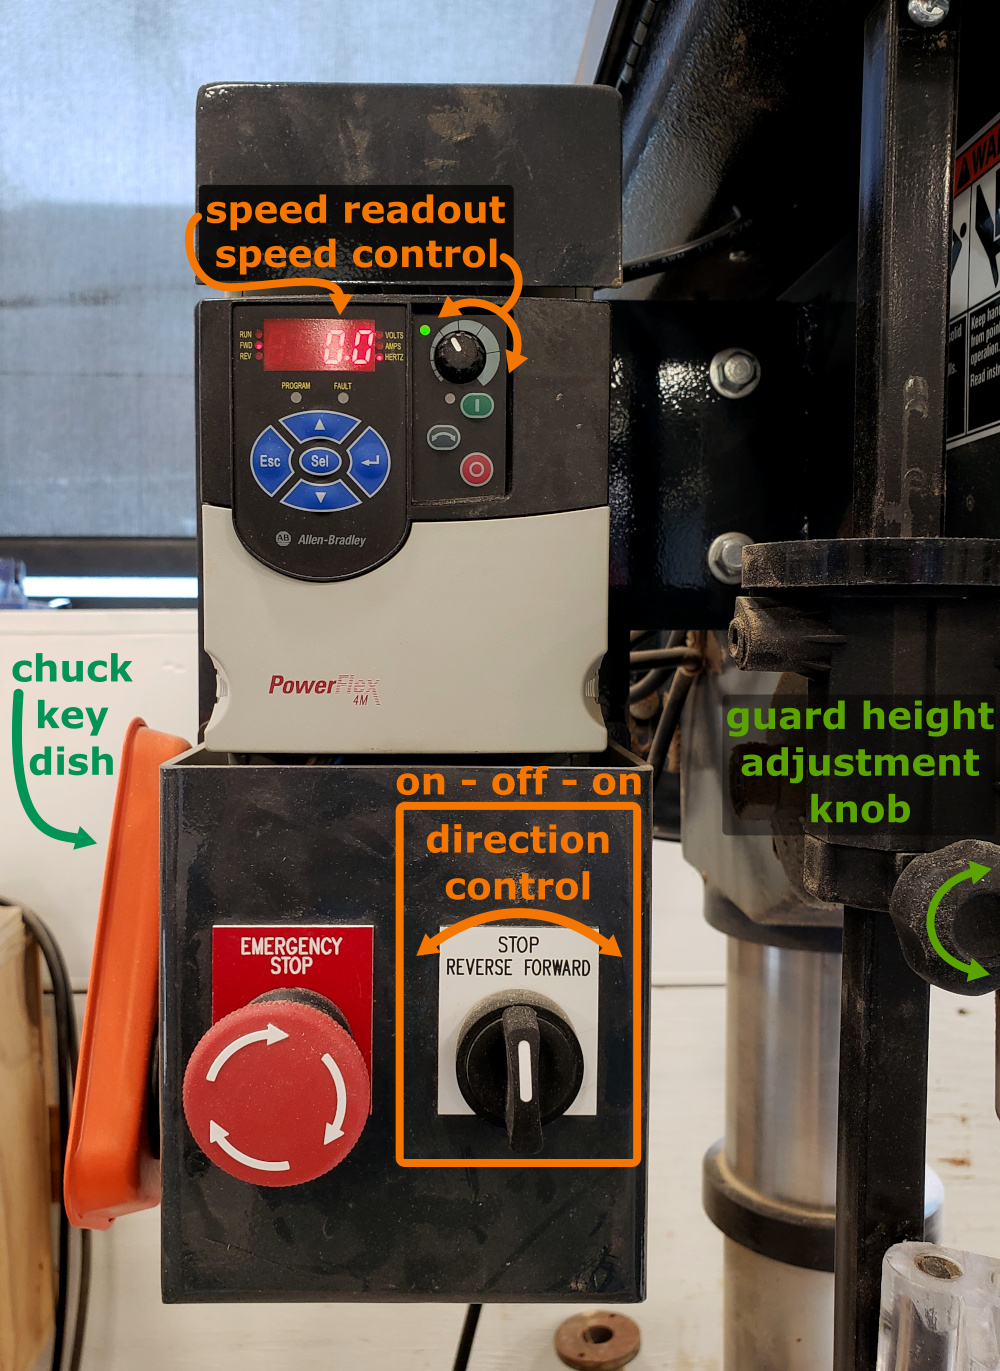
The chuck WILL start turning the moment you turn the direction control knob.
The side panels of the Dake and the Jet are very similar. Click here to see a diagram of the side!
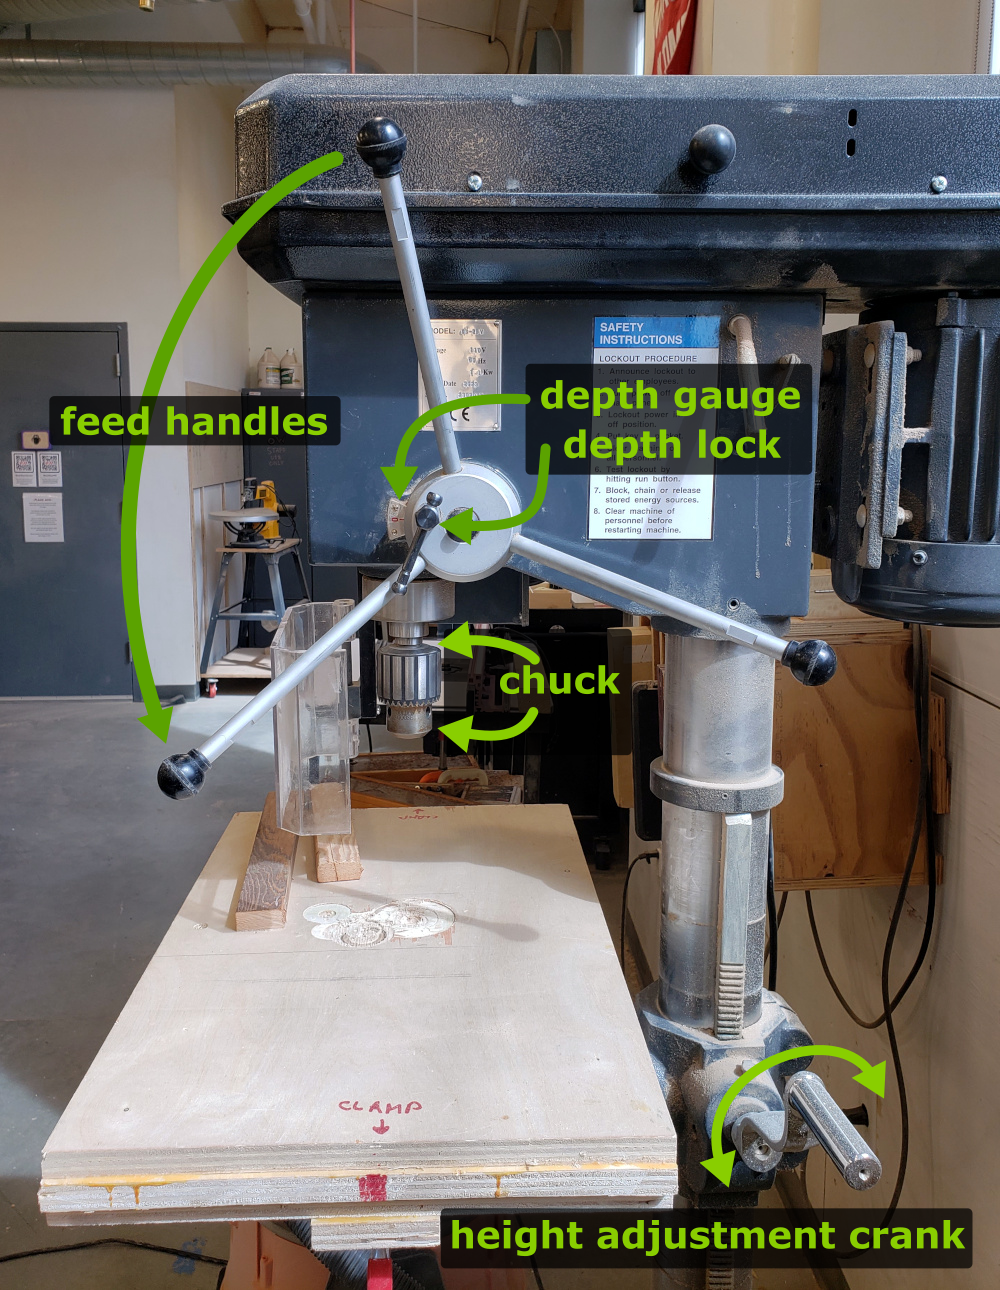
Jet front panel: small green switch to make it go, big red switch to make it stop.
¶ Material Considerations
¶ Acceptable Materials:
¶ Use with Caution and Proper Technique:
¶ Forbidden Materials:
Zinc plated metals
Painted metals
Rusted metals
Wood
¶ Safety and Setup
Personal Protective Equipment (PPE):
• Sturdy, close-toed shoes must be worn at all times. Leather steel-toed boots are recommended for any metal working.
• Safety glasses should be worn at all times.
• Earmuffs or silicone ear plugs should be worn while machines are running, the volume in the Metal Shop can reach an excess of 100 decibels, which can cause permanent hearing damage after just 15 minutes of exposure.
Long hair, jewelry, and loose clothing must be tied back to prevent getting caught in moving parts.
Absolutely no clothing or shoes made from synthetic fibers within the Metal Shop.
For more information on shop safety visit Metal Shop under "Safety."
Do not drill round or unstable objects.
The drill press does not have kickback like many saws do. This means that there are different risks, such as
- the bit binding in the material and rotating the material or snapping the bit.
- unsecured material being dragged up the bit and rotated violently.
- unsecured material being flung in any direction away from the machine.
The chuck WILL start turning the moment you turn the direction control knob.
¶ Step-by-Step Guides
¶ Before You Begin
¶ Loading a drill bit
¶ Marking the material
Mark where the holes should go before bringing the material over to the machine. This will help you work more confidently.
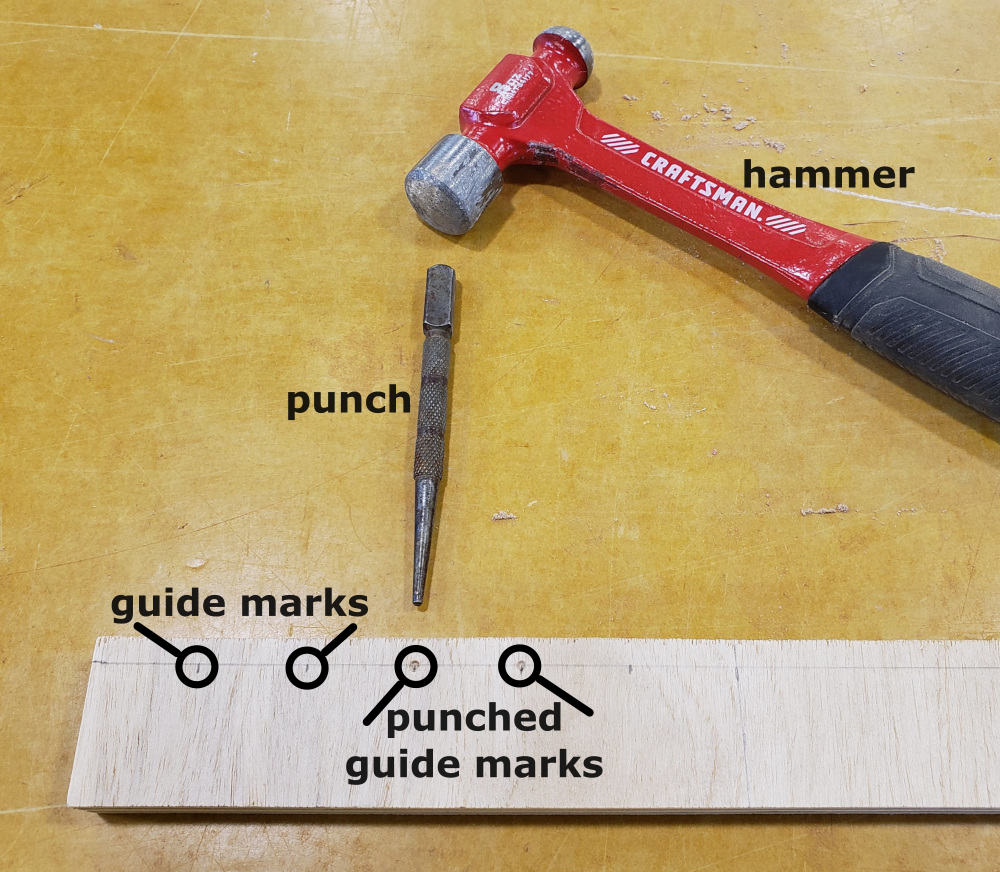
Mark the center of the hole with a pencil. Then use a punch to make a small indentation the center of the hole. This will help keep your bit from wandering and dulling, and will ensure accuracy.
If using a hammer and punch: Hold the punch steady against the mark with one hand and give it a firm tap with the hammer in your other hand.
If using an automatic center punch: Hold the punch steady against the mark with one hand and push down hard on the top of it with your other hand. It will make a large pop and mark your material for you.
¶ Securing the workpiece to the table
It is strongly recommended to clamp the work piece to the table before starting drilling, especially when using larger bits. There is plenty of space on the edges of the table for clamps. There are several types of clamps available: drill press vice which can be clamped to the table, vice grips which can pinch the workpiece to the table, and C-clamps which can clamp the workpiece to the table.
Drilling with the workpiece inadequately secured is dangerous. The drill press can rip the material out of your grip and fling it at you or beat you with it.
If drilling all the way through the work piece, it is also recommended to use a piece of spoil board to prevent you from drilling into the table.
Make sure that the bit comes down exactly where you want it to before securing the clamps.
Make sure the clamps do not interfere with the chuck or bit.
A note on drilling round or unstable objects
It is possible to drill holes in round or unstable object if enough stabilization is provided.
Round or unstable objects significantly increase the risk of the object moving during drilling and causing the bit to bind or break, the hole to be created in the wrong location or the hole to be oblong, and generally increased danger to the user.
| Unsupported Round Object | Risks: |
|---|---|
 |
|
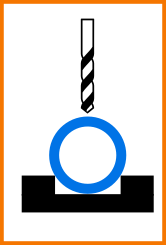
These risks can be reduced but not eliminated by supporting the object and adjusting where the drill bit contacts the object. Always support the object so that the force of the drill bit coming down onto it transfers straight through to the table without the object wobbling in any way. This could be as simple as putting it in a clamp that holds it steady against the table or as complex as building a custom jig that the object is screwed into.
| Supported Round Object | Risks: |
|---|---|
 |
|
¶ Adjusting the height of the table
Click to see details on how to adjust the height of the drill press table!
Adjust the height of the table so that the tip of the bit clears the surface of the material by about 1". This gives you space to move the material around without gouging it on the bit but keeps the bit close enough to the material to be able to estimate where the bit will come down and (in most cases) makes it so that you won't have to turn the feed handles uncomfortably far.
In general, the user should not turn the feed handles more than about 1/2 revolution, meaning that the handle at the top ends at the bottom. This makes it easier to control the feed rate because pushing the feed handles can be difficult.
Adjust the height of the table by:
- Loosening the two handles on the left side of the machine.
- Turning the crank on the right side of the machine to raise or lower the table.
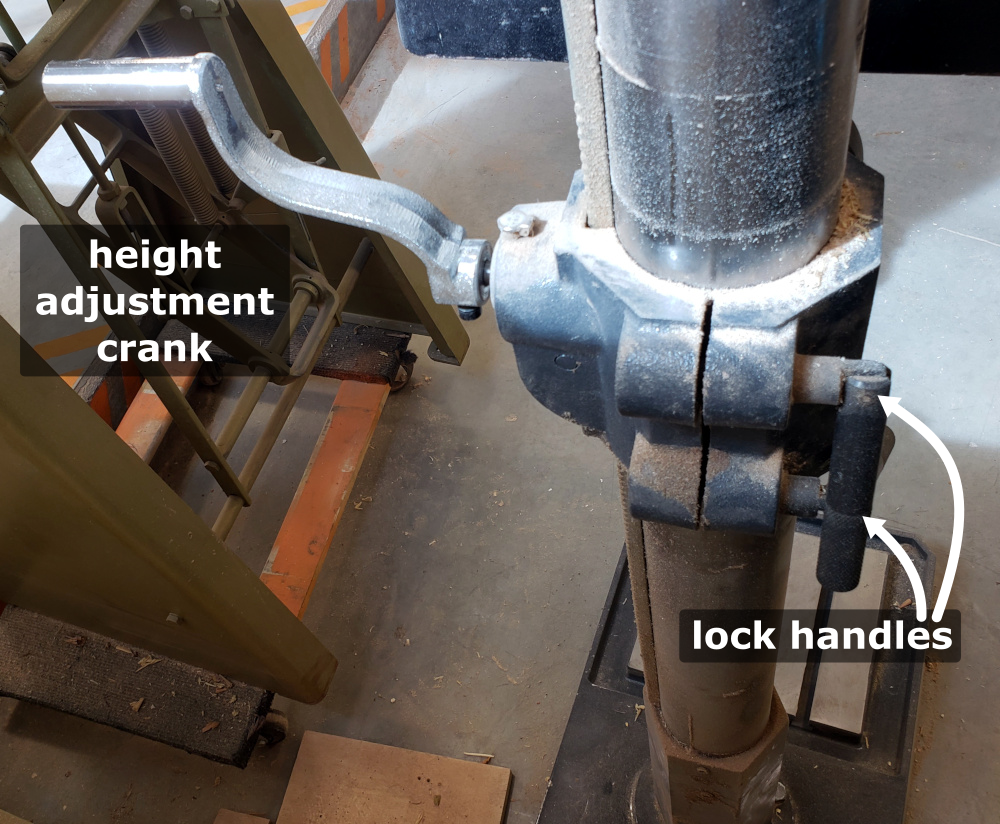
Please note that any of these handles or cranks may be replaced by a vice grip. Do not remove the vice grip.
¶ Using the Machine
¶ Drilling a Hole
Larger holes require slower cuts. If the machine struggles, go slower.
- Using the oil can, add a heavy drop of oil to the area you’re about to drill out.
With thick stock, sometimes it is necessary to add oil throughout the process.
- Turn the knob to forward and wait a couple of seconds for the machine to spin up.
- Pull topmost feed handle toward yourself to lower the bit to the material.
- Do not force a bit to drill. Look for curls of metal. If the drill bit is producing small chips or even dust, this is a sign of a dull bit.
- Feed bit into the material with only enough force to allow the bit to work. Feeding too quickly may cause the motor to slow and/or the bit to break or dull.
- Carefully raise the bit from the material.
Releasing the feed handles will automatically lift the bit, but in a fast and uncontrolled way. It is better to maintain control at all times.
- Turn the knob to stop and wait for the chuck to spin down before removing your material from the table.
¶ Drilling holes of the same depth repeatedly
Click to see an explaination of the depth lock on the Dake drill press!
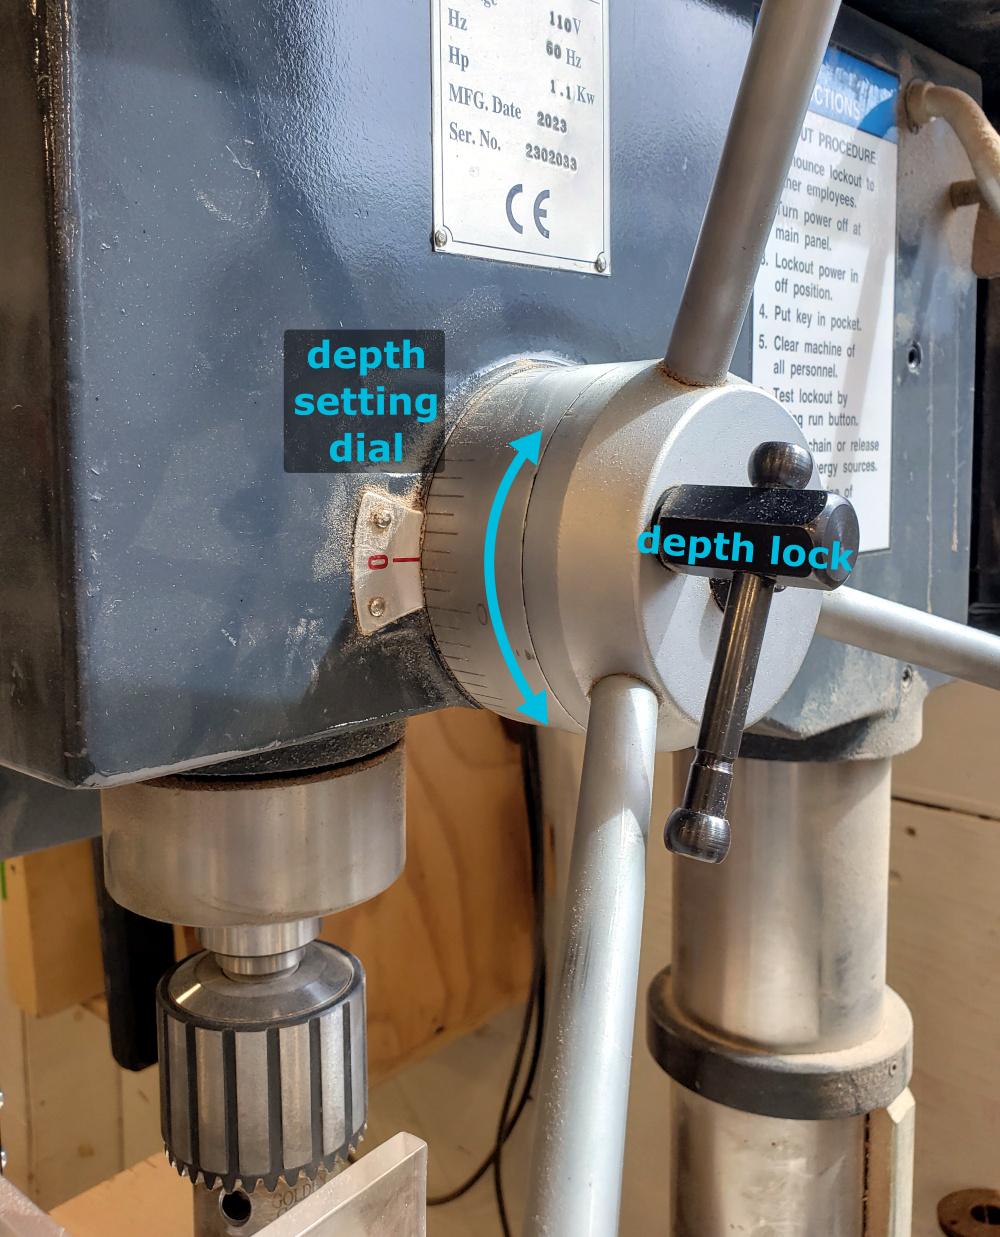
To set the depth lock:
- Loosen the depth lock handle on the feed handle hub.
- Turn the marked dial to the depth you want. Scale is in inches. Scale may not be accurate.
Depth is relative to the maximum height of the spindle, not your work piece. For example, setting the dial to 2.5" with material 2" away from the tip of the bit means that the depth of the hole will be only 0.5".
- Set the depth by tightening the depth lock handle.
- Verify the depth of the cut against the work piece by moving the work piece aside and lowering the bit until it hits the stop.
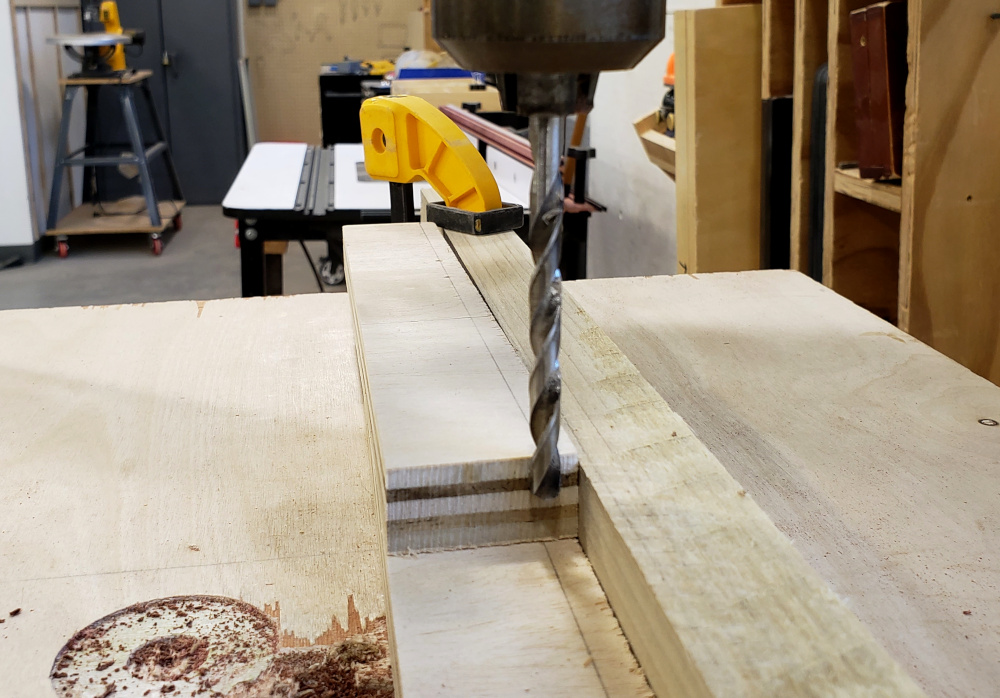
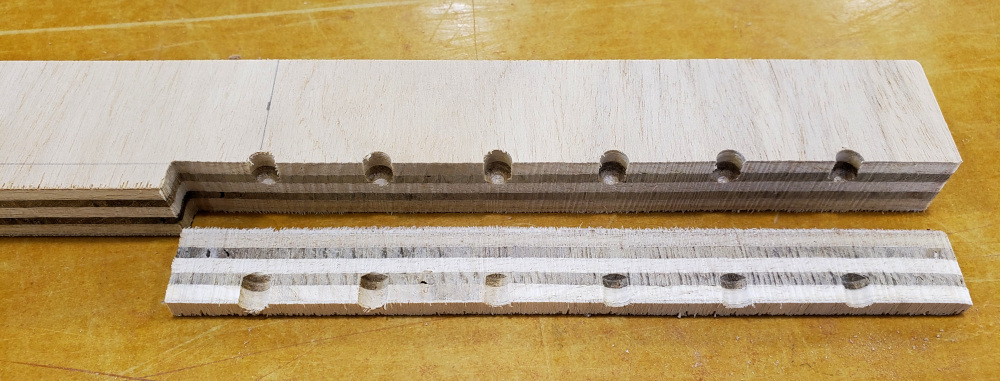
Example: A series of holes was drilled into plywood using the repeat depth setting and then cut open along the line of the holes. The distinct colors in the plywood show that the holes are all the same depth.
¶ Clean up
- Remove the bit and put it away.
- Make sure the chuck key is put away.
- Wipe up any spilled coolant.
- Vacuum up the table and surrounding floor.
¶ Machine Maintenance
All machine maintenance pages are only accessible to Staff. All machine maintenance is only to be done by Staff.
¶ Troubleshooting
All troubleshooting pages are only accessible to Staff. All troubleshooting is only to be done by Staff.
¶ References
Operating Instructions and Parts Manual 16-speed Woodworking Drill Press
Dake Drill Press Model SB-25V Instruction Manual
Dake Drill Press Model SB-25V Parts List
¶ Video Walkthroughs
¶ Glossary
%%TERM
%%definition/description of term