¶ Introduction
This machine combines compressed air and and electricity to generate plasma for computer controled cutting of sheet and plate mild steel. It requires a specific set of consumables, available in the red cabinet in the metal shop. Wear flame resistant clothing such as a welding jacket, welding mask, and gloves during use.
¶ Shop Access
A membership or day pass is required to access the Metal Shop
The Shop Safety Class CNC Plasma 1 Shop Safety is required before using the plasma cutter.
¶ Machine Reservations
The CNC plasma cutter requires a reservation.
¶ Machine Overview
The CNC plasma cutter is good for making duplicate parts and/or complex parts.
The model is the Lincoln Electric Accumove 2.
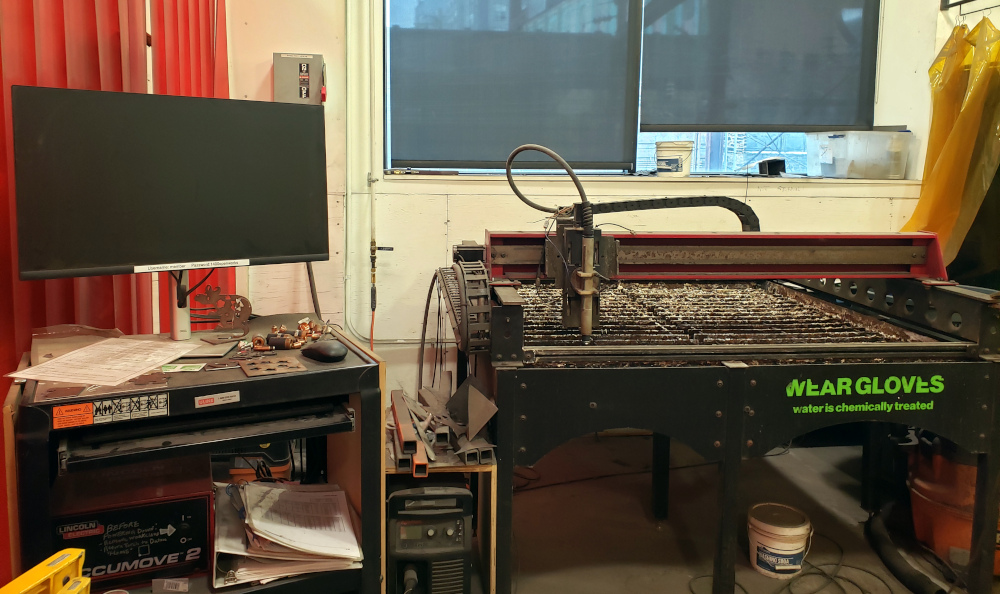
¶ Parts of the Machine
Click to expand
%%INSERT PICTURE¶ Material Considerations
¶ Acceptable Materials:
Mild steel.
¶ Forbidden Materials:
Stainless steel.
¶ Safety
Personal Protective Equipment (PPE):
Sturdy, close-toed shoes must be worn at all times.
Absolutely no clothing or shoes made from synthetic fibers.
For more information on shop safety visit Metal Shop under "Safety."
¶ Step-by-Step Guides
¶ Before You Begin
¶ Precise Drafing with Absolute and Relative Coordinates
You can create precise shapes by making a rough shape and then assigning coordinates, in either Absolute Coordinate Mode or Relative Coordinate Mode.
- Absolute Mode uses the position on the rulers to position a node (relative to zero). Refer to the top set of numbers in the image to the right (0,0 > 0,4 > 2,4 > 2,3.75 etc)
- Relative Mode defines the position of one node based on its distance from the previous node. Refer to the lower set of numbers in the image (0,0 > 0,4 > 2, 0 > 0, -.25 etc)
¶ Plasma Torch Consumable Assembly
CNC Plasma Consumables are rated for 40 and 65 Amps. Check that consumables you are using are appropriate for your set amperage. Amperages are inscribed on each consumable.
¶ Using the Machine
This guide briefly highlights equipment and protocol covered in the CNC Plasma Certification Course. For a more thorough review of the machine, a manual for Torchmate VMD and Hypertherm CAD/CAM is stationed at the computer in the metal shop. Always ask a technician for assistance if you are having any difficulties.
Torchmate can be used to create tool paths from files created in other CAD programs including DXF and AI formatted files. Additionally, it is possible to convert a bitmap or jpg image into a vector format directly in Torchmate CAD/CAM. This allows an image to be brought in, traced, editied, tool pathed, and cut. There are several methods of vector conversion in the software, but we will cover the “Accuscan” method in this guide, as it serves as a convenient and thorough orientation to the interface of Torchmate CAD/CAM.
¶ Converting and Image to a Vector in Accuscan Mode
- Go to “file” > “import” and select your desired file.
- A cursor will appear on the screen; click in the grid to drop the image onto the screen.
- Orient the image in the lower left hand corner until you see a pink highlighted edge. This signifies where your cut begins in reference to the plasma cutter bed and your material. If the design is outside of the bounding box (indicated by a bold black line), the cut file cannot be exported.
- Select the scan tools from the left toolbar, then select the first icon, Accuscan.
The Accuscan feature will interpret any black shapes as parts that will be kept as metal and any white parts of the drawing as scrap.
Smatterings of small negative spaces, tiny holes or voids less than 1/8” diameter should be avoided as the torch cannot make such small and precise cuts. Material thickness will also determine the amount of detail that can be acheived. Thinner material can acheive more precise cuts. - At the top of the screen, you will see a selection box that says “Current Settings”.
In that box, select “LOGO complex-with detail”. - Select “Trace Setup”, the icon directly to the left of the drop down menu.
Trace setup will allow you to alter the speckle filter settings, for instance if you have a grainy image. It also allows you to change how accurately rendered the vector will be from the original file. - Hit “OK” when you’ve made the changes you’d like.
- Select the button to the left of trace setup to vectorize your image, then hit “Close”.
¶ Simplifying and Editing Your Vector
- It will almost always be necessary to edit your vector after tracing, to simplify the amount of lines and corners and check for any overlapping lines or errors in the conversion process. You will need to remove your original image which is overlayed on the new vector. Select and drag the original image to the side, and then delete it.
- Select the vector, then go to the “Layout” tab in the top menu bar, and select “Ungroup”. This separates the vectors.
- Double-click the vector to go into node editing mode. You will see the vector as a line made up of blue dots. Each dot is a “node”. This will allow you to edit parts or “nodes” separately from the whole vector in order to manipulate specific parts of your design.
Right click on a node to control, delete, convert it, or add another node.
-
After tracing, there may be an excessive amount of nodes. Try to delete as many of them as possible. You can select and delete one node at a time, but this can get tedious.
Another method is to select all of the nodes (F3, Ctrl-A, Edit > Select All, or clicking with the arrow tool and dragging a selection box around all nodes will select all of the nodes).
Once all nodes are selected press the U key; this will select every other node. With every other node selected, press Delete. You can repeat this process many times to simplify your vector. -
For cut files made up of several components, like the 3 cats, you can “weld” the separate objects together to create one solid form:
13.1 Orient the separate pieces of the vector so that they all overlap one another.
13.2 Once the pieces are arranged the way you’d like, click and drag your mouse to highlight
all of the objects
13.3 On the tool bar to the left, select the weld icon to connect othe overlapping layers.
¶ Making Cut Paths
- Make sure you are no longer in Node Editing Mode, and select your vector.
- In the menu bar, select “Arrange” > “Make Path”. To make sure there are no open curves that could corrupt your cut file, go back to “Arrange” and this time select “Connect Path”.
- The order in which you make tool paths correlates to the order that the machines will cut the parts. It’s better to start with details inside of your design first, and then cut the outline.
- In the menu bar, select “Machine” > “Create Tool Path” > and the appropriate type of Tool Path (Online, Male or Female).
- The Tool Path settings window will appear. Most of the options should be ignored. Go to “Basic Cut” tab and enter the Feed Rate based on the type and thickness of your metal and the power of the machine. We keep a settings reference guide by the machine.
- The “Lead in/Lead out” tab adjust the points at which the torch starts and stops a cut.
- Hit “OK” when you’re done setting your feed rate. You’ll see lines that indicate where your cuts will be. Deselect by clicking somewhere on the grid, then click back on the vector and drag a layer away. Your cut file is the outline.
- Select the cut outline and go to “Machine” > “Output” > “Cut Now”, and save your cut file.
¶ Torchmate VMD
This is the software that allows you to control the machine. It processes gcode from the toolpaths you’ve created in Torchmate CAD/CAM to execute the cuts. The plasma cutter moves on a gantry in X, Y and Z axis.
“X”= LEFT TO RIGHT “Y”= FRONT TO BACK “Z”= UP AND DOWN
- Turn on the Accumove Controller, which is a red box on the lower shelf of the computer cart.
- Wait 2 minutes and open Torchmate VMD on the desktop.
A screen reading “Accumove Controller Not Connected” may appear. A pop up saying “Turn drivers on” may appear. Close that
window to continue. Yes, it’s confusing. - The torch should be in the near left corner of the bed. Select “Datum” icon. This “homes” the torch. You may now use the XYZ Control Pad to jog the torch quickly around the table.
- Always return the torch to this location immediately AFTER opening, and immediately BEFORE closing the program.
- Place your material on the bed--avoid damaging the torch by jogging it to the back of the bed--the far end towards the window to load up large sheets. You may need to rearrange the support slats to prevent your material from sagging or warping. Clamp the work lead to a vertical support or directly to your material.
- Under “Files of Type” select GM as all cut files exported from Torchmate CAD/CAM, then select “Browse” to find and select your file.
¶ Info and Settings Panels
The Dashboard panel is a guide that displays X, Y, & Z positions relative to the Machine Zero, the position at which the machine was Datumed. Since you’ve Datumed the torch, you can control the Machine Position to set the Program Zero. This will be the reference point from which you execute and navigate cuts.
- Place the torch hovering in the near left corner of your material. This is where you will want your “Zero” to be. The torch should hover 1-2” over your material.
- Select Set Program Zero.
- Plan View is a gridden panel that represents the Plasma bed.
- “Zoom to machine” to orient yourself to see the whole bed (the grid will expand to read 48 x 48).
- The dotted lines are the cut path. Look for any irregularities or unusual patterns, which might indicate an error in your original file.
- Left click and drag to any point on your design to zoom into that area. White crosshairs signify where the torch is in relation to the design/bed, which you can follow as the machine is cutting.
- For more accurate cuts, right click over a specified point in your design to move the torch to or start cutting from that path by selecting “Move To Here” or “Run From Here” .
The AVHC Settings panel is where you enter the cutting parameters from Page 1, and controls the behavior of the height control. There are two AVHC modes: Manual and Auto.
We recommend selecting Auto Mode which keeps the tool at an ideal height above the material by “following” the Set Voltage. Use the cut settings guide from the laminated sheet at the computer station to enter the AVHC settings, which are determined by the thickness and type of metal you are cutting, at a specified amperage.
Sample Voltage should be “ON”
BEFORE CUTTING YOUR FILE, MAKE SURE THAT TORCHMATE VMD IS IN ‘DRY RUN’ MODE.
The run mode button is located just above the jog keys. To toggle between the two modes, just hit the button, which by default may read Active Run. Dry Run allows you to run a job without actually firing the torch, allowing you to test the paths and check for errors, while the active run will turn the tool on to cut out the part.
¶ Start Cuttings
Hit “Run Job” to start cutting (or test your paths in ‘Dry Run’ Mode). Hit stop to pause or cancel if at any time you want or need to stop cutting. You can pause and start mid job.
Be aware that the plasma cutter has a duty cycle--it can run continuously at 45 Amps but not longer than 4 minutes out of 10 minutes for jobs running at 65 Amps.
When you’re done, select ‘Go To Program Zero’ to return the torch head to the home. Remove the work lead and clamp it to the outside of the frame. Turn of the Accumove Control Box and close out the software.
¶ Machine Maintenance
¶ Troubleshooting
- The whiskers inside the body should be “clear”. This indicates broken curves.
- Select the the nodes that are apparently separated by dragging around them.
- Then right click so the node editing tool comes up. Select join, then select whether it will be a point or a curve. The curve should become clear after doing this!
¶ References
[Manual]https://torchmate.com/uploads/downloads/driver_software/Torchmate VMD Software User Manual 0.2.pdf)