¶ Introduction
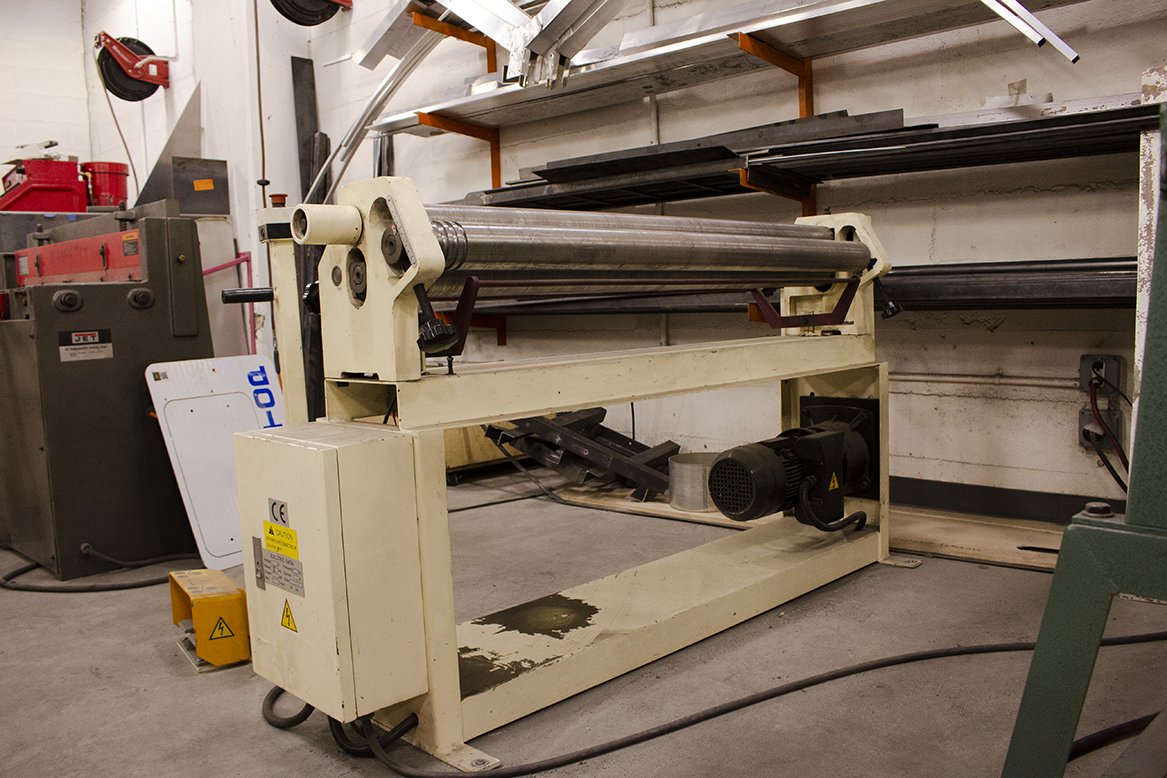
The slip roller is used for making curves, hoops, coils, and cones with sheet metal and round bar. There are three different rollers that act together to feed and form the metal. It can accomodate mild steel up to 16 ga., aluminum up to 1/8", and stainless up to 20 ga., as well as 3/8" round bar. The slip roller at Open Works is electric and controlled by a foot pedal. The slip roller can be set to forward or reverse depending on which pedal the user presses with their foot.
¶ Shop Access
A membership or day pass is required to access the Metal Shop.
The Shop Safety Class Metal 2: Sheet Metal Working is required to operate the slip roller.
¶ Machine Reservations
The slip roller does not require a machine reservation and is available on a first come first serve basis.
¶ Parts of the Machine
• The front lower roller is the Pinch Roller and is connected to the motor, feeding the material forward and back.
• The Pinch Roller Adjustment Knobs are located in front of the machine, on either side of pinch roller. The knobs change the distance between the pinch and gripping roller to allow different gauge metals through. While adjusting the knobs, watch the gap between rollers and test with your workpiece till it catches and easily feeds the material through.
• The Gripping Roller is on top. It has a sleeve which pulls out of the groove of the body of the slip roller, and allows the user to swing the arm of the roller out to release formed hoops and tubes. Caution! It is very heavy!
• The Radius Roller (=idler roller) is in the back. Incrementally adjust its height to set the radius of the desired curve. It too rotates and pushes the material up over the gripping roller.
• The Radius Adjustment Knobs are located on the back of the machine, on either end of the radius roller. To make a perfect cylinder, both knobs must be adjusted equal amounts, incrementally until you acheive your radius. How many times you’ll need to adjust will depend on the thickness of metal and the radius. To make a spiral or a cone, the radius roller will have to be at an angle, the knobs will be adjusted at different points.
¶ Material Considerations
¶ Acceptable Materials:
Up to 16 ga. mild steel
¶ Forbidden Materials:
Everything else
¶ Safety
Personal Protective Equipment (PPE):
• Sturdy, close-toed shoes must be worn at all times. Leather steel-toed boots are recommended for any metal working.
• Safety glasses must be worn at all times.
• Hearing protection must be worn.
Long hair, jewelry, and loose clothing must be tied back to prevent getting caught in moving parts!
For more information on shop safety visit Metal Shop under "Safety."
- There are two emergency stops on the slip roller! At the first sign of danger press an emergency stop immediately!
- Beware of pinch points! Keep hands and fingers away from the rolls when the machine is in operation. Keep hands and fingers clear of any gears or mechanisms. Make sure guard is in place before operating machine.
¶ Step-by-Step Guides
¶ Before You Begin
¶ Moving the remote controls
Pick up and move the remote controls by the handle on the post.
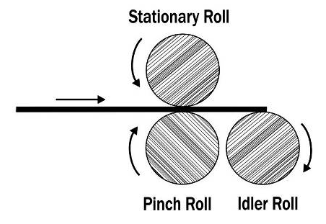
¶ Set Material Thickness
The two front adjusting knobs enable the operator to raise or lower the pinch roll, so that the correct gap between the stationary and pinch rolls may be obtained to feed the desired stock into the machine.
- Insert the material between the rolls from the front of the machine and raise the pinch roll until the material fits tightly.
- Raise the radius roll equal amounts at each end, to desired position for the bend.
¶ Set Degree of Bend
This is an imprecise art and you will need to incrementally approach the desired bend with multiple passes through the roller.
The rear adjusting screws raise or lower the radius roll which determines the degree of bend in the stock that is being fed through the machine. The right and left side frames are each equipped with a scale to aid the operator in determining how far the roll has been moved, or use a caliper to confirm the distance.
Deliberately setting the rolls non-parallel can be used to make cone shapes.
¶ Using the Machine
- Release both Emergency Stops, on the main panel and the pedal post.
- Press “On.” on the control panel on the machine. The “Power” indicator should light green.
- Use the “Forward” pedal to engage the rollers. Feed metal between pinch and gripping rollers.
- The material will exit the rollers between the gripping and radius rollers. Use the reverse pedal to back out material for localized curves or for easing material into a radius.
¶ Flat Rolling
Softer metals (copper, aluminum, etc.) can be processed through the slip roll machine to straighten, flatten, or reduce their thickness. Simply adjust the pinch roll for thickness, lower the radius roll all the way down, and feed the workpiece through.
The radius roll will not descend completely out of the path of the workpiece; thus, there may be a slight bend in the workpiece. By flipping the workpiece over and re-feeding it, this bend can be minimized.
¶ Forming a Radius
- Adjust the pinch roll as needed.
- Turn on the slip roller and insert the workpiece from the front. Make sure the stationary roll is rotating counter-clockwise.
- When the material reaches the point where the radius is to begin (Figure a), stop the machine and raise the radius roll an equal amount on each end to achieve the desired bend.
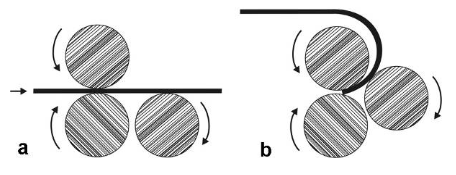
- Re-start the rolls and continue until the bend is completed (Figure b). Support the workpiece as it exits the machine.
- If a smaller radius is needed, adjust the roll distance and re-feed the workpiece.
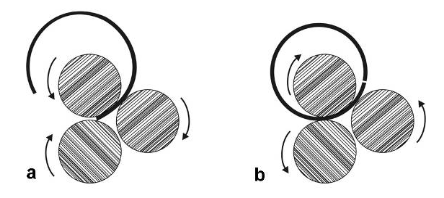
¶ Forming a Tube
A tube can often be made with a single pass through the machine.
-
Adjust the pinch roller as needed to accommodate workpiece thickness.
-
Feed the workpiece into the machine. As it nears the end (Figure a), stop the machine and reverse direction (Figure b).
-
To remove the tube from the stationary roll, pull the sleeve outward until it clears the end bracket; then pivot the roll outward.
-
After the tube is removed, reposition the stationary roll, making sure the sleeve is pushed back in completely.
¶ Bending Wire and Rod
Use the grooves at the ends of the rolls. Use the smallest groove into which the wire will comfortably fit. Follow the instructions for flat rolling and radius forming.
¶ Machine Maintenance
All machine maintenance pages are only accessible to Staff. All machine maintenance is only to be done by Staff.
- Keep the rolls clean and rust-free, and periodically apply a light film of oil.
- Place a few drops of 30W oil into the holes at each end of the rolls (see Figure 6). Then operate the machine for a few seconds to distribute the oil.
- Apply a light coat of oil to the exposed end of the stationary roll beneath the sleeve (shown in Figure 5).
- Keep the gears lubricated with a good quality, non-hardening grease. (Remove end cover to access gears and chain.) Operate the machine to disperse the grease.
- Apply a light coat of grease to the pinch roll and radius roll adjustment screws (see Figure 1)
¶ Troubleshooting
¶ References
manual for hand cranked model
Manufacturer website
Instructions adapted from the Manual for a similar tool