¶ Tool Overview
RDWorks has this icon:
RDWorks is a software used for controlling laser engraving and cutting machines. The software provides users with a graphical user interface to create, edit, and execute laser engraving and cutting jobs.
It allows users to import a design as an image, and then use tools such as color mapping, layer management, and text editing to edit the design. The user can provide parameters such as the laser power, speed, and frequency to achieve different results. The user can also preview the job before execution.
¶ Skills/Class Required
- A membership or day pass is required to access the Computer Lab.
- Creating a file in RDWorks is covered in depth in Laser 1: Shop Safety.
Laser 1: Shop Safety is not required to access RDWorks.
Laser 1: Shop Safety is required to run a RDWorks file on an Open Works Boss Laser Cutter.
¶ Step-by-Step Guides
¶ 1. Prepare an Image for Cutting or Engraving
Prepare an Image for Cutting using Illustrator or Inkscape.
¶ 2. Import Image to RDWorks
The RDWorks software reads .DXF and .AI vectors best, but .JPG, and .BMP files can be imported for engraving raster images.
- Open RDWorks from the desktop.
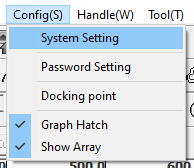
- Set units to match your design file (inches or mm) by going to the top menu bar and selecting Config -> System Setting.
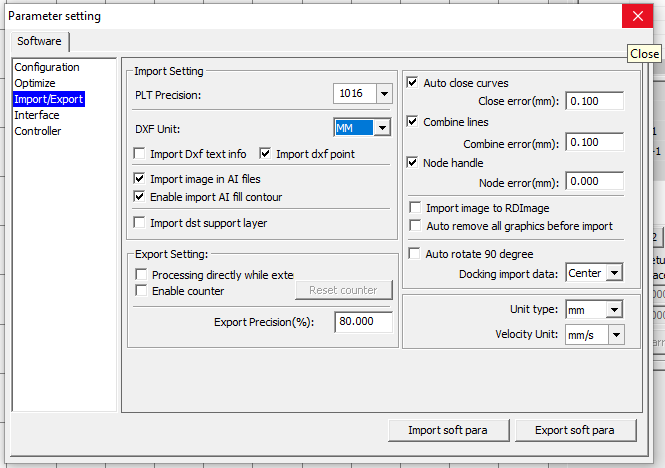
- Parameter setting window opens. Go to the Import/Export tab on the left.
- Change DXF Unit to your desired unit. Close the parameter setting window by clicking the X button in the upper right.
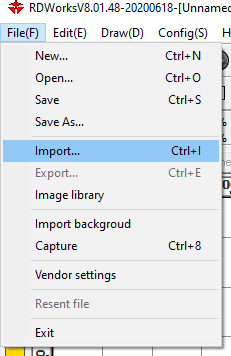
- Insert your file by going File -> Import
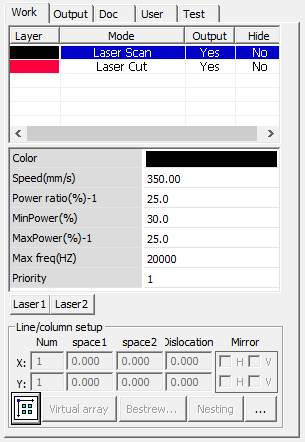
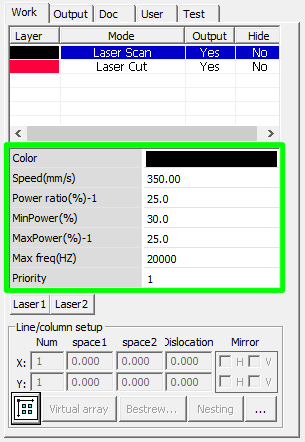
- Various cut and engrave actions will appear as layers in the Work tab.
If you are expecting to do more than one type of cut/engrave action and you don't see multiple layers, go back to the tool you designed in (Ai or Inkscape) and tweak your design.
- Make sure that RDWorks has guessed correctly what Mode each layer is supposed to be and set power and speed.
¶ 3. Preparing a Cut File
¶ 3.1 Material Considerations
Only certain types of natural and synthetic materials are safe to use in the laser cutter. Many materials produce fumes which can be filtered out safely but others including PVC are highly toxic and therefore banned from the Digital Fabrication Shop.
See Laser-safe Materials on the Laser Cutter page for more information.
If you have not used a material before, do a test cut on a small piece first.
Really small pieces of material can be moved around by the ventilation system inside the laser cutter.
A good cut has a crisp outline and edge of the material feels smooth when running fingers along it.
Plywood
The quality of your plywood will affect how it cuts. Low quality plywood will char and produce a lower quality cut. Even if you can get material that chars to cut on a small scale, the risk of failure is going to be higher overall, especially on larger projects.
Signs of low quality plywood or cut settings too intense for the material
The cut edge is completely blackened and the individual layers become indestinguishable.
There is charring/ash along edge.
Swiping edge picks up significant residue.
Edges are uneven vertically/the cut line has begun to burn outside of the line itself.
Embers take longer to settle down when cutting.
Better plywood
The cut edges are dark brown and plywood layers are still distinct along burned edge.
¶ 3.2 Power Settings
Desired cut quality and the type/thickness of your workpiece will dictate the cut settings you will need to select while operating RDWorks. Cut quality is determined by a “Speed + Power relationship.”
- Speed is the rate at which the laser head moves over the piece, measured in “mm/s”.
- Power is the intensity of the laser, usually between 15%-95%.
- A faster speed will give you the same effect as a lower power. A higher power will give you the same effect as a slower speed.
For example, at the same speed, an increased power will make a darker and deeper mark on the material.
Similarly, at the same power, an increased speed will make a lighter and shallower mark on the material.
This is why the recommended cut settings are at a much higher power and lower speed than the engraving settings.
There are a bunch of samples on the table in Digital Fabrication if you would like to view what the settings look like on various materials. The recommended power settings are here. Please note the maxiumum material thicknesses.
¶ 3.3 Layer Parameters
RDWorks organizes different types of cuts into layers and identifies them in the drawing by colors.
The Work tab shows which color is associated with which cut type. Power and speed can be set here. Priority tells RDWorks which layer to execute first.
It is generally best to execute all scan/engrave layers before any cut layers. It is generally best to execute smaller cut layers before larger cut layers so that the laser is always cutting the largest possible piece of material. This makes the work piece more stable and resistant to being moved by the ventilation and creates a higher quality cut.
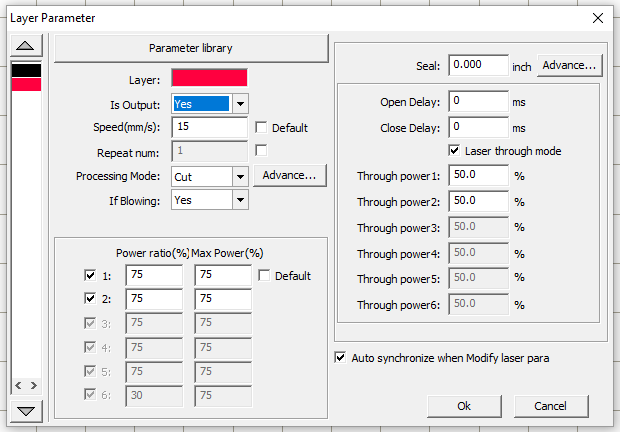
Double click a layer by color to change the settings in the “Layer Parameter” window. Here, you can turn layers on or off (“Is Output”) and change the speed and power. You can also change the “through power” for cuts, and the resolution for engraving.
¶ 3.4 Processing Modes
When generating a cut file, there are several types of cuts. The type is set under Processing Mode, accessed by double clicking on the layer row in the Work tab.
- Cut will burn along any vector, closed or open. Usually used to cut through a material to create a silhouette or a fine line.
- Scan (engraving, etching or rastering) will burn the area inside a closed vector. Usually used for fills to create texture, shading, or opacity.
- Dot
- Pen
¶ 4. Download the file to the machine.
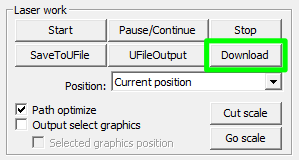
If you are at the computer beside the laser cutter, select “Download” and give the file a short name. If the machine is on, the file will upload to the lasercutter.
If you are in the computer lab, you can save the cut file to a USB key to bring it down to Digital Fabrication. Use RDWorks to open the cut file and download it to the lasercutter using the instruction above.
¶ Glossary
Cut file: Colloquial term for any file that describes how to cut something to a machine
para
parameter
raster: A raster graphic represents a two-dimensional picture as a rectangular matrix or grid of pixels. Wikipedia: Raster Graphics
vector: A vector graphic is an image which is created directly from geometric shapes defined on a Cartesian plane. Wikipedia: Vector Graphics