¶ Introduction
There are many ways to cut dados and rabbets. The methods range in difficulty and resulting quality of cut. Some methods are outlined here in approximate order of easiest and safest to most difficult (but not necessarily less safe) for an unexperienced person.
¶ Skills/Class Required
A membership or day pass is required to access the Wood Shop. The following Shop Safety Class is required to access the Table Saws:
¶ Machine Reservations
No reservations needed.
¶ Safety
Safety Check:
Sturdy, close-toed shoes must be worn at all times.
Long hair, jewelry, and loose clothing must be tied back.
Safety glasses and earmuffs must be worn while machines are running.
A dust mask or a NIOSH certified respirator is recommended.
For more information on shop safety visit Wood Shop under "Safety."
¶ Time to complete
Depending on the technique and the size of the cut, 5 minutes to an hour.
¶ Tools Required
- See specific tutorial.
¶ Materials Required
- See specific tutorial.
¶ What is a dado?
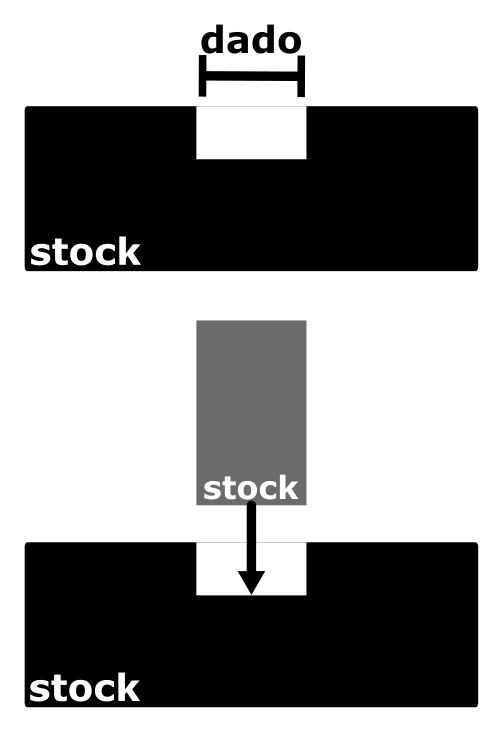
A dado is a straight walled, flat bottomed channel cut into stock, usually for the purpose of slotting another piece of stock into the first. When the channel runs parallel with the grain, it is called a groove. When the channel runs perpendicular to the grain, it is called a dado.
For effective joinery, the channel must be as close as possible to the width of the stock that will be mated with it. The depth of the channel depends on the type of stock being used. Generally, when both pieces are solid wood, 1/8" is deep enough. For composite materials such as plywood, MDF, or particleboard, 1/4" is deep enough. However, the end use of the work also influences the depth. For example, a shelf that will be supporting a great deal of weight should have a deeper channel cut into thicker wood than the bottom of a jewelry box.
A hidden/blind dado means that that the cut does not go the full length of the stock so that one end is hidden from view after the joint is assembled.

¶ What is a rabbet?
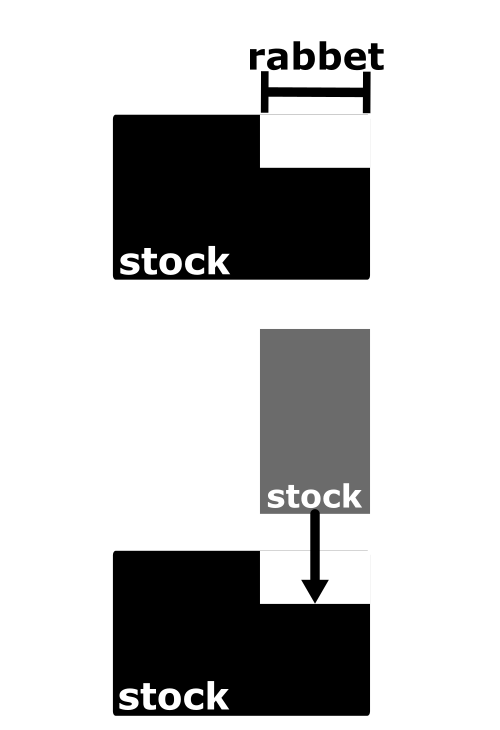
A rabbet is a groove cut into the edge of a piece of stock such that the groove only has one side.
Most considerations that apply to cutting dados also applies to cutting rabbets.

¶ What is a tenon?
A tenon is one half of a joinery technique known as "mortise and tenon". The tenon is a projection on the end of a piece of wood shaped for insertion into a mortise to make a joint. The mortise is a (typically) rectangular hole cut into a piece of stock to fit the tenon.
¶ Table Saw (dado blade)
Best for situations where you will need to make a lot of identical cuts. Can't do hidden/blind dados.
¶ Set the width of the blade
- Set a sample of the stock that will be mated to the dado on the table surface.
- Get the two outer blades and place one of them out-side down next to the sample stock.
- Stack up chipper blades on top of the outer blade, making sure that they lie flat without their teeth touching.
- When the stack is almost to the thickness of the sample stock, place the second outer blade on the top of the stack. Rub your finger from the stack to the sample stock.
- If the stack is too tall, remove a chipper blade and test it for height again.
- If the stack is too short, insert spacers (or another chipper blade) until it is perfectly level with the surface of the sample stock. Distribute spacers between the outer and chipper blades.
- In the order you have laid them out, put them on the table saw arbor. Make sure that no teeth are touching.
- Make sure that the arbor nut has 2-3 threads of engagement with the stack installed.
- Tighten the arbor nut and install a throat plate that clears the stack.
¶ Setting the blade height and fence for dados
- Set a ruler/square next to where the blade will come up through the saw table.
- Using the crank on the side of the machine, raise the blade until it is the right height. Look at it level from the side.
- Know how far you want the dado from the edge of the stock.
- Use a ruler/square to measure from the edge of the blade nearest the fence to the fence. Wiggle the fence over until it's the right distance from the blade.
- Lock the fence in place.
¶ Setting the fence and blade height for rabbets and tenons
- Lower the blade stack below the surface of the throat plate.
- Move the fence to just beside the blade stack.
- Secure a sacrificial board to the fence with clamps. Make sure the blade stack extends beyond the edge of the board. Make sure the clamps will clear your work pieces and the blade.
- Mark the desired blade height on the fence.
- Turn the saw on and using the crank on the side, raise the blade until it meets the mark.
- Turn the saw off.
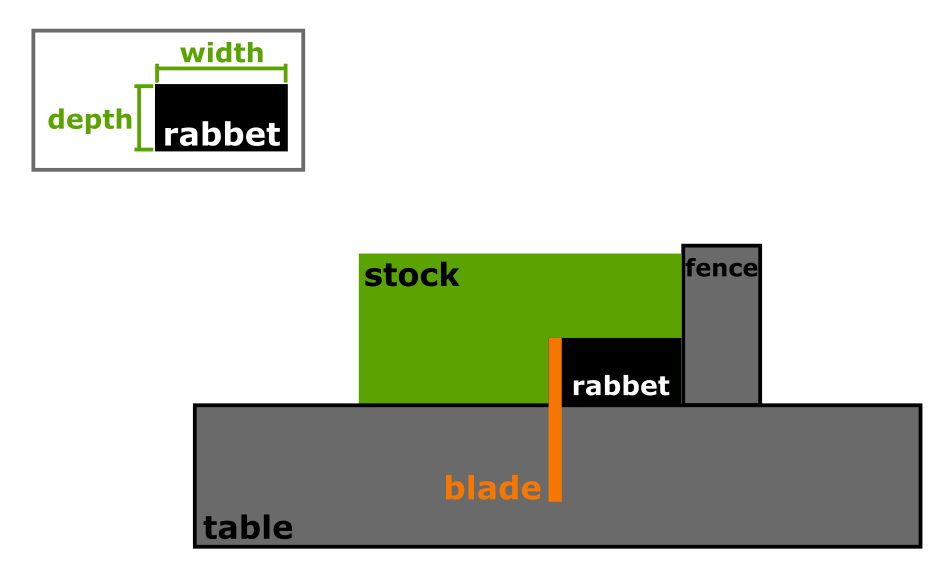
- Move the fence assembly until the width of exposed blade is equal to the desired width of the rabbet or tenon.
¶ Make the cut
- Safety first: clear the saw table of everything that is not your material and push sticks!
- Turn the saw on.
- Using push sticks as appropriate, press the material to the fence and move it over the blade.
¶ Table Saw (with crosscut or ripcut blade)
For small dados, this is a slow and iterative process that produces less precise results than using the dado setup or a router with a correctly sized bit. For large dados (over 3/4 inch width or depth) where you only need to make one or two channels, this is a good method because you can space the cuts out with 1/8 to 1/4 inch between the cuts and chisel the remaining flanges out very quickly. Like the dado blade, this can't do hidden/blind dados.
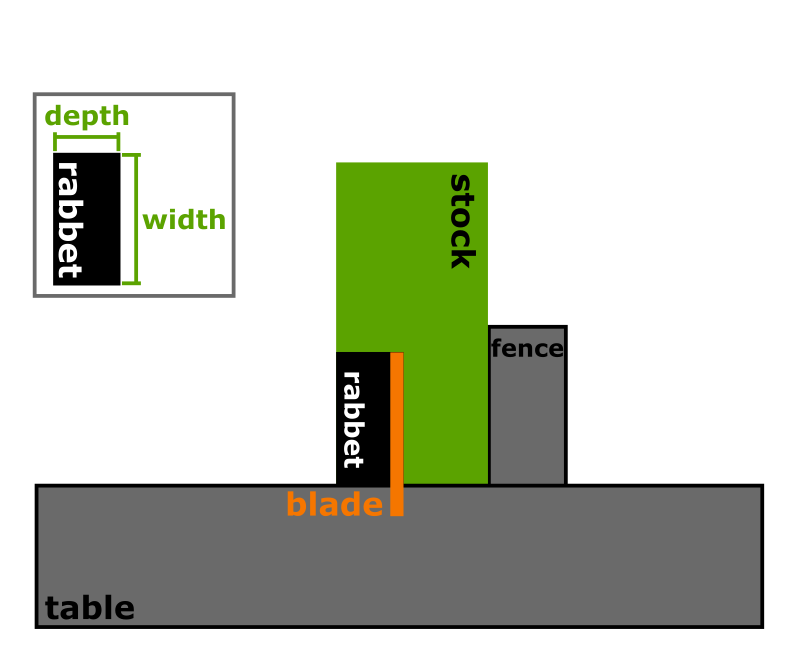
However, this technique is pretty good for large rabbets.
¶ Setting the blade height and fence for dados
- Set a ruler/square next to where the blade will come up.
- Using the crank on the side of the machine, raise the blade until it is the right height. Look at it level from the side.
- Know how far you want the dado from the edge of the stock.
- Use a ruler/square to measure from the edge of the blade nearest the fence to the fence. Wiggle the fence over until it's the right distance from the blade.
- Lock the fence in place. Clear the table of everything that is not your material and push sticks!
- Turn the saw on.
- Using push sticks as appropriate, press the material to the fence and move it over the blade.
- Turn the saw off.
- Tap the fence over a small amount and lock it in place.
- Repeat until the channel is the width needed. After each pass, test the width of the channel by attempting to insert the mating piece of stock.
If the bottom of the channel is uneven, use a chisel of the desired width of the channel to scrape the bottom clear.
¶ Setting the fence and blade height for rabbets
- Set a ruler/square next to where the blade will come up.
- Using the crank on the side of the machine, raise the blade until it is the right depth. Look at it level from the side.
- Know how wide you want the rabbet to be.
- Use a ruler/square to measure from the edge of the blade nearest the fence to the fence. Wiggle the fence over until it's the right width from the blade.
- Lock the fence in place.
- Turn the saw on.
- Using push sticks as appropriate, press the material to the fence and move it over the blade.
- Turn the saw off.
- Set the blade to the width and the fence to the depth. The edge of the blade should perfectly meet the end of the existing cut. Lock the fence in place.
| Cut you just made | Cut you're about to make |
|---|---|
 |
 |
- Turn the saw on.
- Using push sticks as appropriate, press the material to the fence and move it over the blade.
- Turn the saw off.
- A small piece the length of your stock should fall out.
¶ Handheld Router
Great for hidden/blind dados.
- Select a bit of the appropriate width and put it in the router.
- Mark on the stock where you want the dado or rabbet to be.
- Set up a fence so that
3.1 the fence is parallel with the mark
3.2 the fence is an appropriate distance from the mark to account for the footprint of the router and the width of the bit.
With the bit retracted, place the router on the stock and against the fence. Look in from the side to make sure that the bit aligns with the mark.
- Clamp the fence and the stock together to a work table. Make sure that pushing against the fence does not move the fence or the stock.
- Set the depth of the cut by adjusting the router. If the cut is more than 1/4" deep or wide and/or the stock is a hardwood, make several shallower cuts.
- Turn the router on. Slide the foot on to the stock without contacting the bit. Press the router against the fence and proceed with the cut. Hold router firmly against the fence.
¶ Router Table
Not good for hidden/blind dados.
- Select a bit of the appropriate width and put it in the router.
- Mark on the stock where you want the dado or rabbet to be.
- Set up a fence so that the fence is an appropriate distance from the mark to account for the width of the bit.
With the bit retracted, place the stock on the router and against the fence. Look in from the side to make sure that the bit aligns with the mark.
- Clamp the fence in place. Make sure that pushing against the fence does not move the fence or the stock.
- Set the depth of the cut by adjusting the router. If the cut is more than 1/4" deep or wide and/or the stock is a hardwood, make several shallower cuts.
- Turn the router on.
- Press the stock firmly against the fence and proceed with the cut.
¶ Track Saw
Okay for hidden/blind dados.
- Mark on the stock where you want the dado or rabbet to be.
- Set up the track such that
3.1 the track is parallel with the mark
3.2 the track is an appropriate distance from the mark to account for the width of the saw.
With the blade retracted, place the saw on the track at the very end. Look in from the side to make sure that the blade aligns with the mark on the waste side.
- Clamp the track and stock in place. Make sure that pushing against the track does not move the track or the stock.
- Set the depth of the cut on the saw.
- With the saw off, place the saw on the track at the very end. Make sure that the blade is not contacting the material.
- Turn the saw on and make the cut.
¶ Chisel
Great for hidden/blind dados but it can be done.
- Mark on the stock where you want the dado or rabbet to be.
- Use a saw to cut edges to depth. You can use a power saw and a method listed above or a hand saw pressed against a guide.
- Use a chisel to cut the width. Use a chisel that is the desired width of the cut or narrower. Periodically check the depth along the cut with a ruler as you work.
¶ Next Steps
¶ References
https://www.youtube.com/watch?v=SrRGLCWBf4w