¶ Introduction
The following guide covers the basics of using Design Shop Pro. This software is only available in the Digital Textiles Lab.
¶ Time to complete
- as much as your design needs
¶ Materials Required
- vector graphics file. Check out the quick start guide for Inkscape
¶ Personal Protective Equipment (PPE):
• Sturdy, close-toed shoes must be worn at all times.
• Long hair, jewelry, and loose clothing must be tied back.
• Ear protection is recommended when two or more machines in the lab are running at once.
For more information on shop safety visit Digital Textiles under "Safety."
¶ Importing into Design Shop Pro
Use File -> Open, or drag and drop your vector file into the work area of Design Shop Pro.
.ai file types import more reliably than .svg file types. If you are using Inkscape, be aware that objects import better than paths, and it seems to scramble the node order of paths on import.
¶ Editing your design in DSP
DSP has rudimentary vector editing tools that let you
- add, remove, and relocate nodes
- open/break a path by right clicking on a node, then Operation -> split element
For convenience, try to make all changes to the design before embroiderizing.
¶ Converting to Embroidery
Converting a design to embroidery is a complicated process with a huge number of factors to consider. This is going to be at best an overview because of how complex an art this is.
¶ Cheat Mode
Select everything, click Convert. It will make a guess at the best settings and apply them.
¶ Nuance Mode
The panel on the right of the interface shows all of the layers in the project. With nothing embroiderized, there will be a tree of all the paths in the design.
Click on a path to select it. Then use the Convert to Embroidery toolbar that appears at the top to choose settings and create the stitch pattern for that path.

As soon as a path is converted to embroidery, a new tree called "Design" will appear. This tree lists every stitch and color applied to every shape. Right clicking on an entry in the tree will bring up a menu:
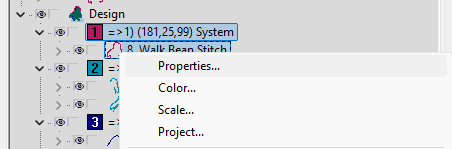
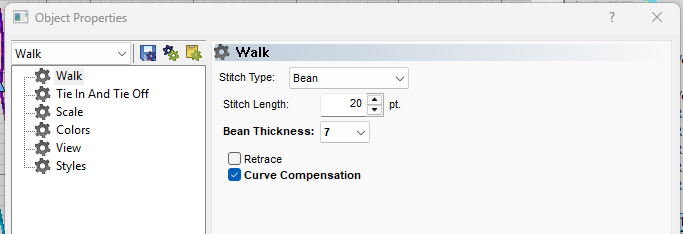
Click on Properties to get to the specific settings for that part of the design.
When satisfied with the stitch layout, File -> Save Project. Save the .ofm file to a personal usb drive or cloud account.