
¶ Introduction
Orca is a 'slicer', which is a tool that is used to turn a 3D model/solid model into g-code, the code that drives a 3D printer. It is not a tool for creating the model and it is not for controling the printer.
¶ Skills/Class Required
- A membership or day pass is required to access the Computer Lab.
- Mention what class(es) this software is covered in depth in
¶ Time to complete
- Variable.
¶ Before you Begin
Personal Protective Equipment (PPE):
• As in all of the shops, sturdy, close-toed shoes must be worn at all times for traction and stability.
For more information on shop safety visit 3D Printing under "Safety."
- The nozzle and bed of the 3D printers get
hot! Do not touch the nozzle or the bed while they are
hot!
¶ Tools Required
- Orca.
- Knowledge of which model of 3D Printer you will be using.
¶ Materials Required
- Knowledge of what type of filament you will be using.
¶ Using Orca to slice a 3D Model for Printing
This guide will focus on the basic steps for slicing a model for printing.
¶ Previous Steps
¶ Step-by-Step Guide:
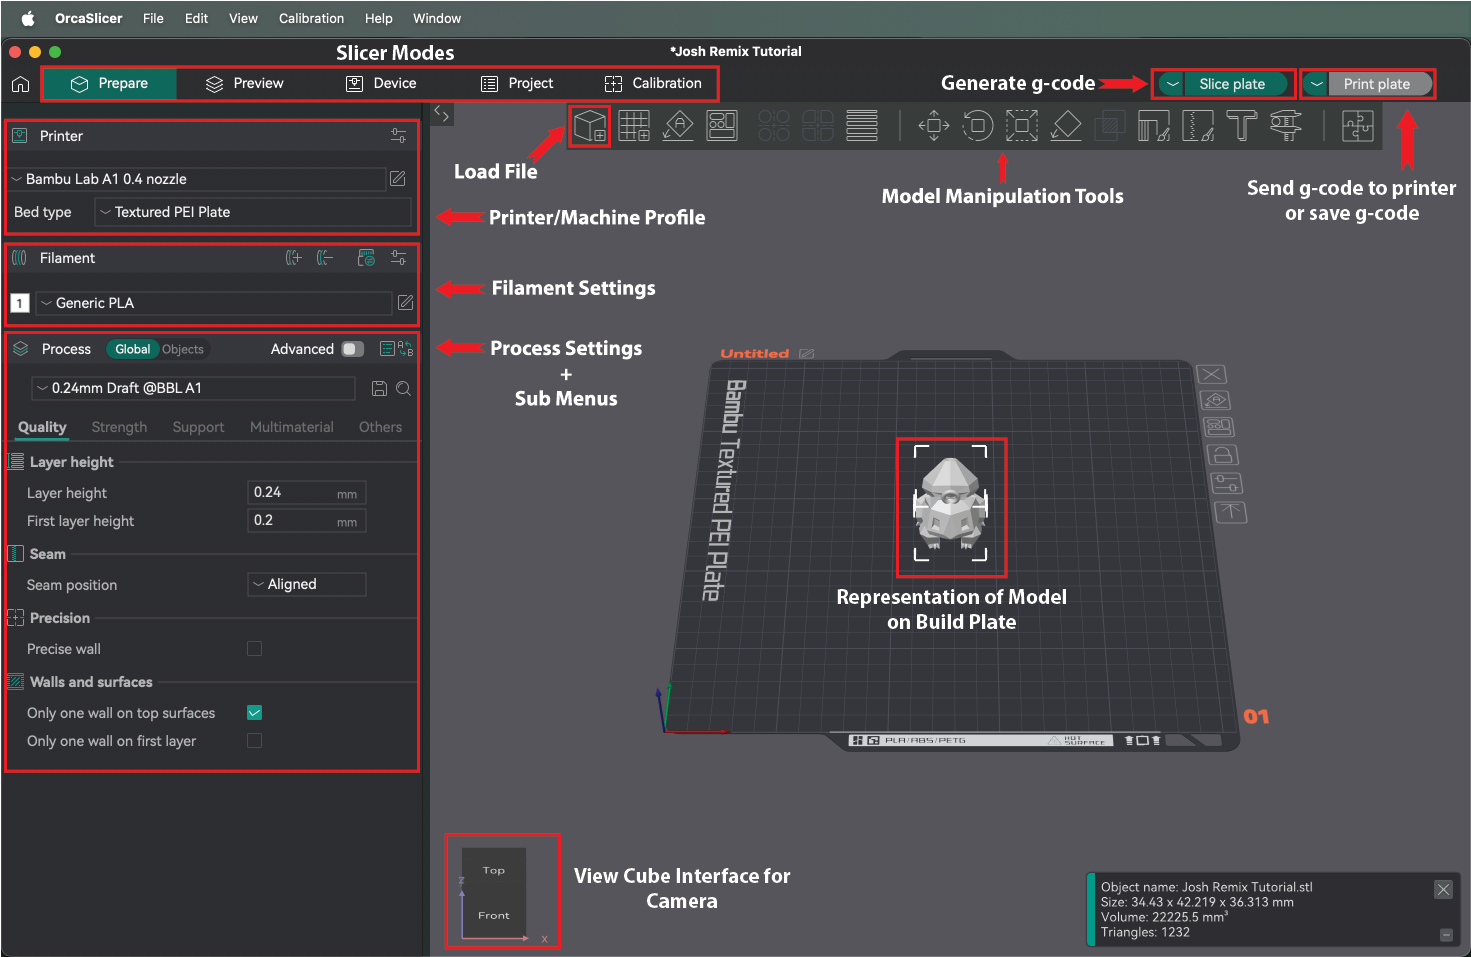
- Open Orca. on the main screen you can either click on th "New Project" button or click on the tab to the right of the home icon named "Prepare"
- If this is the first time Orca has been opened on the PC you're working on it will ask you to specify which printer you are using- depending on which machine you have reserved you'll select either the Creality Ender-3 V3 SE or the Bambu A1 machine profile for either machine be sure to select 0.4mm nozzle. If specifying the Ender-3 V3, once back in the Prepare mode, make sure click on the pencil and paper icon next to the edit the printer settings and check the box next to " Support multi bed types." This will allow you to change the bed types when setting up your print.

- In the prepare mode, click on the cube with a "+" sign icon on the top left to add your 3D model

- In the settings pane on the left side of the program, you'll want to confirm that the printer option reflects the machine you'll be working on, "Creality Ender-3 0.4 nozzle" V2 or "Bambu A1 0.4 nozzle." Additionally, you'll need to confirm that your Bed type is "Textured PEI Plate."

- If not already set, set the material to "Generic PLA."

- In the "Process" menu you'll have 5 settings categories you can edit: Note: If toggle is set to "advanced" there will be 6 catergories and many more editable parameters in each.

- Quality | Layer height, seam position and wall settings
- Strength | Wall and shell loops (# of walls and top and bottom shell layers your print has) and infill settings
- Support | Enable supports for your print and their characteristics
- Mulimaterial | Settings for prints using multiple filaments, See AMS section (link incoming)
- Other | Bed adhesion and sepcial print mod
Additionally there are several system presets that can be chosen from that come with their own process settings. These settings are largely differentiated by their layer height from "extra fine" .08mm layer height to "draft" .24mm layer height as well as strength settings.
Key terms/concepts when considering how to slice your print:
¶ Layer height
Layer Thickness specifies how thick each layer of the print is. Thicker layers print more quickly than thinner layers but thicker layers also have a rougher texture and less detail (a lower "resolution") than thinner layers.
¶ Infill
Infill specifies how solid the print is. For example, 25% infill will make the final object 75% air and 25% PLA on the inside. The higher the infill, the longer the print will take and the more filament it will use. Decorative objects don't typically require more than 15% infill at the maximum.
¶ Support
Support determines if support material is printed. Support material is used to stabilize unsteady regions of the model that may collapse or otherwise print poorly without assistance. Support material is typically easy to break away from the model and usually leaves a nearly unmarred surface behind.
¶ Bed Adhesion
Enabling Adhesion increases the ability of a model to stick to the build surface by adding a skirt, brim, or raft to the print.
| Skirt | Brim | Raft |
|---|---|---|
| A skirt is a line printed around the object on the first layer, but not connected to the object. This helps prime the extrusion nozzle and can be an additional check for bed leveling before the print begins. | adds a single layer flat area around the base of the model to prevent warping. The brim is connected to the model and makes the bottom surface area bigger. This increases the adhesion to the build plate and, in case of warping, the corners of the model are less likely to curl up because of the brim attached to it. | A raft adds a thick grid with a roof between the model and the build plate. This can be useful when the bottom surface of a model is not completely flat or has little adhesion to the build plate. A raft ensures that the model will stick better to the build plate. |
¶ Additional Tools:
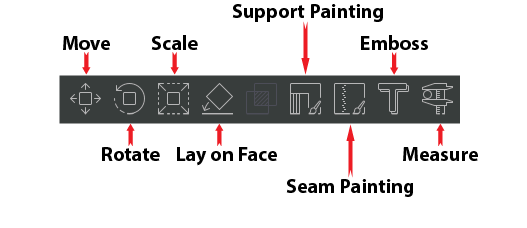
- Move | changes the location of the model on the build plate.
- Rotate | rotates the model around the X, Y, and/or Z axis.
- Scale | changes the size of the model.
- Lay on Face | Reorient your part by selecting a face of your part to lay on the print bed.
- Support Painting | allows you to "paint" the areas of your part that you want supports on. You must have supports enabled and have Type equal to either "Normal(manual)" or "Tree(manual)" for custom supports to load when slcing your part.
- Seam Painting | allows you to "paint" the areas of your part where your seam will appear. In 3D printing the seam is visible area on a printed object where the nozzle begins and ends extruding the layer.
- Emboss | allows you to emboss or deboss text on a 3D printed part.
- Mirror | flips the object along the X, Y, and/or Z axis. This can be accessed by right-clicking on ojbect and choosing command from dropdown.
- Click "Slice Plate" in the upper right corner. When you click this button the view mode will change to the "Preview" mode. In this mode you'll be able to see a digital representation of your printed part with layer lines, seams, the layer by layer timeline view of your model, and the material usage and print time of your model. Any time you make changes to the process settings you'll need to click this button to re-slice your model.
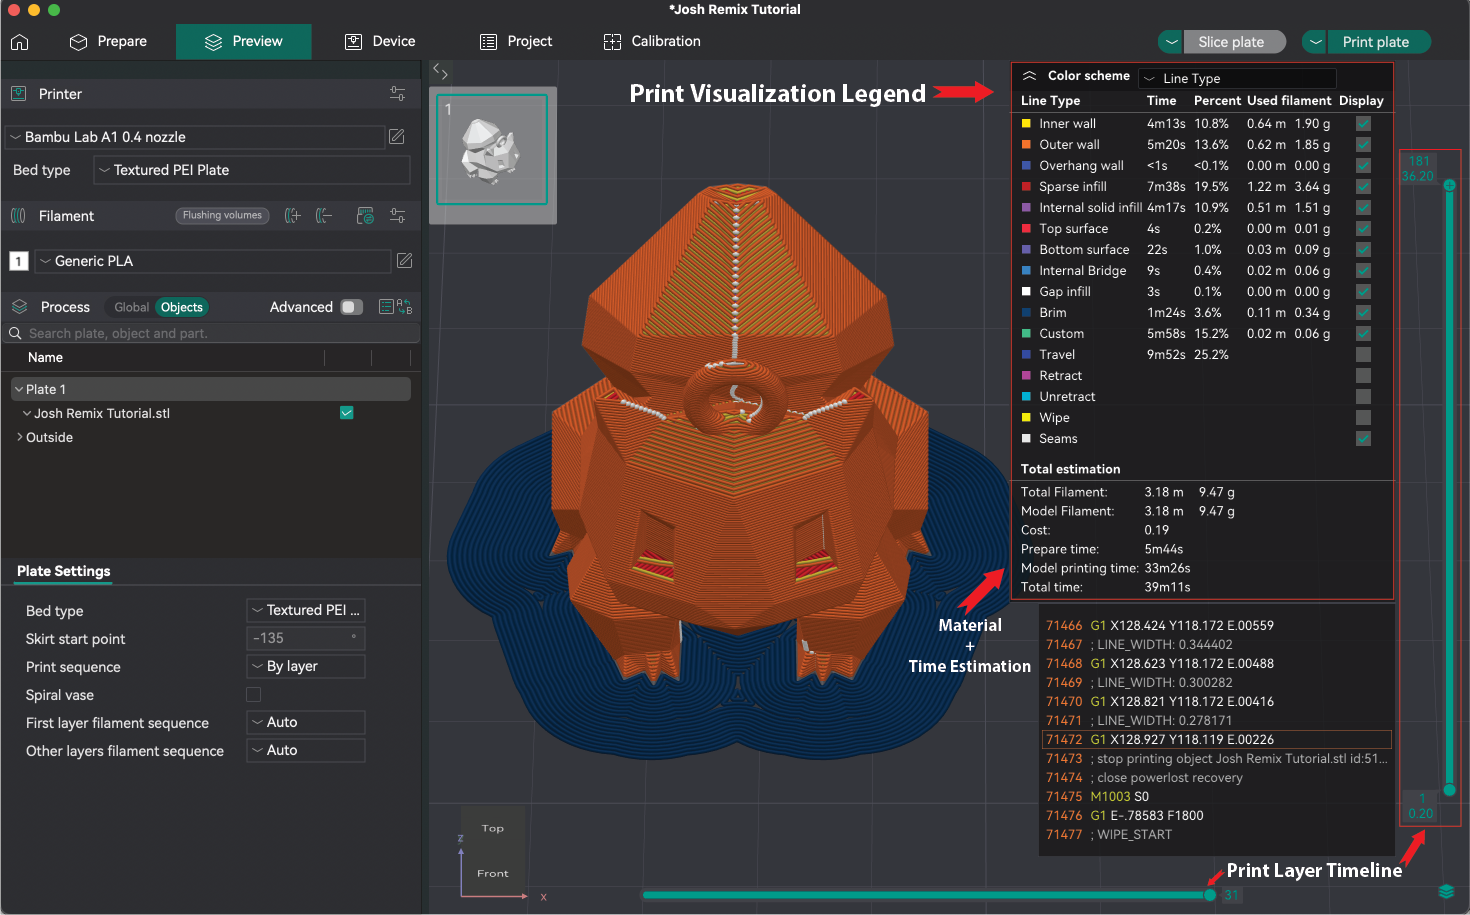
- When you are satisfied with the model and print settings and after you have clicked the "Slice plate" button, you can export the g-code for your model in one of the following ways:
- When using a Bambu A1 | Click the "Print plate" button
- When using an Ender-3 V3 SE | Click the "Export G-code file" button to save the file to either personal storage such as a cloud account or thumb drive, or to the SD card that the printer uses.