¶ Setting up the heat press
Heat Transfer Vinyl (HTV) requires heat, time, and pressure in order to become firmly affixed to the fabric. Most HTV comes with recommended settings on the packaging but in the absence of packaging, look online for the type of vinyl you think you have and use those settings.
Heat presses come in a variety of shapes, sizes, and functions. Depending on what location you’re at, any of the following might be available:
¶ Square Heat Presses (Cricut, HTV RONT)
¶ Set up Material
- Always press on a sturdy, stable foundation. If an ironing board or pressing mat is not available, place a folded, wrinkle free towel underneath, or place a teflon sheet underneath.
- Avoid pressing on heat-sensitive surfaces. Protect your work surface with a pressing mat or thick bath towel
- Avoid seams, buttons, zippers, and any sort of bump that could scratch the surface of the heat press.
- Lay material out on a sturdy, flat, heat-resistant surface.
- If working on a T-shirt or other thing with multiple layers, place parchment paper or heat-resistant mat between the layers.
- Place HTV in position on the material.
- Make sure any registration marks or areas that should not be transferred have a shield between them and the material.
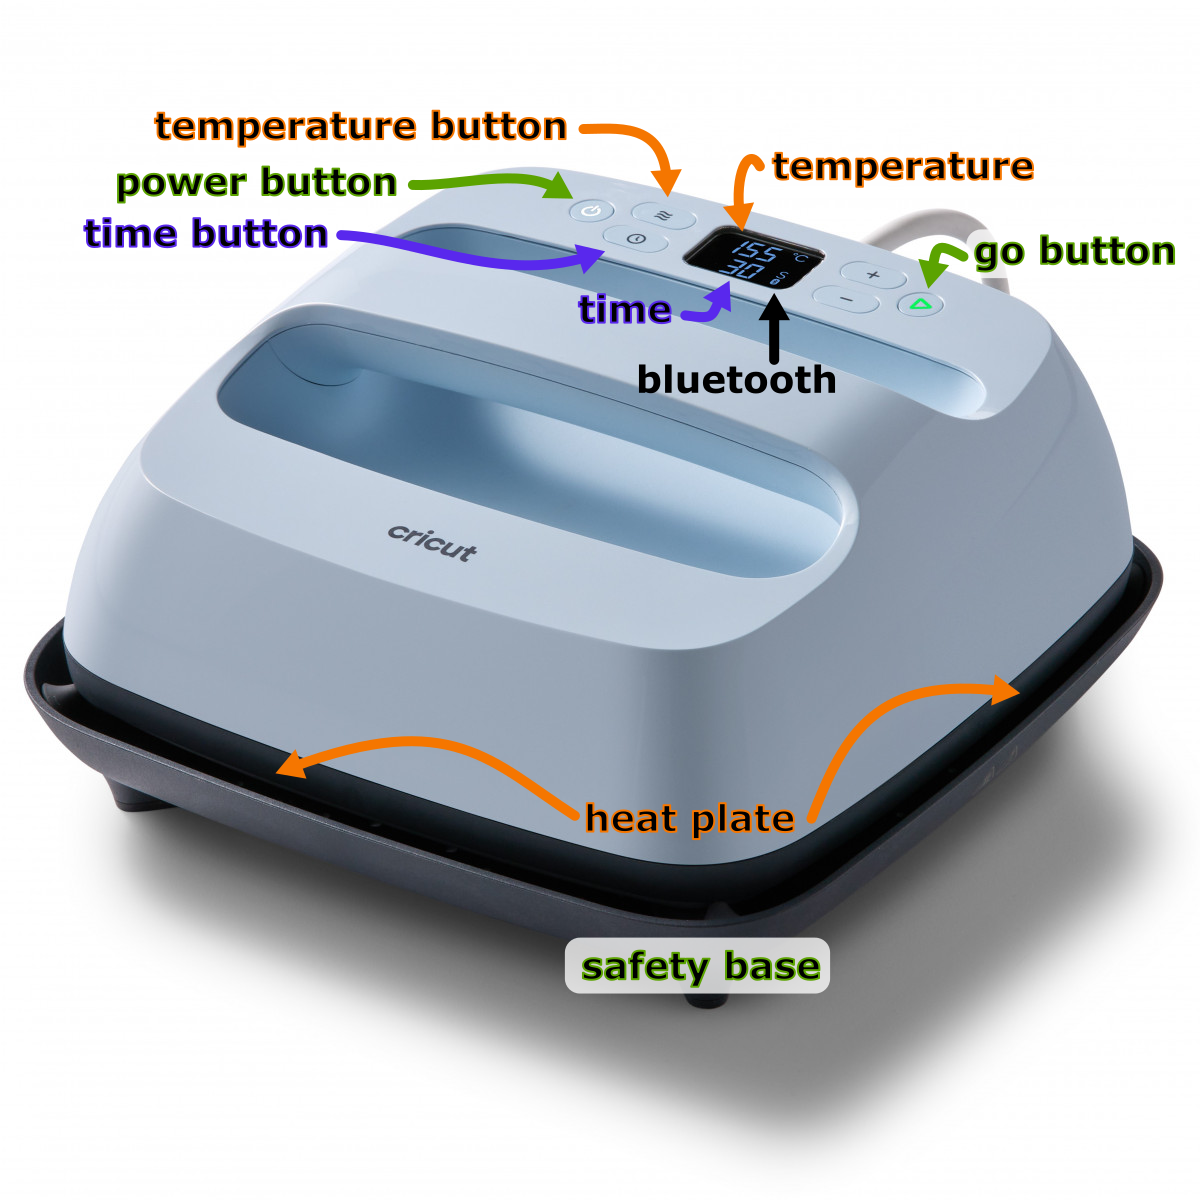
¶ Set up Heat Press
- Press the Power Button on the left to turn on/heat-up.
- To set temperature, press the Temperature Button and use +/- to adjust.
- To set time, press the Time Button and use +/- to adjust.
- Place heat press on material.
- To start countdown, press the Go Button on the right.
- Using the handle on the heat press, press down on it. Some presses may display how much pressure you are applying.
- It will beep to signal that time is up. Lift heat press and return it to the safety base.
- Press the Power Button to turn off.
Tip: The heat press will auto-off after 13 minutes of inactivity.
¶ Mpress
- Power switch is on the left side of the base. After it’s powered on, it will display the main screen. The main screen will show the currently set temperature and time. Caution: the heat press will start heating as soon as it’s powered on! Be careful of your knuckles and fingers when setting up material.
Tip: the upper display labeled PV for Present Value will show the mode name. The lower display labeled SV for Set Value will show what the value is being set to.
- Press “SET” to switch to “SH” mode. Here you can set the desired temperature. Use the “▲” and “▼” buttons to increase or decrease this value.
- Press “SET” to switch to “ST” mode. Here you can set the timer. Use the “▲” and “▼” buttons to increase or decrease the seconds. Press set to return to the Main Screen.
- Pressure is set by adjusting the knob on the top. Turn counterclockwise for less pressure, clockwise for more pressure.
- Set up material
5.1 Make sure there is a silicon mat or parchment paper below the material, between layers of the material if needed, and between the HTV and the upper plate of the heat press.
Caution: the heat press will start heating as soon as it’s powered on! Be careful of your knuckles and fingers when setting up material.
- Wait for the heat press to come up to temperature
- Use the handle to lower the top and lock it in place.
- It will beep and start counting down.
- When time is up, it will beep. Lift the handle and remove material.
- Power off the heat press when you’re done using it!
¶ Cricut Mini
This mini press is ideal for small projects and awkward shapes.
¶ Set up Material
- Always press on a sturdy, stable foundation. If an ironing board or pressing mat is not available, place a folded, wrinkle free towel underneath, or place a teflon sheet underneath.
- Avoid pressing on heat-sensitive surfaces. Protect your work surface with a pressing mat or thick bath towel
- If the object is hollow and squishy but can’t be folded flat (such as a canvas shoe), stuff the object with cloth to provide support.
- Avoid seams, buttons, zippers, and any sort of bump that could scratch the surface of the heat press.
¶ Set up Heat Press
- There are three temperature settings. Pick the range that corresponds to the HTV you are using.
- Use a timer on your phone, watch, or watch a clock to estimate how long you are pressing the HTV
- Apply the press.
¶ Iron
¶ Set up Material
- Always press on a sturdy, stable foundation. If an ironing board or pressing mat is not available, place a folded, wrinkle free towel underneath, or place a teflon sheet underneath.
- Avoid pressing on heat-sensitive surfaces. Protect your work surface with a pressing mat or thick bath towel
- Avoid seams, buttons, zippers, and any sort of bump that could scratch the surface of the heat press.
- Lay material out on a sturdy, flat, heat-resistant surface.
- If working on a T-shirt or other thing with multiple layers, place parchment paper or heat-resistant mat between the layers.
- Place HTV in position on the material.
- Make sure any registration marks or areas that should not be transferred have a shield between them and the material.
¶ Set up Iron
- Steam OFF
- Set temperature to what is appropriate for the fabric
- Place parchment paper on top of the HTV
- Press firmly
- Check every 5-10 seconds to make sure that you are not burning the vinyl
¶ How to Peel the transfer/carrier sheet off
HTV varies in how soon after heating that the carrier sheet can be removed. The two categories are known as Hot Peel and Cold Peel. Hot or Warm peel varieties can be peeled when the material is still hot or warm to the touch. Cold peel varieties require the material to be air temperature, cool, or cold before the carrier sheet is removed.
Tip: It is always safe to wait until the material has cooled all the way before peeling the carrier sheet off.
Wait until the product is the correct temperature and safe to touch. Then, start from one corner of the design and peel the carrier sheet up as you move across the design. As you go, make sure that the vinyl underneath is staying down. If it’s not, press the carrier sheet back down, press the material again, and wait until the product is cooler before trying to peel it off again.
¶ Washing
Always wait the recommended time between applying the vinyl and washing the product. If you don’t have the packaging or it doesn’t provide a recommendation, wait 24-48 hours before washing the product.