¶ Description
In this project you will design and construct a small patchwork quilt using basic quilting techniques such as piecing, basting, binding, and quilting. It will be about 7 by 7 inches.
Note: This project could take 3-6 hours to complete depending on your starting skill level and confidence. Please plan for at least four hours and make sure to take breaks!
If you need this project to go more quickly or require fewer materials, the following adjustments could be made:
- Cut the top as 3 strips instead of 9 squares
- Cut the top as 1 square, same as the back
- Purchase binding tape instead of making it
¶ Materials and Tools
- Several different woven fabrics
- Two or more to create the pieces for the top (9 pieces of size 2.5” by 2.5” minimum)
- One for the binding (about 2.5” x 30”)
- One for the backing (about 7” x 7”)
- Batting, the filler for the quilt (about 7” x 7”)
- Thread
- Coordinating color with the binding or backing
- Contrast or coordinating color with the quilt top pieces
- Seam ripper
- Scissors and rotary cutter
- Rulers and cutting mat
- Pins/clips
- Marking chalk/pencil
- Hand sewing needle
¶ Prior Knowledge
Going into this project, you’re expected to know how to operate the sewing machine, follow a seam allowance, and use an iron. If you need more help with those steps or want a refresher, review the prior projects or check out the Quick Guides.
¶ What is a Quilt?
A quilt is a multi-layered textile, traditionally composed of two or more layers of fabric or fiber. Commonly three layers are used with a filler material. These layers traditionally include a woven cloth top, a layer of batting or wadding, and a woven back combined using the techniques of quilting. [Wikipedia]
Piecing: piecing is the process of sewing together small pieces of fabric to make a larger piece. Often done in patterns to create blocks.
Blocks: a quilt block is one unit of a pattern. Multiple blocks can be used to create a larger pattern.
Basting: long, loose stitches done to hold layers of fabric together during the construction phase which are meant to be removed later.
Binding: The binding is the strip of fabric that goes around the edge of the quilt, binding all of the layers together.
Batting: the filler for the quilt, the stuff that makes it warm.
Quilting: Quilting is the stitching that holds the layers of the quilt together. It is often decorative but can also be utilitarian.
¶ Quilt Top
We will make a basic nine piece quilt top. In a larger quilt, this would make up one block of many that are assembled to create the quilt. The first step is to prepare the fabrics and cut the squares. After that the squares will be sewn together.
¶ Making the Squares
To make this block you will need nine 2.5 by 2.5 inch squares. Each square is 2.5 by 2.5 inches to provide a ¼” seam allowance on every edge. If you want an increased seam allowance, increase the size of the square accordingly. For example, a half inch seam allowance would make the squares 3 inches on a side.
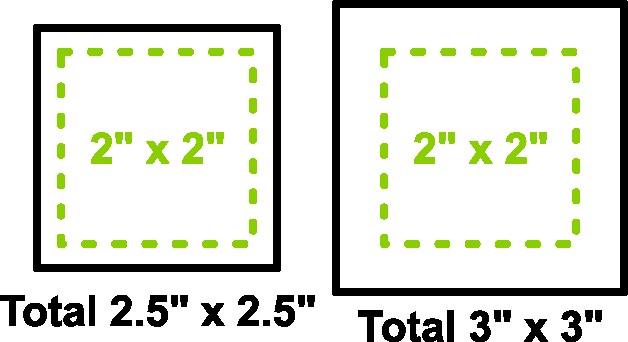
Use woven fabrics for these squares. Ideally, all of the fabrics should be washed before use OR they all should remain unwashed. All fabrics need the same wash status. This prevents uneven shrinking and excess wrinkling when the quilt is washed later.
Once you have your fabrics, you will need to find the grain of the fabric. On a raw edge of the fabric, pull a thread free from along the edge. You may need to pull several threads free to get a straight edge all the way across the fabric. If the threads sticking out of the edge are annoying, trim them back.
- Align the straight edge you’ve just created in the fabric with a line on the cutting mat.
- Pick an area of the mat that you can reach easily.
- Lay the fabric out flat.
- Place the ruler/cutting guide on the fabric 2.5” (or the distance you’ve selected) away from the edge of the fabric.
- Use the grid on the mat to align the ruler so that it is parallel with the fabric edge. Make sure to not move the fabric, and check both ends of the ruler for alignment.
Tip: the rotary cutter can be swapped between left and right handed modes. See the guide for using the Rotary Cutter for more.
- Use the rotary cutter to cut strips out of the fabric.
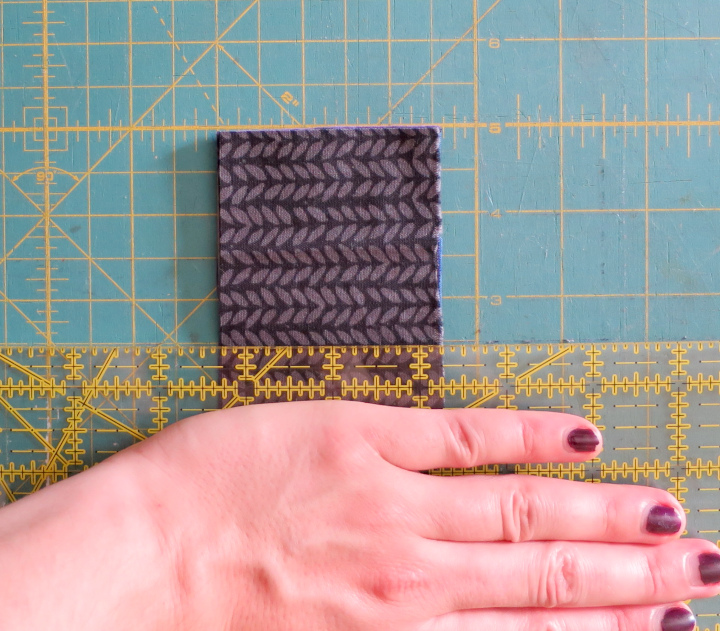
- The ruler is essential for guiding the rotary cutter. Hold the ruler down with one hand. If possible, put your palm flat on the ruler and lean into it in order to hold it securely. Make sure that your fingers do not cross the cutting edge.
- Set the blade of the cutter against the ruler. Hold the cutter so that it is perpendicular to the table and the blade is parallel with the ruler.
- Push down and forward firmly as you guide the cutter along the ruler.
- Watch out for your fingers and don’t let the ruler wobble!
- Repeat this for every fabric you intend to make squares out of.
These strips should have the width you’ve chosen for your squares. If they are too wide, use the ruler and rotary cutter to trim them now. If they are too narrow, make a new strip or narrow all of the strips to match the width of the smallest one. If they’re all the same wrong width, measure them so that you know what size to cut the squares to in the next step.
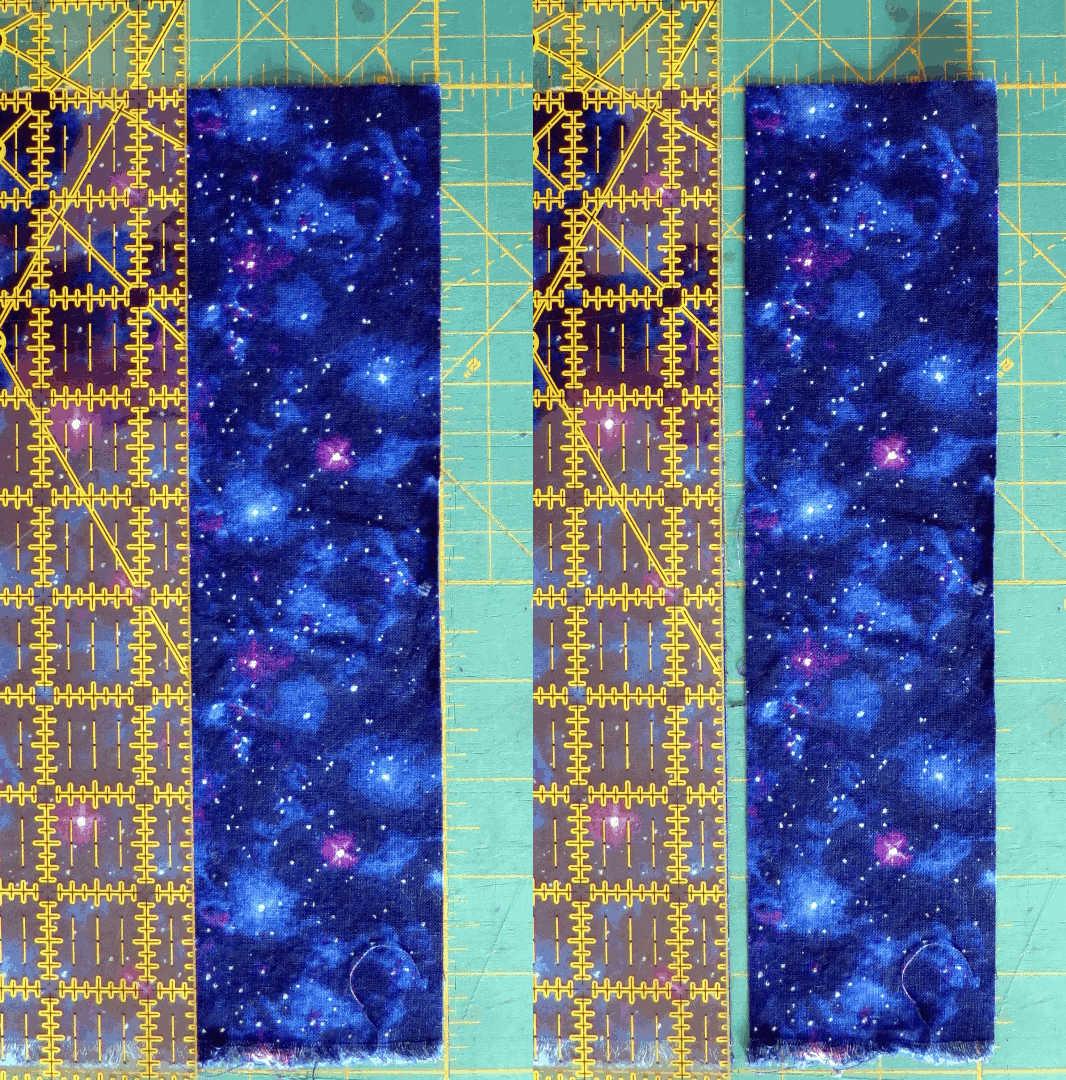
Now we will cut the strips into squares. There are two methods: cut every strip individually or stack them and cut them all at once. The first method is slow. The second method risks having the stack slide during cutting and creating non-square pieces of different sizes.
They use the same technique:
- Align a strip with the grid on the cutting mat. Make sure both the short edge and the long edge are aligned. If stacking the strips, stack the strips now.
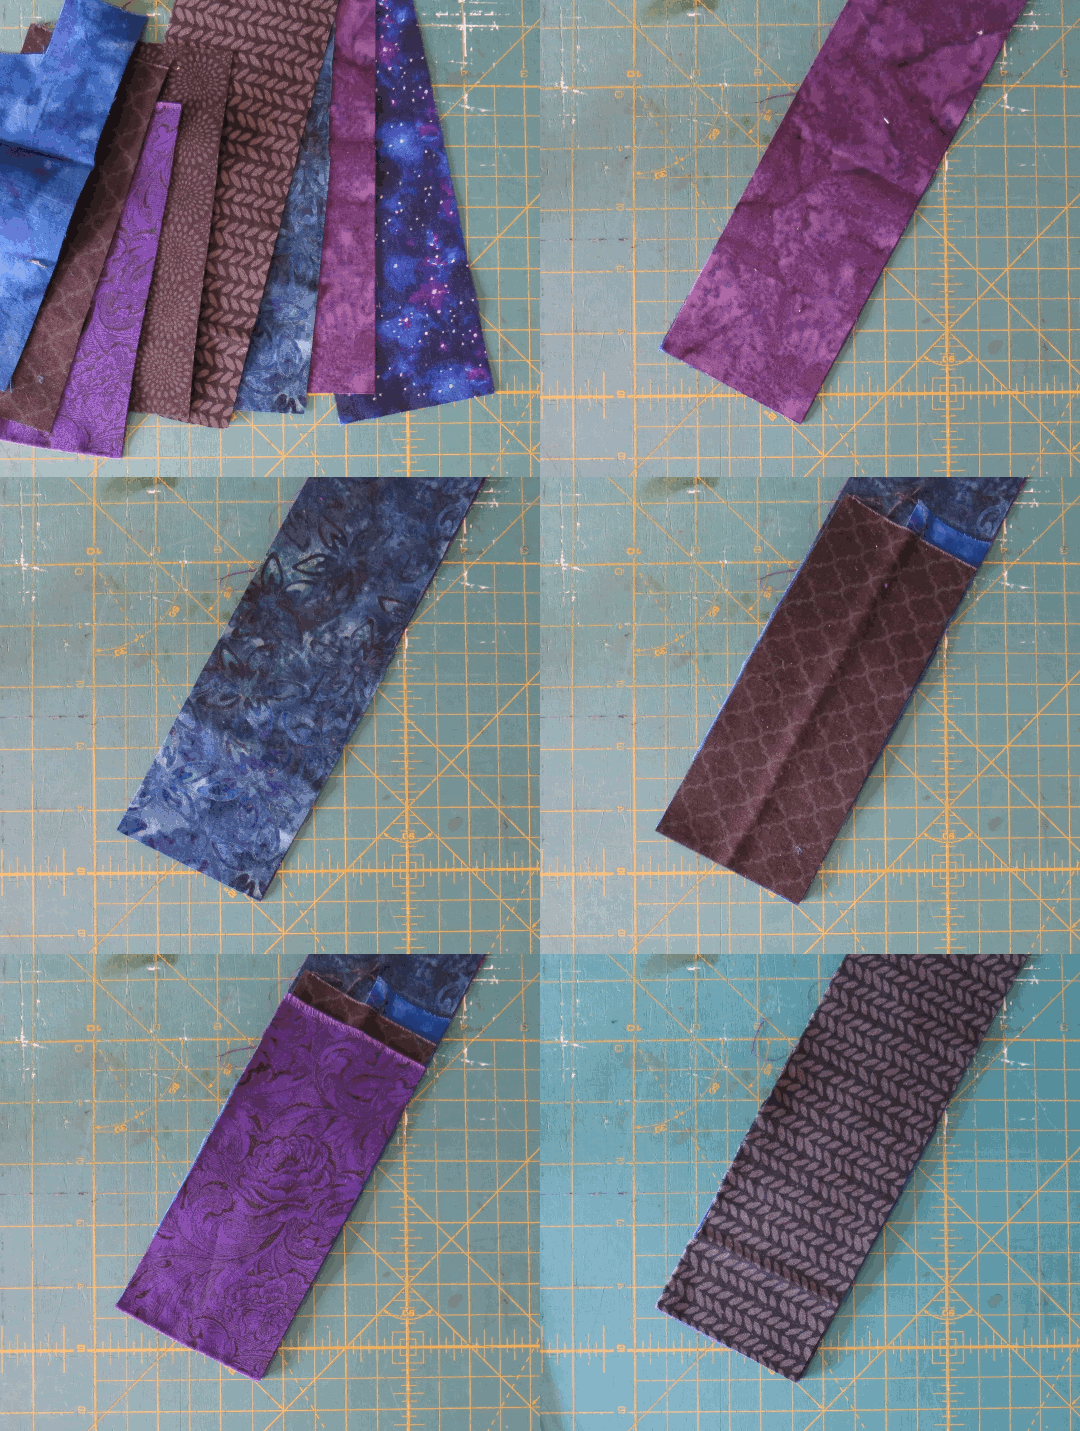
Repeat this until you have all of the squares that you want cut out.
¶ Making the Block
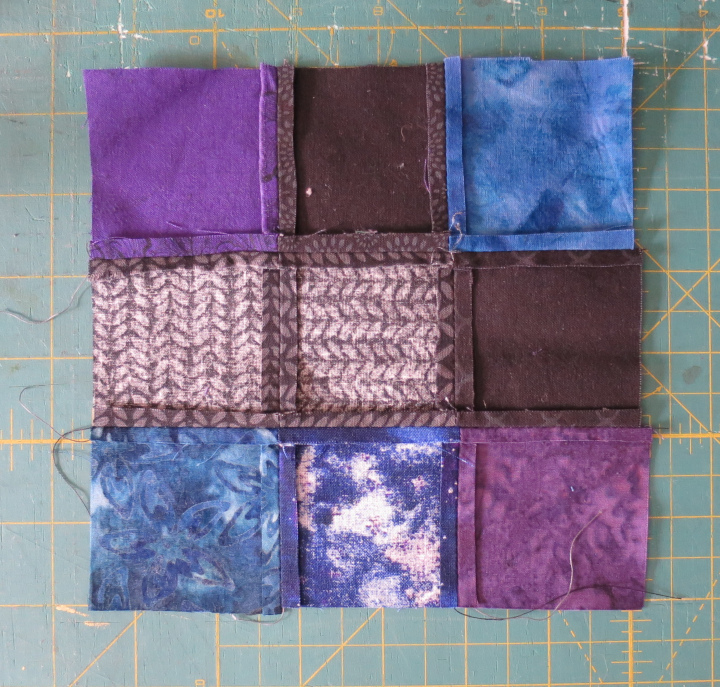
Now that you have nine squares, we will move on to sewing the block together. The squares are joined into strips which are then joined together to create the block. Each strip is made out of three squares.
Lay the squares out on the work surface and arrange them into the design you want.
The method for joining two squares, or a square to a strip with two squares is:
- Select two adjacent squares.
- Put them right sides together and pin or clip them with the edges of the pieces aligned.
- Then sew them together at the seam allowance that you’ve chosen.
- There is no need to backstitch or lock off these seams. The ends will be sewn into other seams in future steps.
Tip: placing pieces back into the layout after they’re sewn helps preserve the layout.
Tip: if you prepare multiple seams for sewing then you can zip through them very quickly.
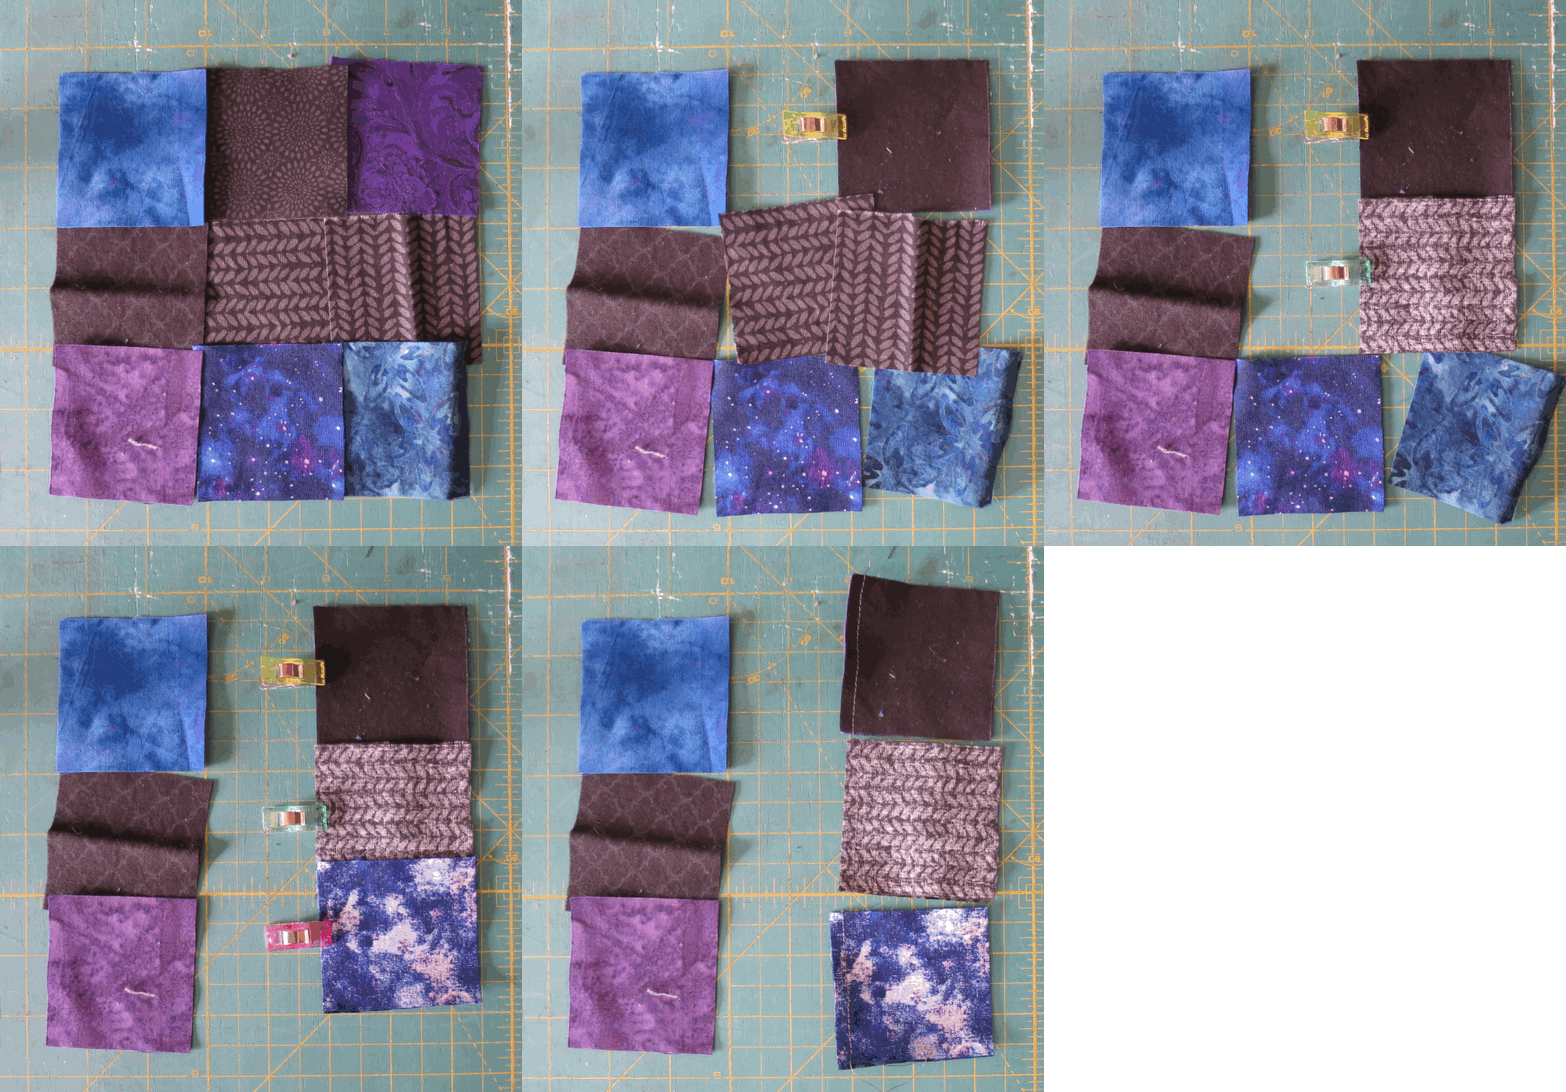
Repeat this for the other squares until you have three strips.
Once you have all three strips, press the seams open. Open means that the tabs or flaps of the seam allowance are pressed away from each other and flat against the fabric of the piece that the seam allowance belongs to. Pressing the seams open will make the strips lie flat and make them easier to sew during the next steps. Ultimately it will result in a neater looking quilt block.
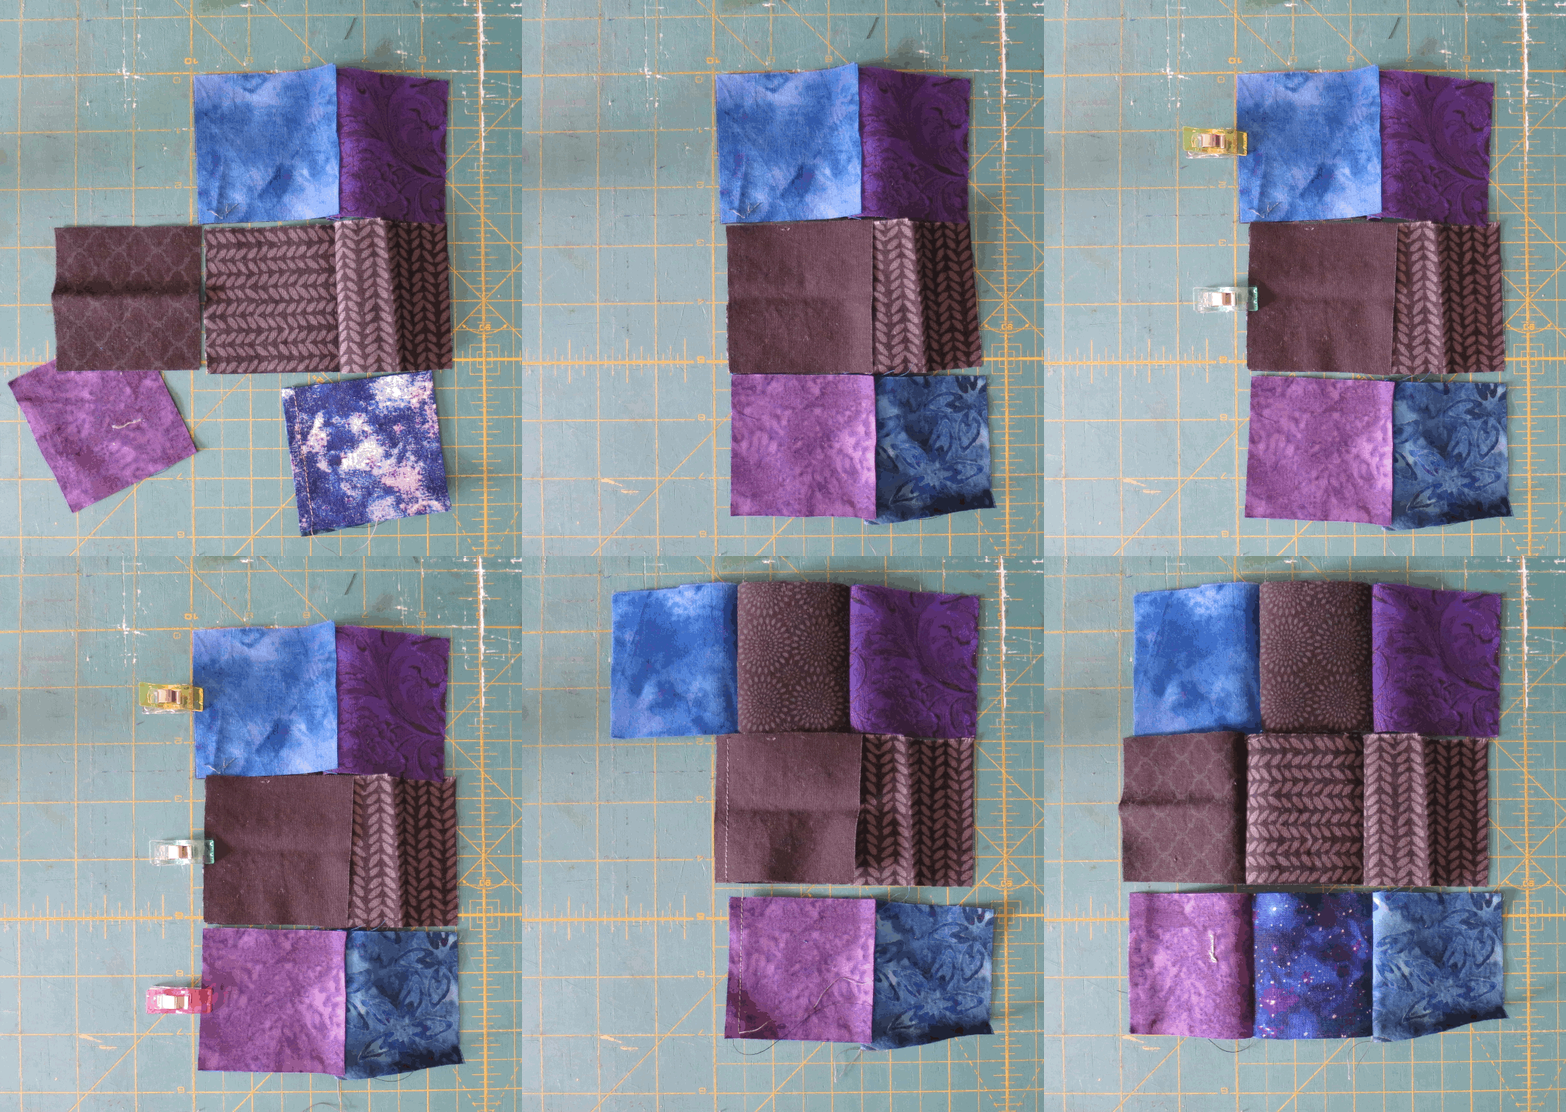
Select two adjacent strips. Put them right sides together with the edges aligned. Make sure the seams between the squares align. Pin/clip and sew them together at the seam allowance that you’ve chosen. There is no need to backstitch or lock off these seams.
Repeat for the last strip.
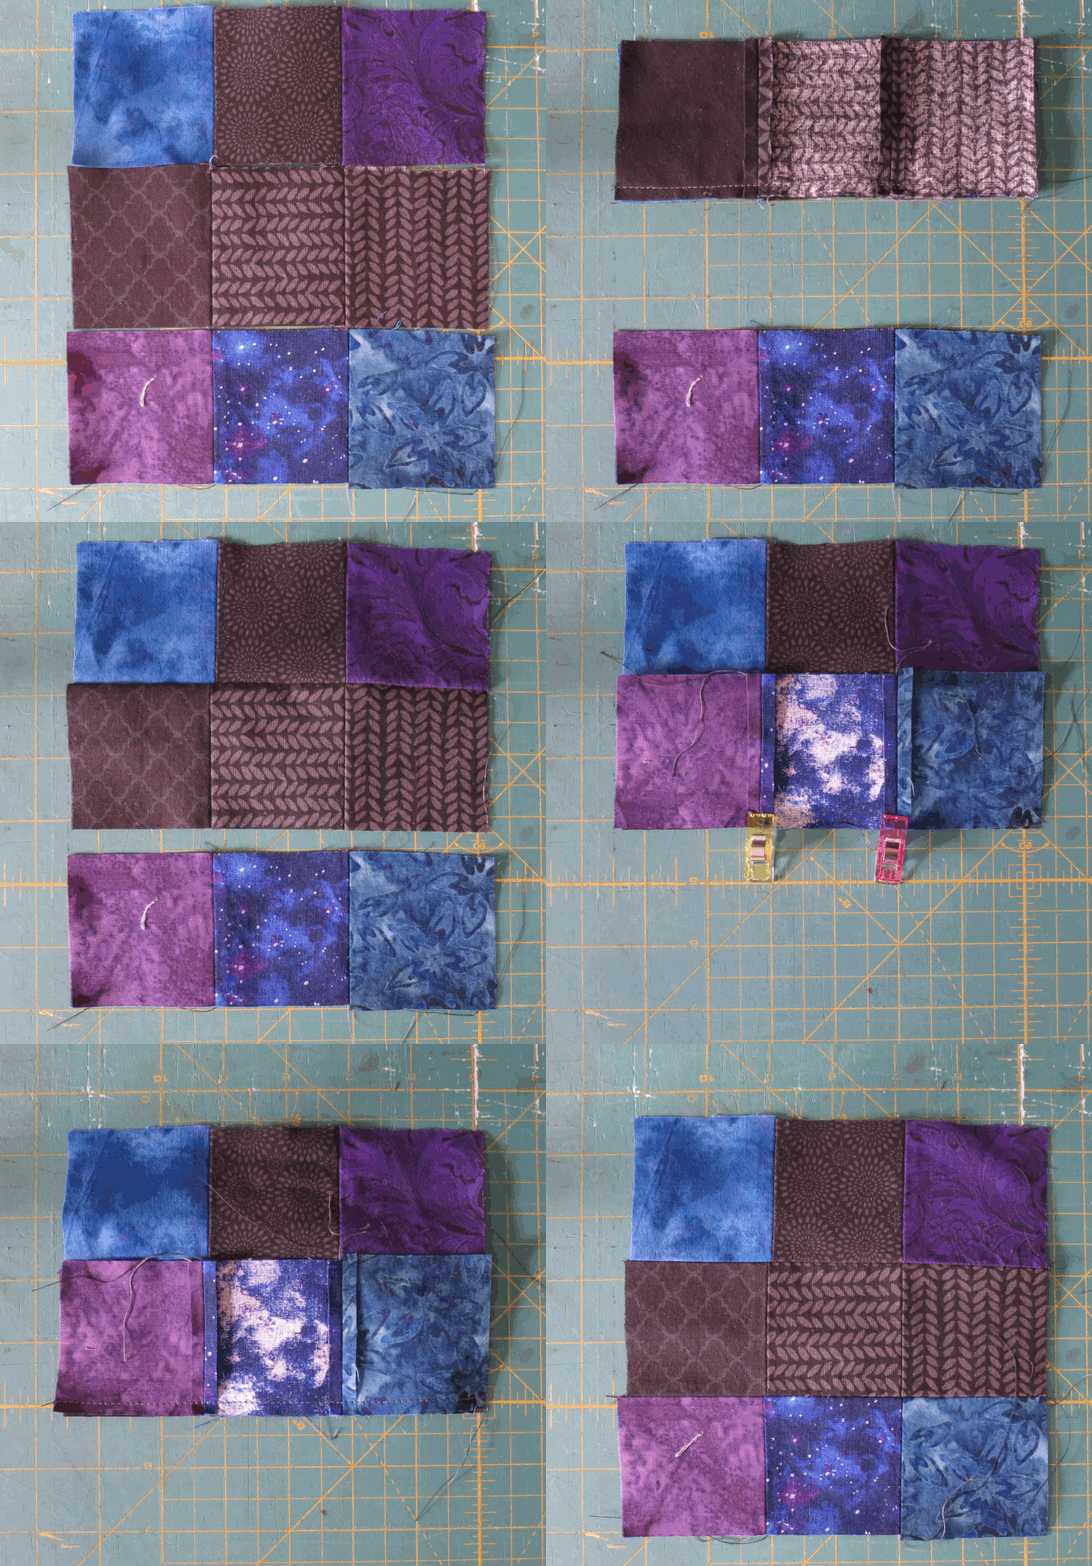
Press the seams open.
Now you have a quilt block!
¶ Bonus: Applique
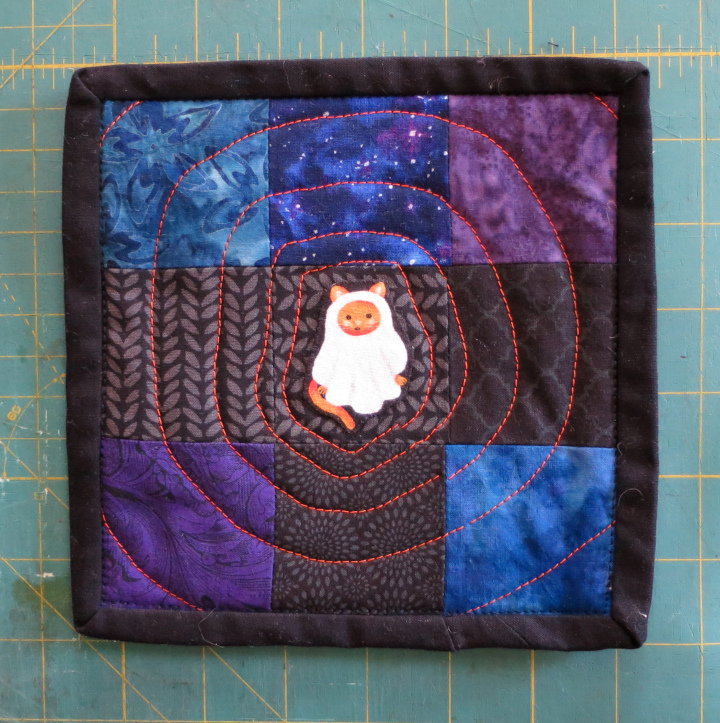
If you intend to apply any decorations to the top of the quilt, do that now. A common technique is called applique, where another piece is sewn directly to the top of the quilt top. Here, a cat was cut out of another piece of fabric, the raw edges turned under, and hand sewn to the quilt top. There are many methods of applique- search online for tutorials.
¶ Cutting the Back and Batting
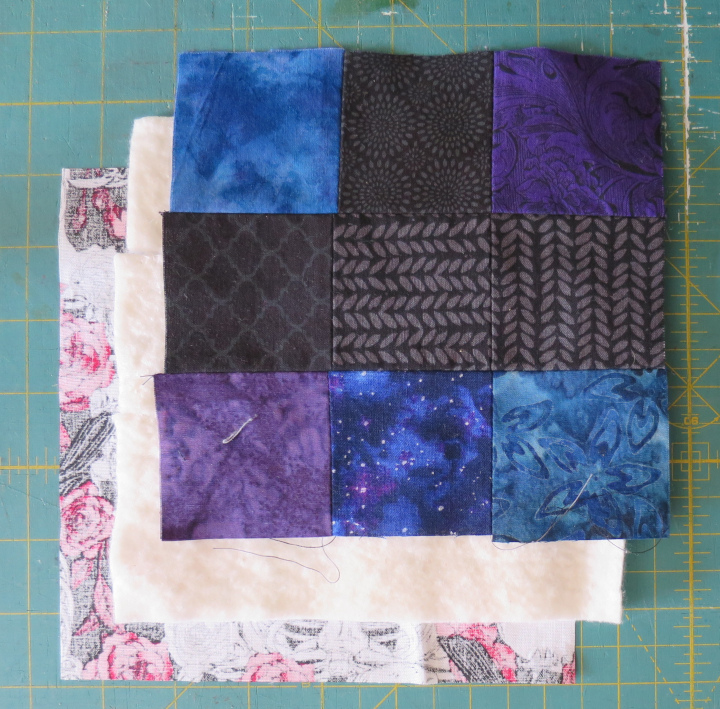
Much like the squares, start the back by finding the straight edge of the fabric. It will be cut out the same way that the squares for the top were except it is one square that is the size of the quilt block. It should be 6” plus two times your chosen seam allowance or the size of the quilt block you just made, whichever is larger. Here it is better to cut larger than necessary because the excess will be cut off later.
Do the same for the batting. Batting does not have a straight edge/grain so there is no need to find it. Simply cut a square that matches the backing–you could just trace the backing you cut and cut that shape out.
¶ Basting
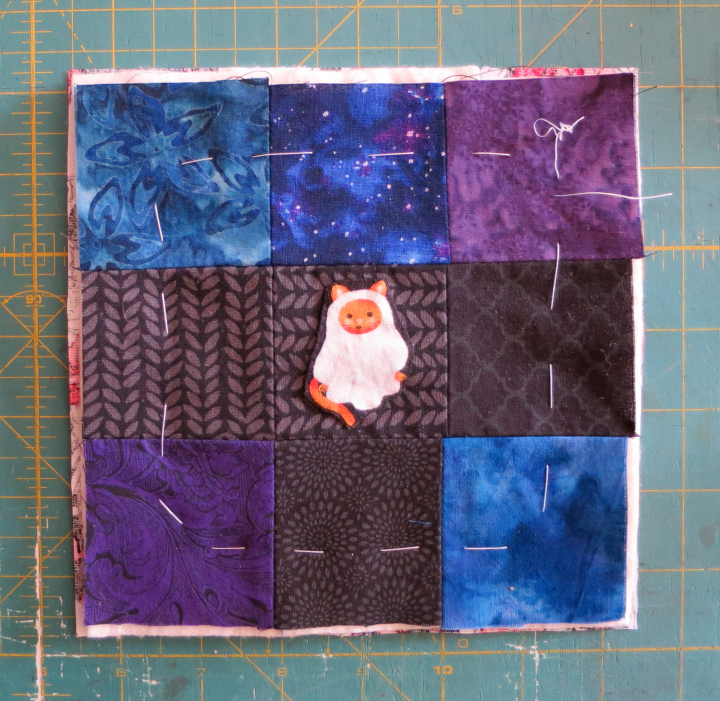
Basting is the process of temporarily stitching together layers of material to keep them from moving relative to each other while the quilting is being done.
Basting stitches are typically very long and loose. If done by machine, use the longest stitch setting available. If done by hand, maximum stitch length is about one half inch. A contrasting color of thread is often used in order to make finding it to remove later easier.
- Stack the top, batting, and backing. Make sure that the top and backing are facing right sides out, away from the batting.
- Pin the layers in place or clip the edges.
- If hand sewing, thread the needle. There is no need to knot the thread. Use a running stitch.
- Pick a spot and start sewing. If hand sewing, leave a long tail.
- Remove the pins/clips before proceeding.
People often sew in a circle, square, a grid, or another pattern that won’t interfere with the quilting design. The goal is to keep the layers from moving relative to each other.
¶ Quilting
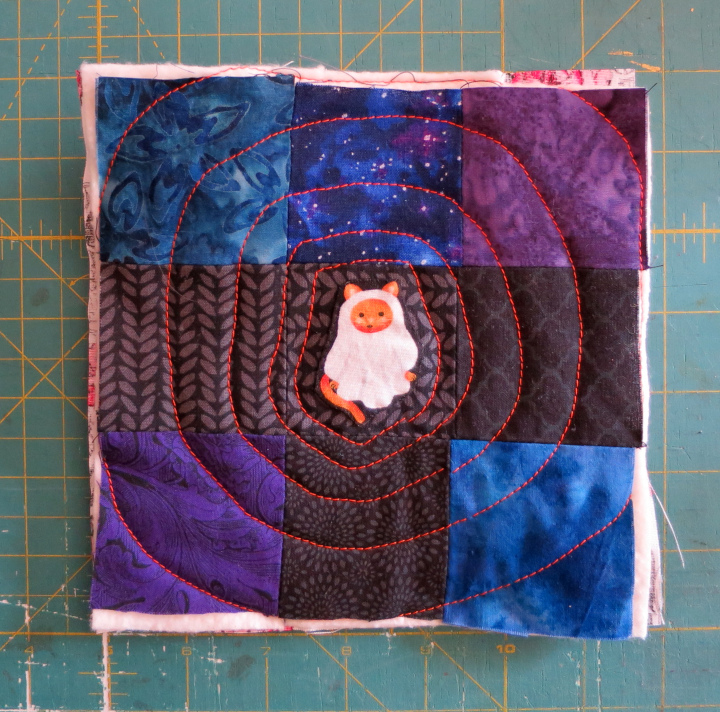
Come up with a design for the quilting. It can be purely functional, or decorative. If desired, use chalk to sketch the design onto the quilt top.
If needed and available, swap the presser foot out for a free motion quilting foot. The free motion foot makes it easy to move the material in any direction. If the free motion quilting foot is not available, reduce the pressure and stitch slowly so that you can turn the material and follow the design.
When done stitching, remove the basting. Cut the basting thread as needed to pull it free. Be sure not to cut the quilt top or bottom.
If there are loose thread ends from the quilting that won’t be covered by the binding, use a sewing needle to bury the ends between the layers of the quilt.
¶ Trimming
Now that the layers are secure, it’s time to trim the excess off. There may have been some shifting or relocation during the sewing and quilting processes. The goal is to make the quilt into a square (or at least a regular and neat shape) again.
- Find the best side and position it along a line on the cutting mat. The best side is the one that has the smallest differences across the layers and needs the least trimming. Align the quilt against the line so that the edges of the layers that don’t agree will be cut off but also so that you are making the smallest possible cut. The edges of the layers may stick out over the lines on the mat.
- Align the ruler with the line on the cutting mat. The ruler should be on the quilt.
- Using the rotary cutter, cut that edge along the ruler.
- Repeat that process for the other sides, using the first side as a reference to make sure it turns out square.
¶ Make the Binding
The binding is the strip of fabric that goes around the edge of the quilt and covers the raw edges of the top, batting, and back. If you’ve purchased binding, you can skip ahead to the section “Apply the Binding”. If you’re making your own but you have enough fabric to make it in one piece, be sure to cut the ends at an angle and fold it in half the long way–details are in the instructions below.
¶ Cutting the Strip(s)
Working with another piece of fabric, find the straight edge and align that edge with a line on the cutting mat. Using a ruler and a rotary cutter, place the ruler at 2.5” (or the width of the squares you cut earlier) from the edge of the fabric, using the cutting mat to align it, and cut strips off of the fabric with the rotary cutter.
The total length of the strips needs to be 30 inches MINIMUM. You will need extra if you need to sew pieces together to create the full length– some will be lost to seam allowance in that process–and it is good practice to make extra length because it’s really annoying to have to add more later. Instructions to join strips are below.
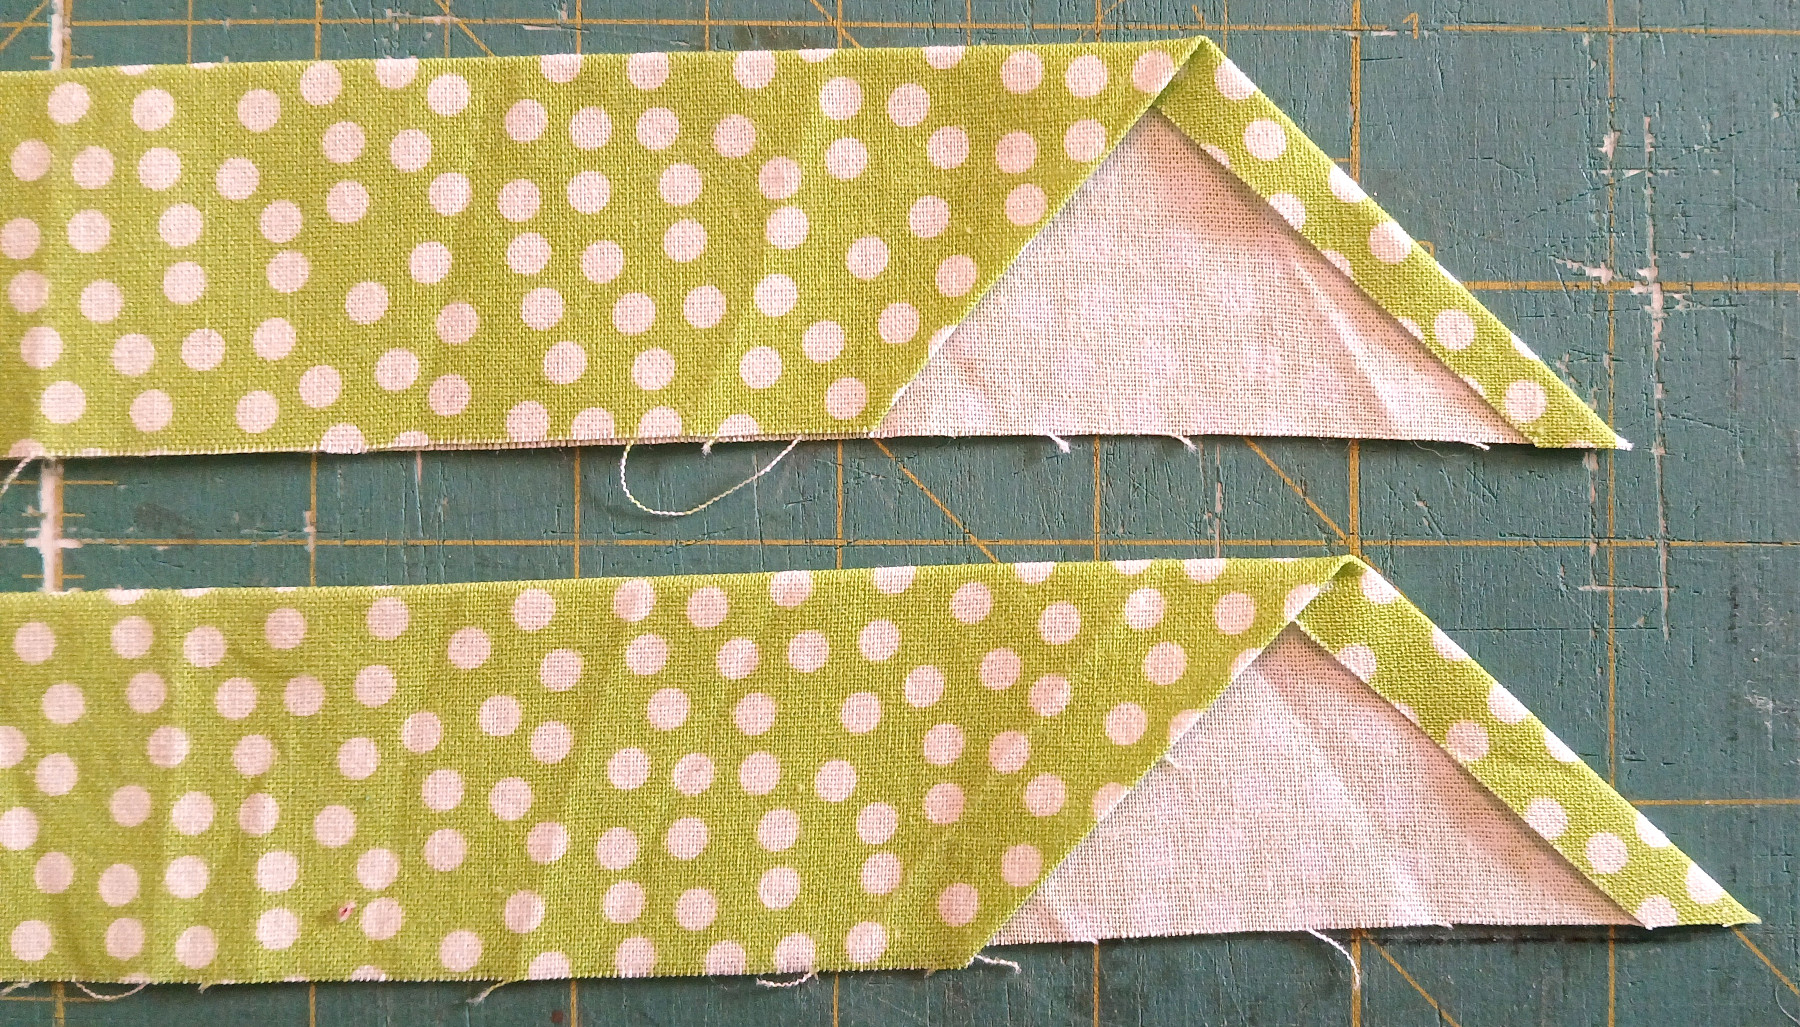
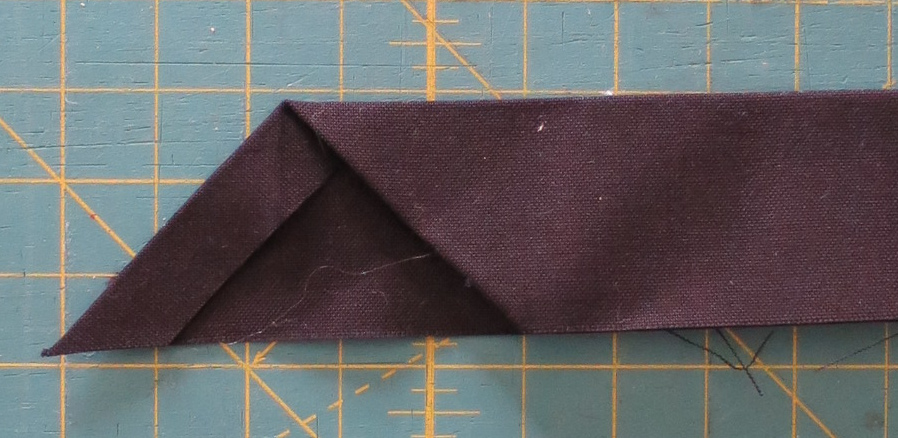
Once you have a 30+ inch long strip, cut each end off at 45°. The ends should be cut so that they’re parallel. For example, if you made the strip into a loop, the points would not touch but instead the ends would fit neatly together. Then fold the end back a little ways, parallel to the cut, and iron it into place. Then fold the entire strip in half the long way (hotdog style) with wrong sides together and iron it to set the fold.
When the strip is done, the ends will look similar to this.
¶ Joining Strips
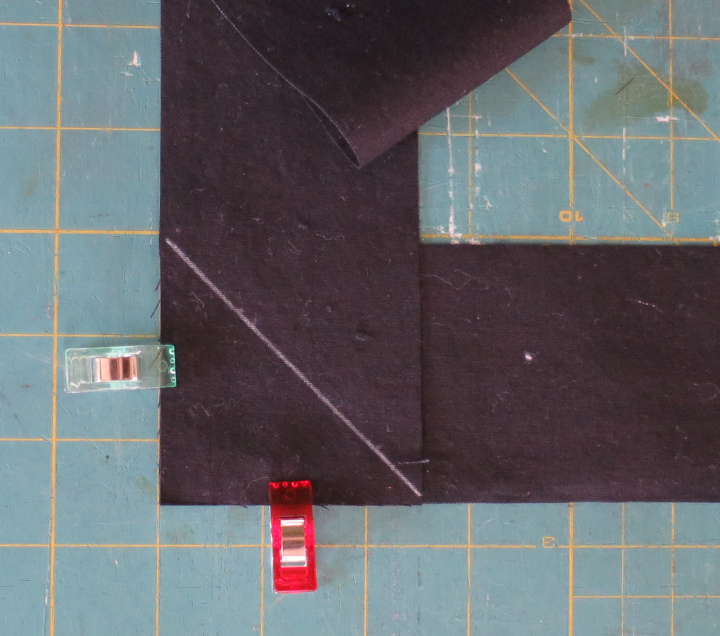
To join strips:
- Position the ends of the strips at right angles to each other. The end of both strips should stick out one seam allowance beyond the edge of the other strip. This offset makes the strip come out straight. Use the lines on the cutting mat as a guide.
- Using the ruler and chalk, mark a diagonal line from corner to corner across the strips.
- Clip or pin the layers together.
- Sew along the line. Do not add a seam allowance.
- Once sewn, trim the triangles off of the corner.
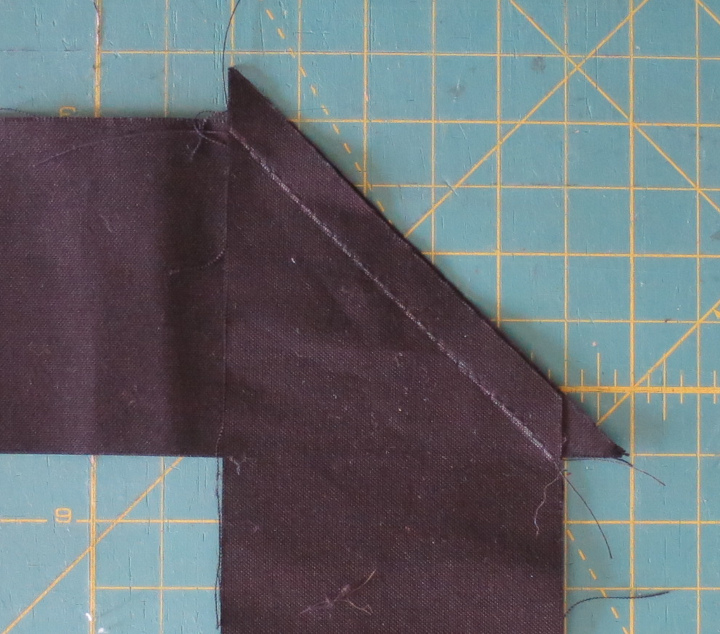
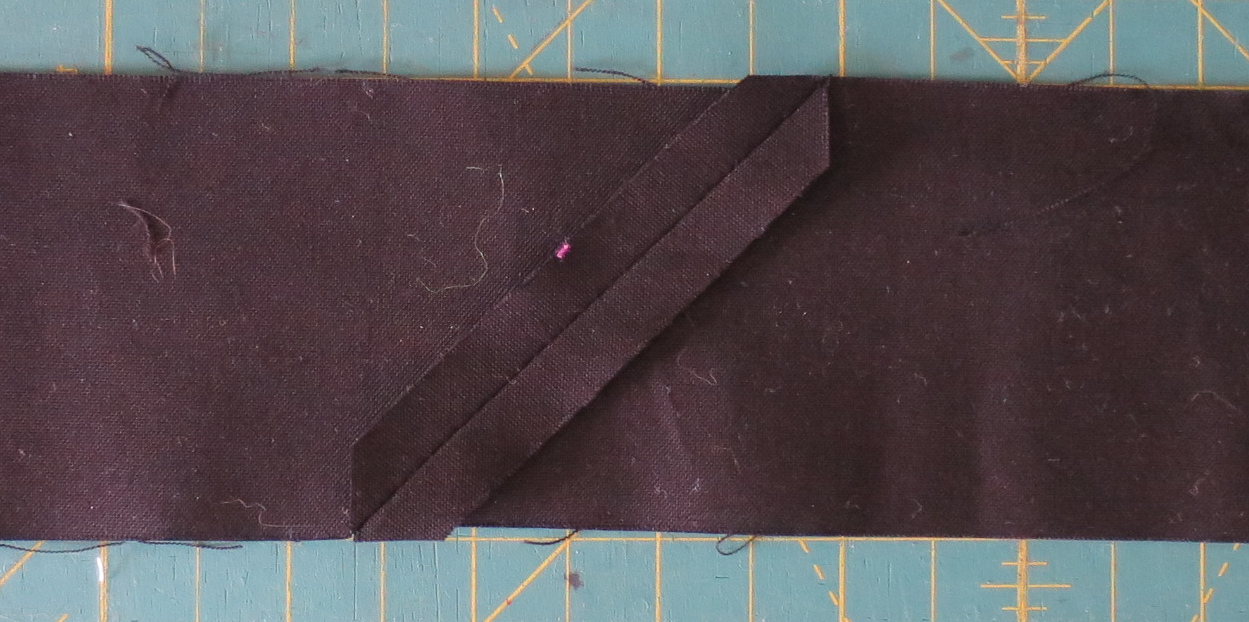
Tip: This seam is on the diagonal in order to avoid a bulky seam when applying the binding later.
¶ Apply the Binding
Once you have the strip, fold it in half the long way (hotdog style). Iron it to set the fold.
Open one end and cut it at an angle. Fold the raw edge back. Iron it into place. Iron the long fold in that area again.
¶ Apply the Binding
The binding joins and covers the raw edges of the quilt top, batting, and back. It is sewn on from the top, wrapped around to the bottom, and then sewn into place.
We will pin the binding into place before sewing anything because this quilt is so small. The bindings on large quilts are typically sewn without being pinned because pinning a large quilt is a lot of work and makes handling them a lot more dangerous.
¶ Pinning the Binding
It's fine to use the clips for this as well.
- Pick the center of one edge of the quilt to start on. This is easier than starting at a corner and avoids making one corner bulky.
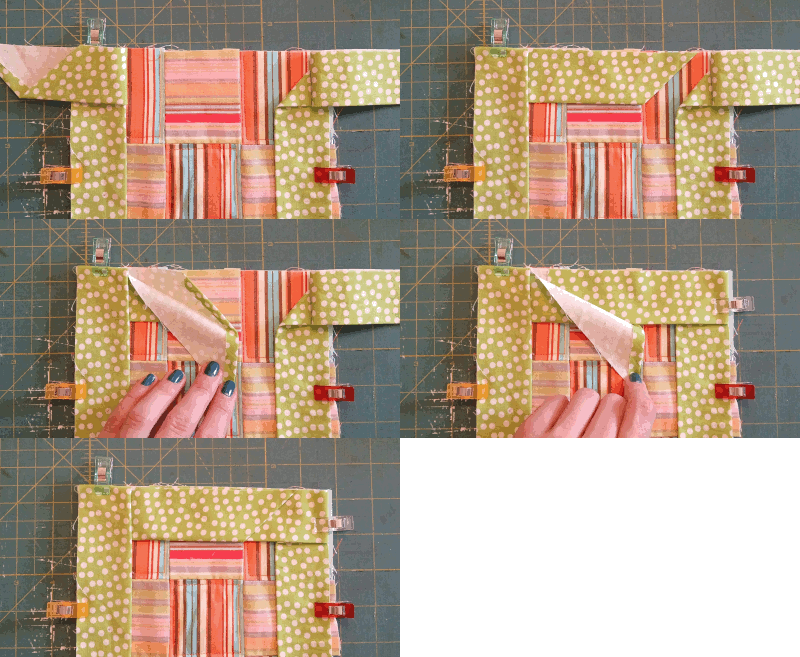
- Work one edge at a time. Align the raw edges of the binding with the raw edges of the quilt. The binding will be entirely on top of the quilt at this time.
- Place a pin or clip a little way from the start of the binding. See the arrow in the picture.
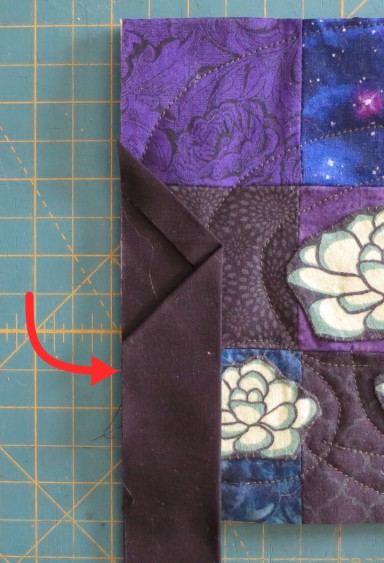
Tip: Start the seam where the arrow is pointing in the image, a little ways after the binding starts to overlap itself and have two layers instead of one.
¶ Mitering the corners
This produces a neat 45° fold at each corner of the quilt.
- Turn the binding at the corner of the quilt. It will create a 45 degree fold hidden underneath the new direction of the binding.
- Align the corner in the binding with the corner of the quilt.
- Place a pin or clip to hold the corner as you continue.
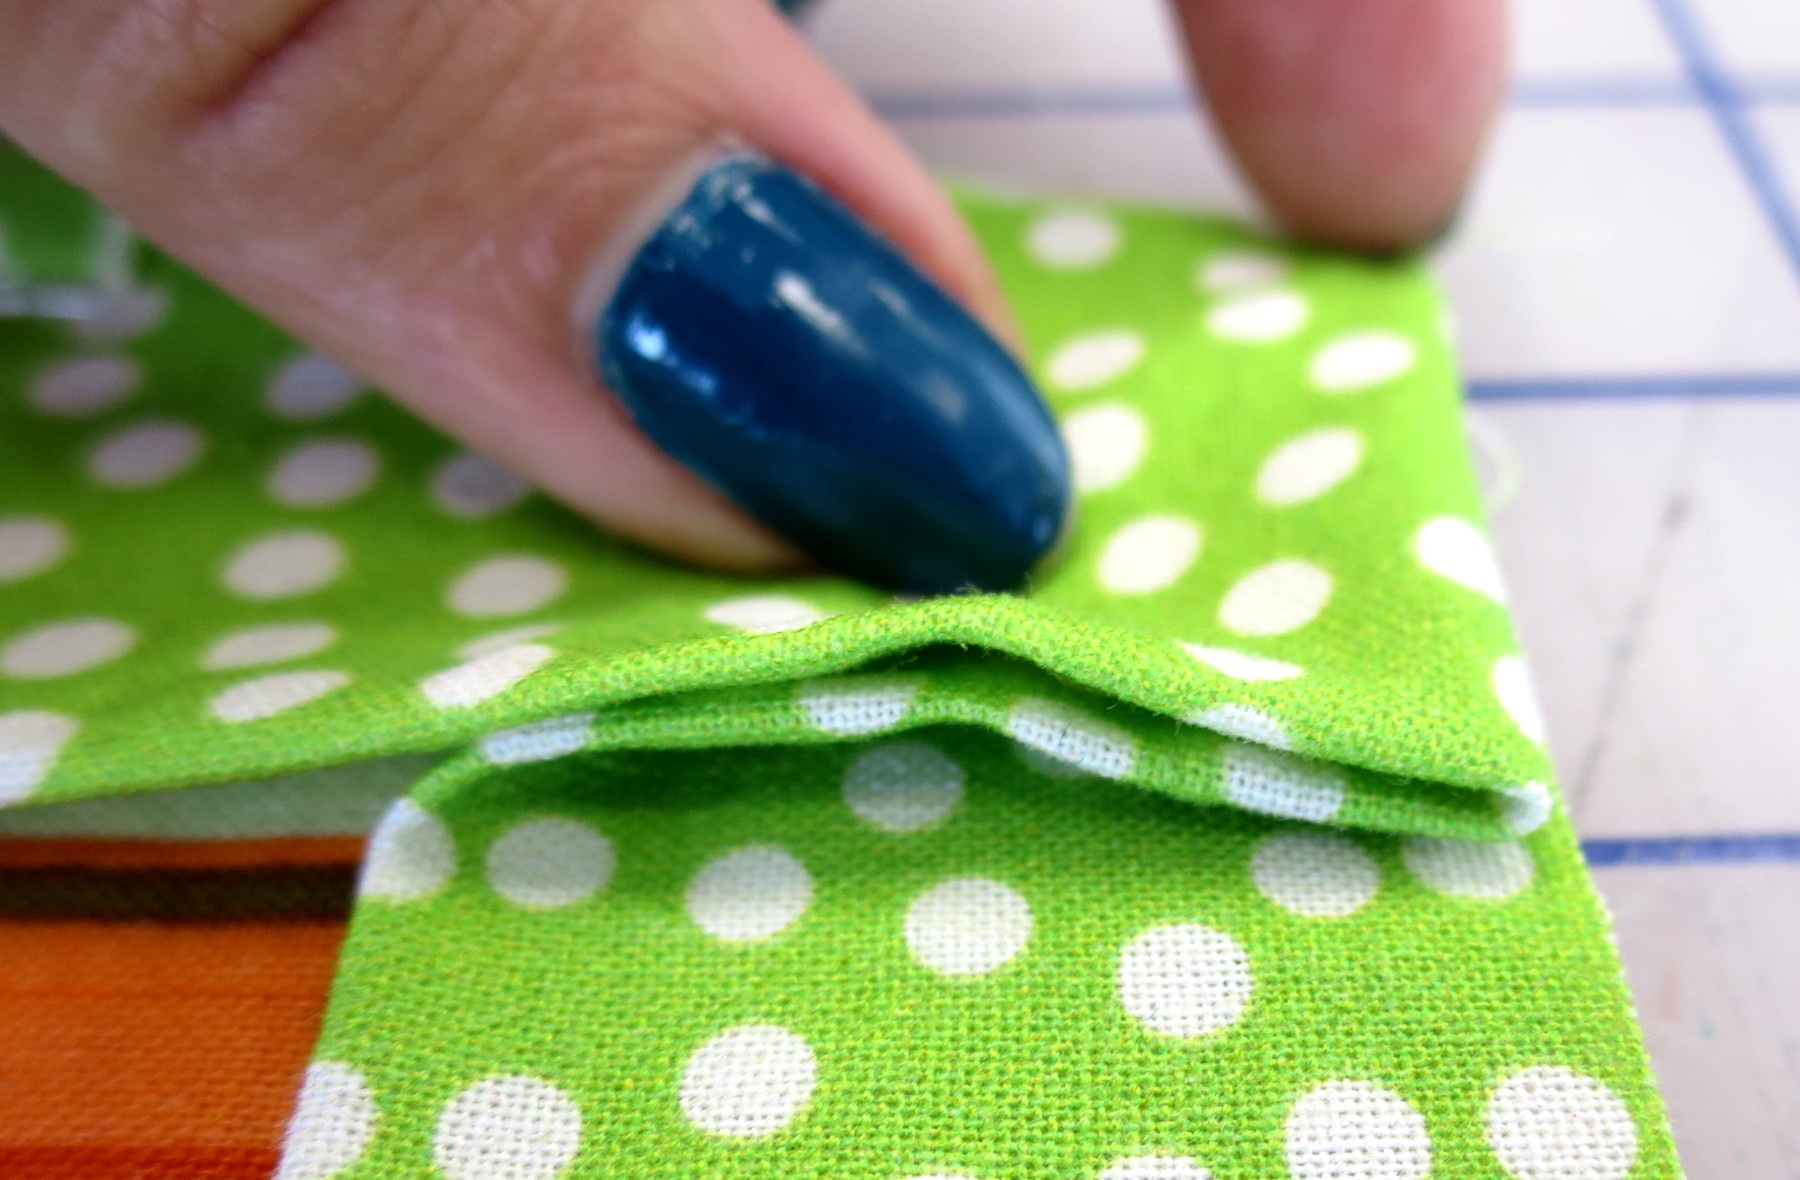
Tip: the fold created in the binding should be perfectly parallel with the edge underneath it.
¶ Tucking the binding
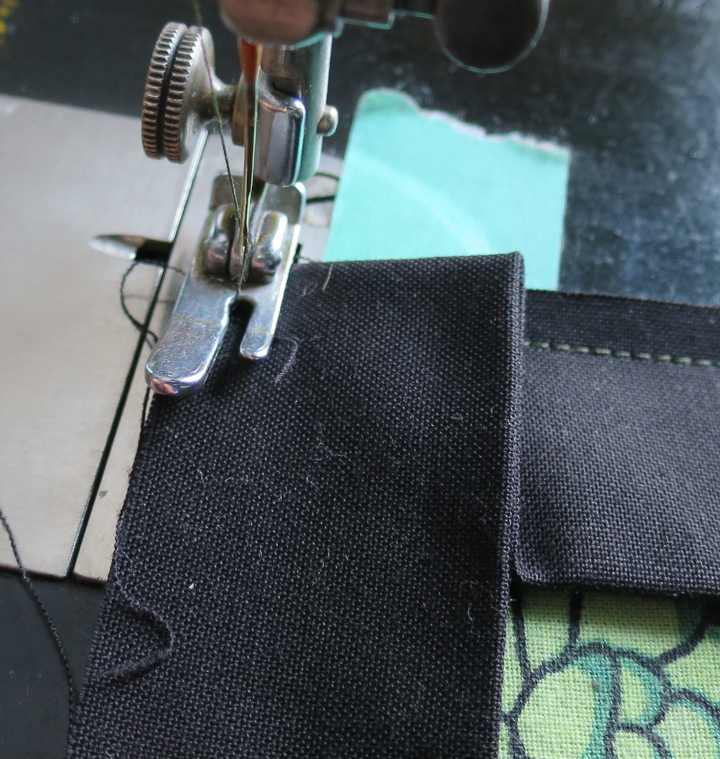
This creates a neat, no-sew join between the beginning and end of the binding.
- Go as far as you can without overlapping the beginning.
- Make sure that the end will fill the entire space left open by the diagonal cut at the start of the binding. Leaving at least an inch extra, cut the binding to length.
- Tuck the end of the binding inside the start. Make sure that both ends of the binding are parallel with the edge of the block and do not have any lumps or wrinkles in them.
- Pin or clip in place.
¶ Sewing the Binding (Top)
Now that the binding is pinned to the quilt block, we will start sewing it in place. Because it has been pre-pinned, it is important to be extra careful at the corners so as to not sew them shut.
- Start the seam in the same general area as you started the binding.
- Sew at ¼” or your chosen seam allowance away from the edge.
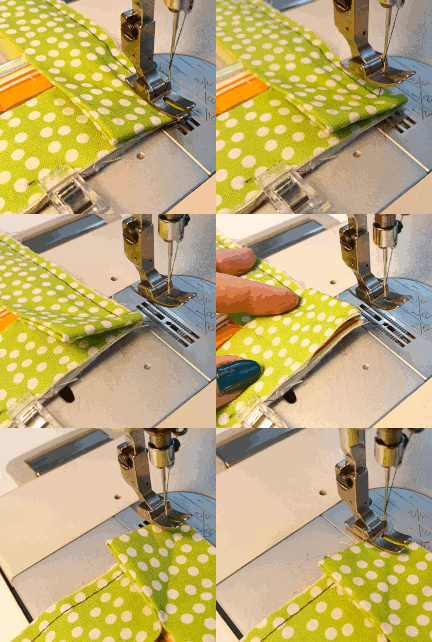
- Go until you reach the fold at the corner. This will be approximately one seam allowance away from the edge. Be careful to not sew the flap/fold down.
- Take your foot off of the drive pedal of the sewing machine. Lift the needle to its maximum height by turning the hand wheel. Raise the presser foot with the knee pad or lever. The quilt should move freely now.
- Pull the quilt a little way away from the presser foot. About an inch will give you room to work and enough thread to get around the fold.
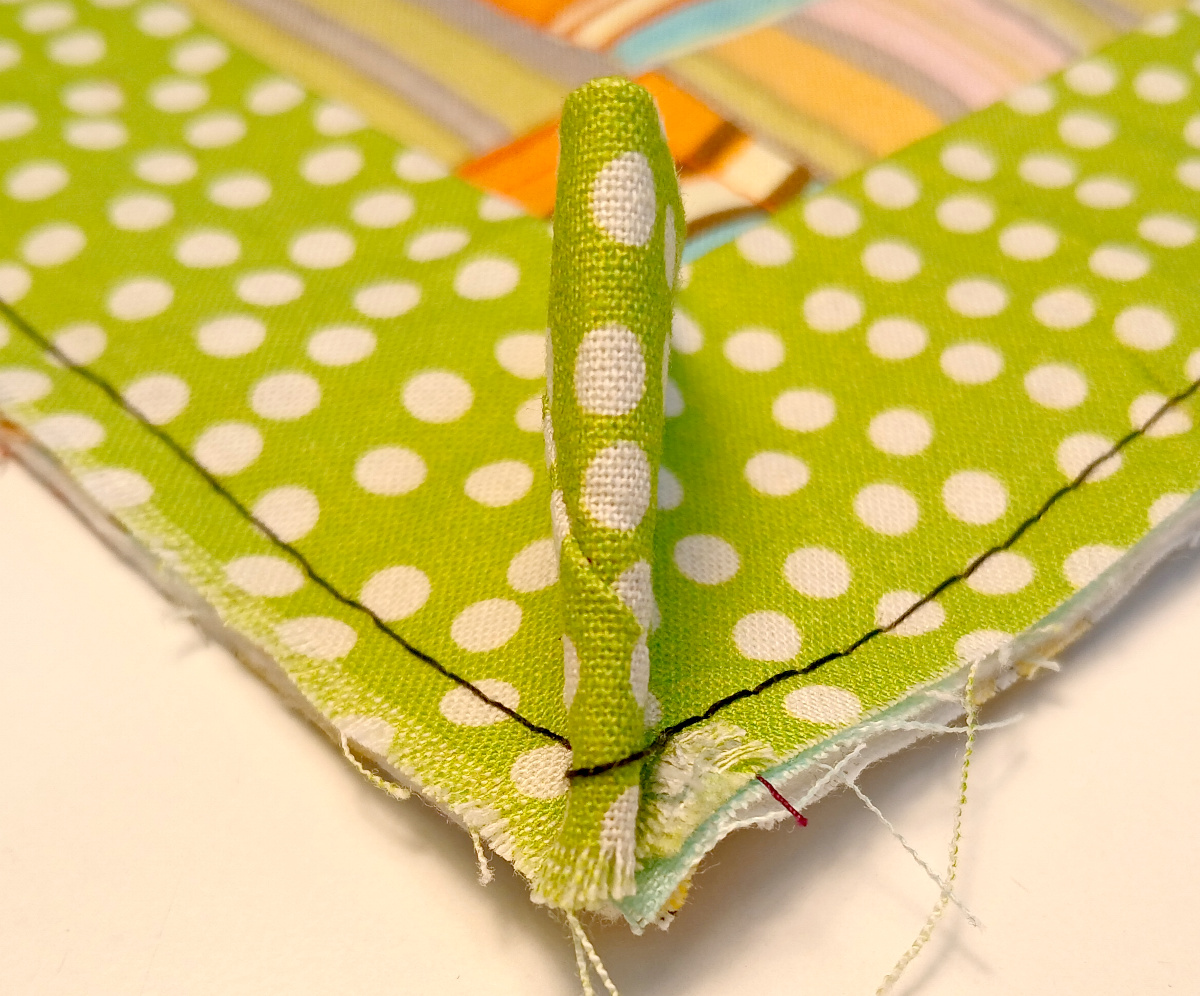
- With the presser foot raised, flip the fold so that it covers the stitching you just did.
- Rotate the quilt so that the next side to sew is in line and ready to go.
- Lower the presser foot.
- Sew until you reach the next corner and repeat steps 4-9 until you reach the start of the seam.
- Overlap the start of the seam by an inch or two.
Tip: the thread will form a little bubble to go over the fold at the corner.
¶ Preparing for the second seam
Now the binding will be wrapped around the raw edges to cover them.
- Working from the top, iron the binding so that it’s sticking out flat beyond the edges of the quilt top.
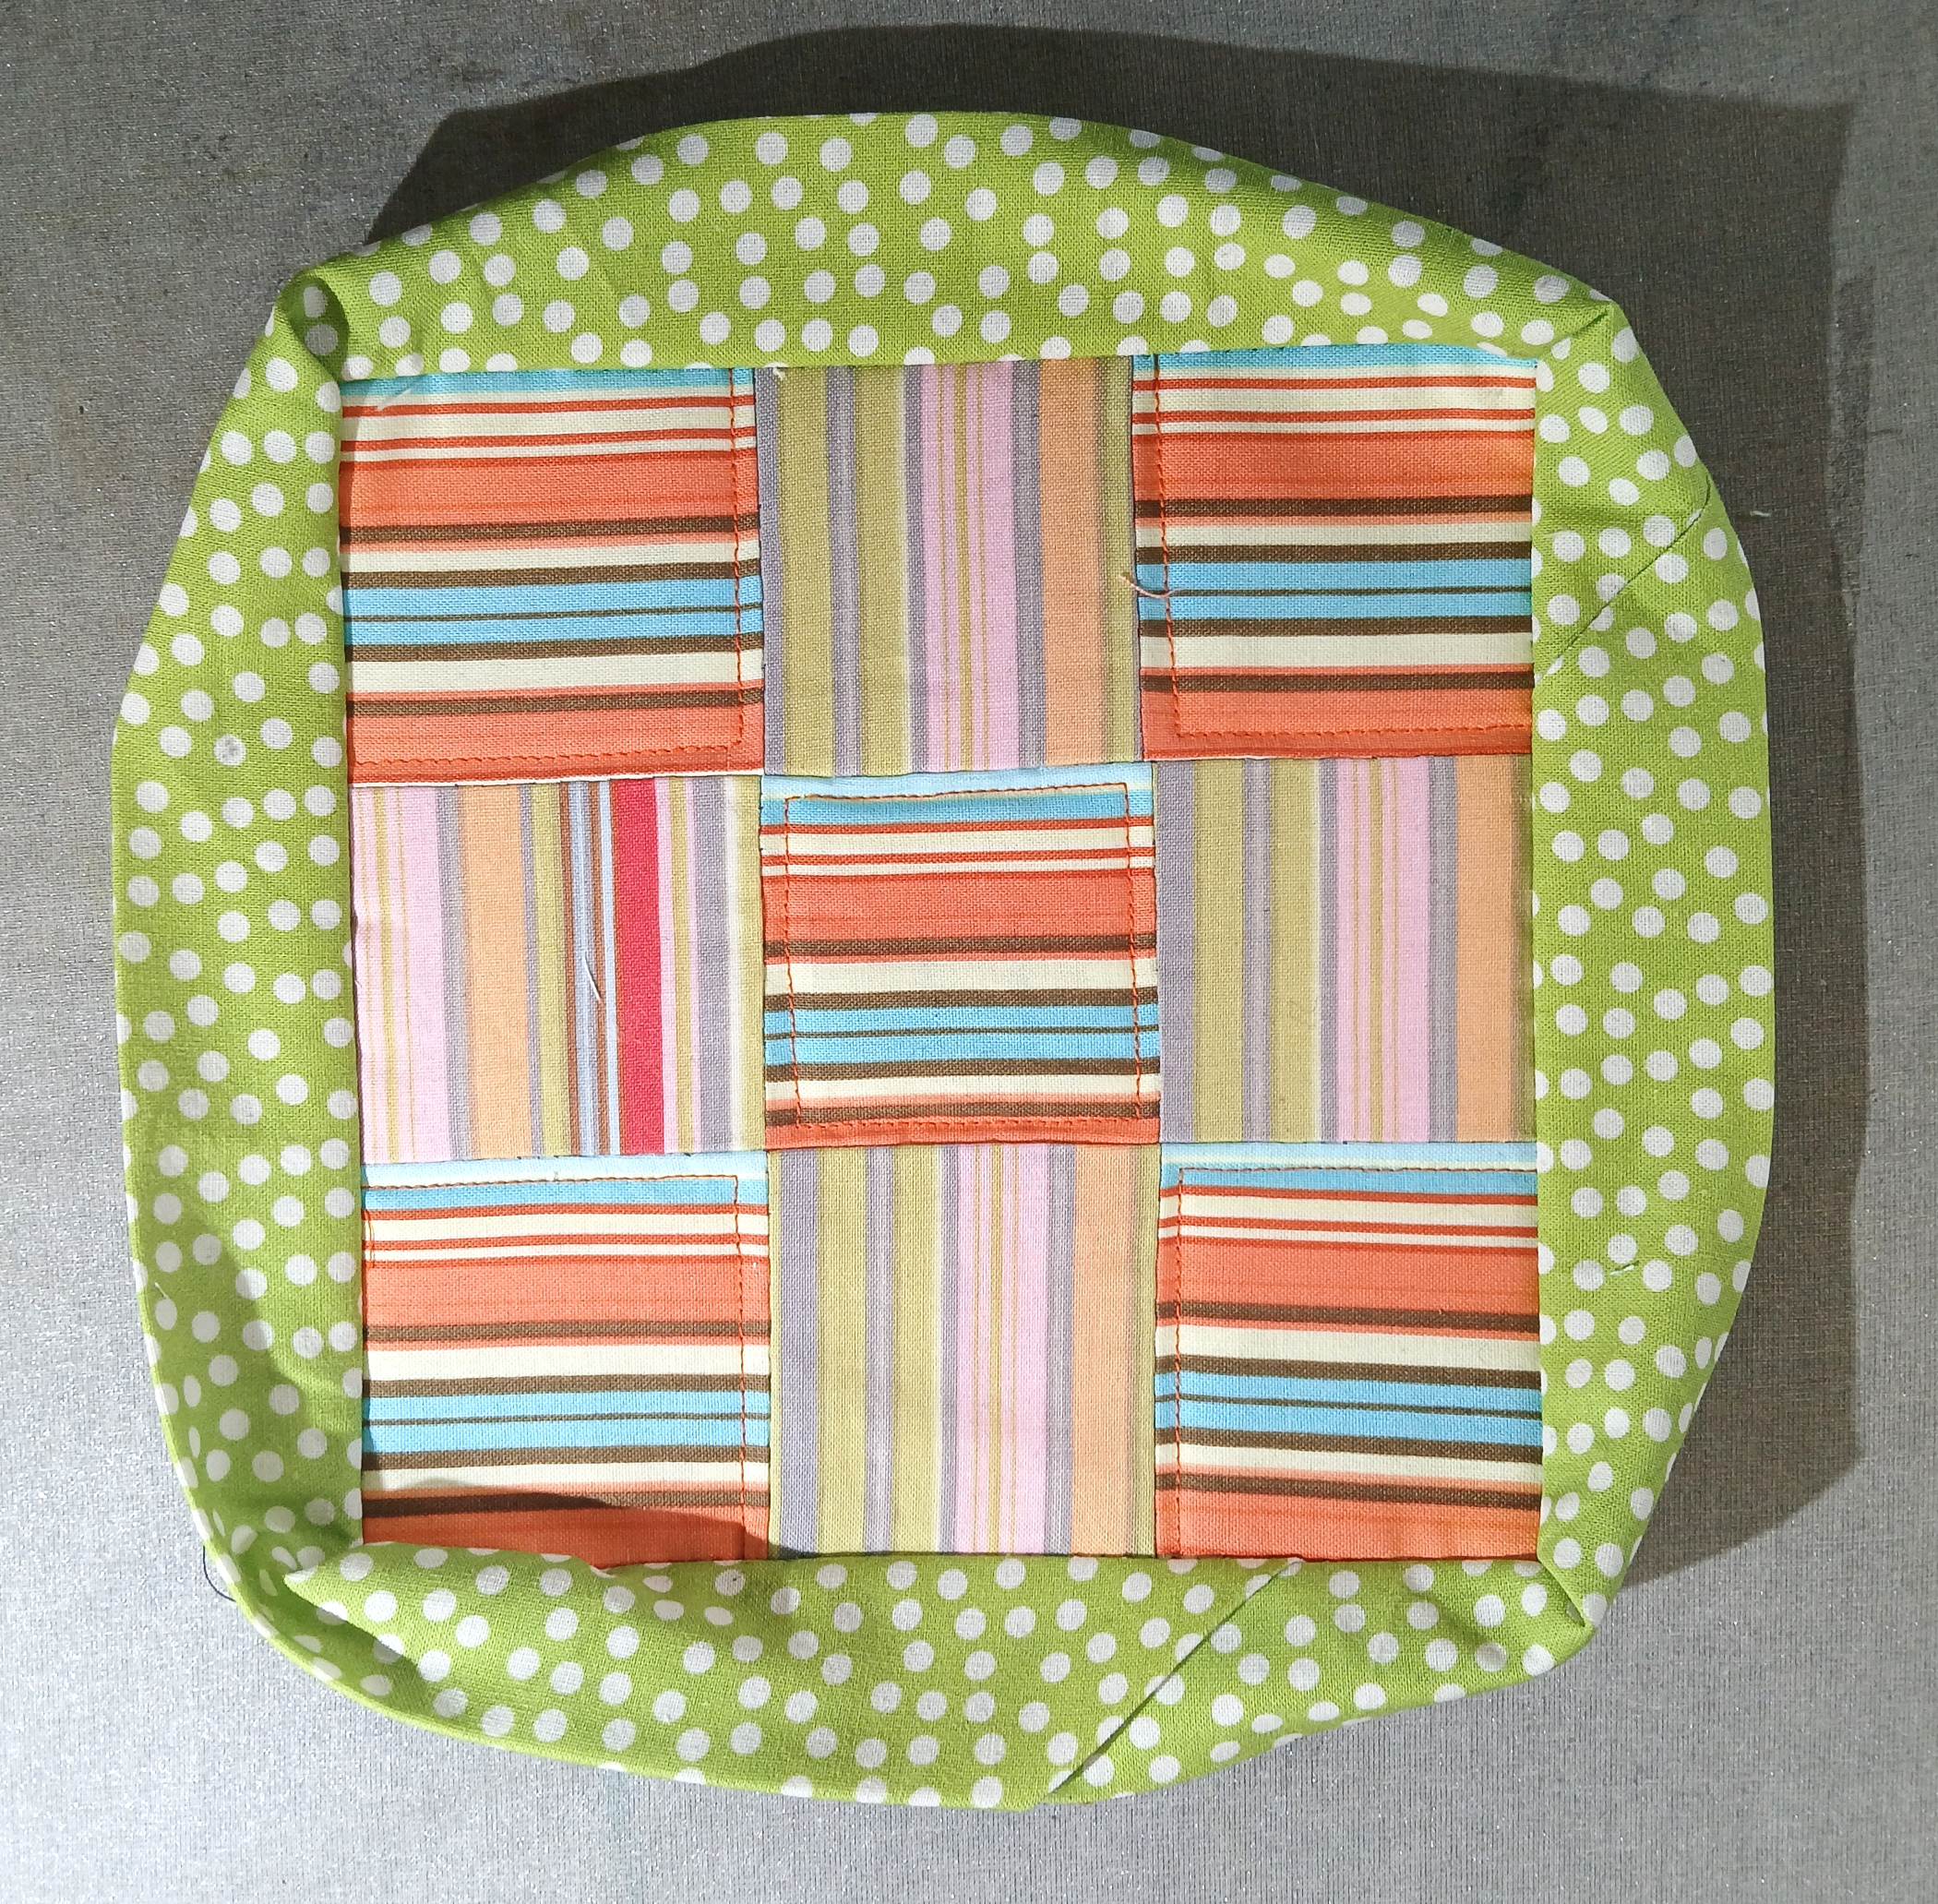
- Flip the quilt over.
- Fold the binding over to cover the raw edges. The edge of the binding should cover the seam holding it on by at least 1/8th inch. If the binding doesn’t cover the seam, there’s a tip for fixing it just below.
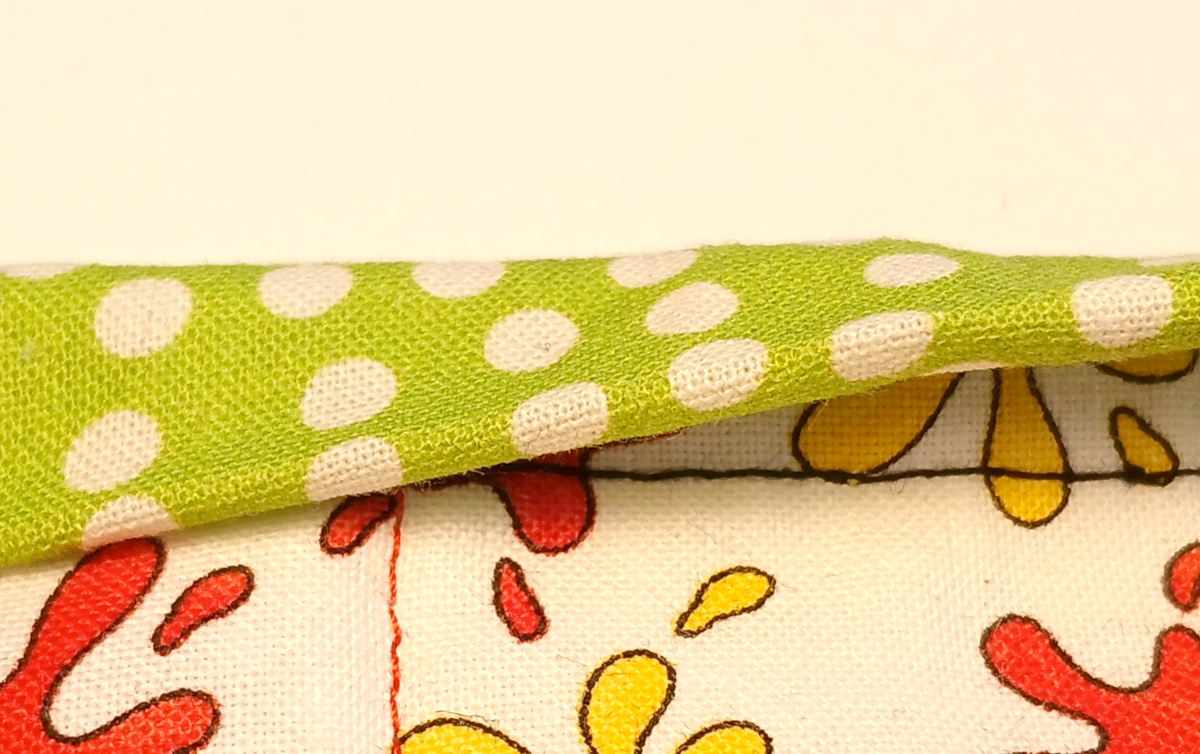
- Ironing it may make it easier to sew. Clip/pin it in place.
- Make sure the corners are neat. The process is similar to mitering the corners on the top.
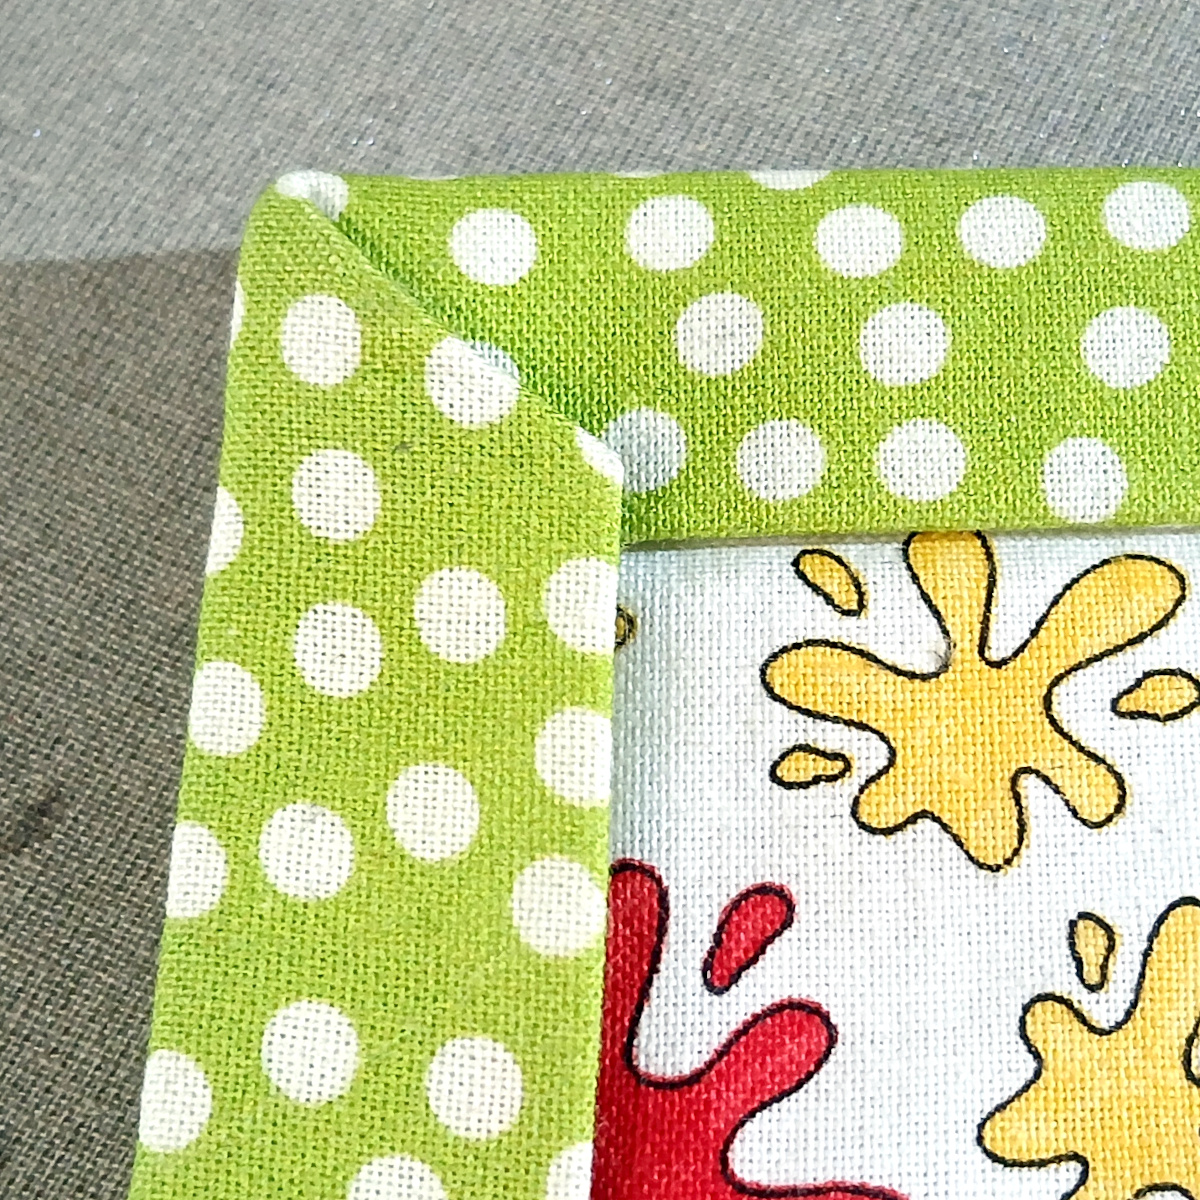
Tip: If the width of the binding is not enough to cover the raw edges and be sewn into place when the seam is placed just inside of the edge of the binding on the top, there is a fix for that. Carefully trim some of the seam allowance off of the sides of the block (without cutting the binding at all) to reduce the overall width. The binding will have to cover less, effectively making it wider.
¶ Sewing the Binding (Back)
Now the binding will be sewn into place. From the top:
- Sew right along the edge of the binding, being sure to catch it on the back but not the top. This technique is similar to one called “Stitch in the ditch”.
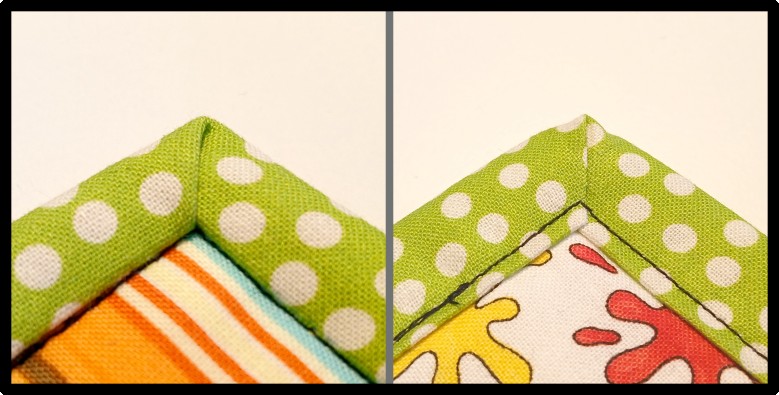
- Overlap the beginning of the seam for an inch or two.
- Snip threads and bury them.
That’s it! You made a quilt!